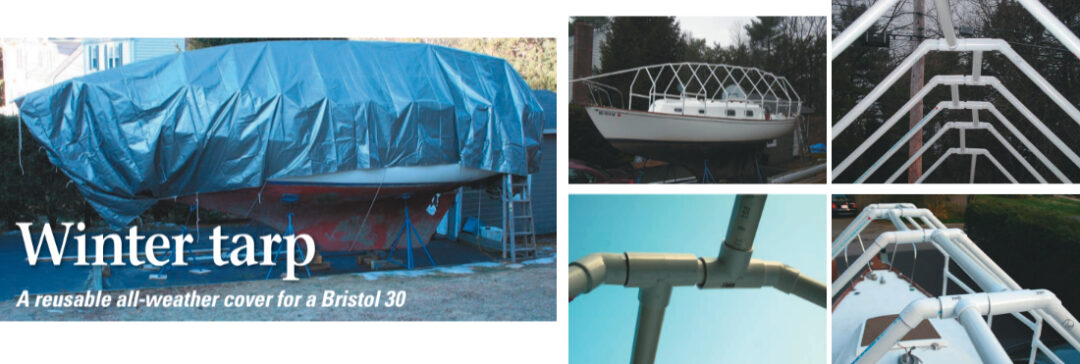
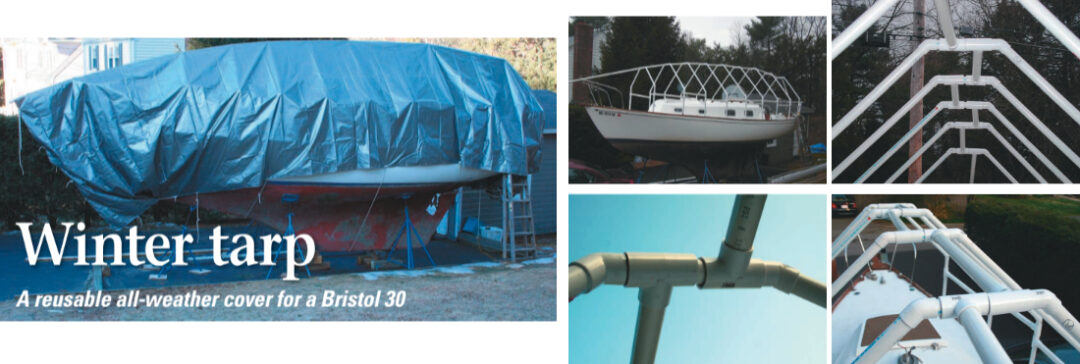
A reusable all-weather cover for a Bristol 30
Issue 56 : Sept/Oct 2007
I never like the wooden frames for sailboat winter storage. To me, they look kind of sloppy and seem to chafe the tarp. It also seems as though you are starting over every year when you assemble the pieces. When it came time to make a frame for my new 1977 Bristol 30, I wanted something more reusable. With a picture of a frame that he had built for his Bristol, Karl Friedland, a guru of the Yahoo Bristol Group, inspired my alternative system.
To Karl’s plan I added only the articulating joints that make the changes in width and height of the rafter frames less problematic. The longitudinals at the peak are free to articulate up and down with the height of the frames, and the ones port and starboard are free to articulate side to side with the varying widths along the beam. In both cases, the longitudinals run one beside the other from frame to frame.
I purchased materials for this frame from Home Depot for $200. I started by measuring port-to-starboard dimensions for each rafter location, beginning with the lifeline stanchion locations and filling in from there. After marking those rafter locations on the deck, I measured between them to find the length for the articulating longitudinals. I then went to the drawing board (computer) and drew the rafters at their different widths to determine the length of the 45-degree angle pipes. This could also be done mathematically for those so enabled.
I used 1 1⁄4-inch inside diameter Schedule 40 PVC, 45-degree angle connectors for the rafters, and 1 1⁄2-inch T-joints and pipe for the articulating longitudinals. This combination made for nice loose joints for articulation.
I did all cutting in the shop with a hand-held jigsaw. That was nice because it was getting pretty cold in Boston by the time I got around to this job. I assembled the verticals as a sub-assembly with the two T-joints and the 45-degree elbow.
I drove a screw through the vertical pipe just below each of the T-joints to keep them in general position during assembly. I made one other sub-assembly for the peak out of a short piece of pipe, two elbows, and two T-joints.
The fun part was the assembly, which, even working alone, took less than two hours. I glued nothing and pounded things together with a claw hammer. I did cut the head and tail pieces on the boat. I notched them where they intersected the boat’s railings and secured them with electrical ties. Next year I might glue some of these sub-assemblies together. It is definitely not a fussy thing. It will store easily and go together very quickly next time. I also like the dinosaur look. I hated to cover it with canvas.
Joe van Beten has operated a shop in Chestnut Hill, Massachusetts, building handmade furniture for the past 29 years http://www.vanbenten.com. Last year he purchased a 1977 Bristol 30, which he sails with his wife, Sarah, out of Pocasset on Buzzard’s Bay.
Thank you to Sailrite Enterprises, Inc., for providing free access to back issues of Good Old Boat through intellectual property rights. Sailrite.com