Having capitulated, here’s how to raise the waterline
Issue 24 : May/June 2002

In the course of family boating history, some truths become self-evident. One of these is that boats get smaller. Sailing is not always an inexpensive form of transportation. Waterlines (as well as beltbuckle holes) disappear under increasing weight. This last problem (the boat, not the belt) has been haunting me since our first weekend sail in Lindsay Christine, our Mercator 30 offshore sloop. The amount of necessary stuff on board grows with our length of travel, comfort needs, and children. Our boat is slowly sinking. The problem has become severe enough to require being put on our current refit list: solve weight problem.
After careful deliberation, I assembled a list of possible options, some of which proved unpopular, impractical, or controversial. The first option was to inject every open space aboard Lindsay Christine with helium in order to lighten the boat. This proved to have some minor drawbacks. Calculations confirmed that the amount of helium wouldn’t help much, mostly because there aren’t any empty open spaces on the boat. Also, with the leakage of helium that was bound to occur, it was felt that we might not be able to stand being together long if we all sounded like squeaky variants of Mickey Mouse.
Another option along the helium line was to suspend a large helium-filled balloon from the masthead. This would not only lighten the boat but also virtually eliminate heeling. No more rolly anchorages either. However, one expert (my son) brought up some minor technical problems such as bridges, powerlines, and the occasional low-flying aircraft. This idea was discarded even though the thought of sailing downwind in a gale with none of the pesky drag-inducing hull in the water was appealing.
After eliminating several other ideas such as putting the crew on a grapefruit diet, cutting down on ballast, or eliminating the head, it was decided that raising the waterline was the solution that everyone (except me) would feel most comfortable with. I get all trembly when I think of trying to draw a straight line on a compound curve. Who hasn’t seen the lovely lines of a graceful sailing craft ruined by an undulating waterline?
However, in the end it was decided, and I was instructed to come up with a way to make a new improved waterline even after I pointed out that this was only a temporary fix . . . as we would soon have a teenage son.
After some diligent research, I came up with three possible solutions. The first is to use water to mark the waterline. The second is the high-tech laser method. And the third is having the boatyard do it, which was shot down due to funding limitations. Presented for your enjoyment or trepidation are the two do-it-yourself methods. And note that both methods require that your boat be level. . . fore and aft as well as port to starboard.
The hose trick
Ancient Chinese (or Norwegian) saying: “Water seeks its own level.” If one takes a length of clear hose filled with water, one finds that when held up, the level of water in both ends, no matter how far away, is the same. This is the principle of the water level. For about five bucks you can convert your garden-variety garden hose into a low-tech water level.
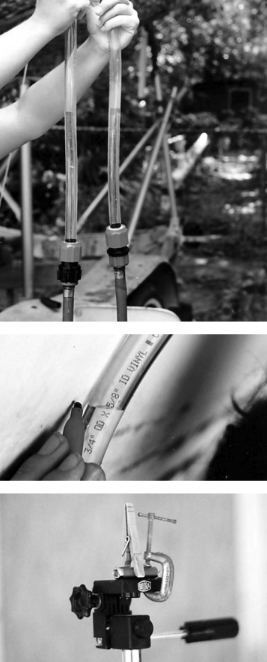
At your local hardware store, get two do-it-yourself end fittings for garden hoses . . . one male and one female. You figure out which is which. It makes me blush. Also pick up 2 feet of 5⁄8-inch clear tubing. Attach one hose fitting to one end of the tubing and the other end to the other. There you have it: a 2-foot-long hose extension. Not very useful until you give it the coup de grâce. Cut the hose in half at the center, and you now have two clear 1-foot-long pieces that can be attached to the ends of the garden hose.
Now fill up the hose completely until the water is visible in the clear sections, making sure that all air bubbles are out. Without spilling any water, have one person hold one end of the hose up with the water level at the height you want your new waterline. Now simply move around the boat at 6- to 12-inch intervals, marking the point where the water is in the other end of the hose. Easy and foolproof. (Actually it’s neither, but if you’re careful it can produce a fairly accurate waterline.)
Try to use as short a hose as possible (about the length of your boat) and be certain there is no air in the hose. Also when you move the hose to the next spot, move slowly to reduce water movement inside, and let the water settle. Connect the dots with masking tape, and there’s your new waterline.
High technology
An alternative is to use NASA technology. Go to your local Office Depot and pick up a $15 laser pointer, just like high-level NASA folks use in their meetings. You’ll also need a camera tripod that can extend high enough to be level with your new waterline and a clothespin. Attach the pointer to the tripod with clamps, and you’re ready to start. Set up your tripod assembly 20 or so feet from your boat. Carefully level your laser from side to side and front to back to get the laser as close as you can to the same height as your new waterline.
Start at a point where you want the new waterline to be, carefully swing the laser beam (sounds cool, doesn’t it?), and mark every 6 to 12 inches. One advantage of this method is that, while time consuming, it can be done by one person with a good pair of Nikes. Use a clothespin to keep the laser switch clamped in the “on” position.
If your boat and laser are level, this is a very accurate method. If your boat has a nice overhanging stern, you’ll notice that the beam widens as the angle from the laser increases. For this reason, try to find a pointer with a small dot — they’re not all the same. Now connect your laser- perfect dots with tape, and you’re finished.
Thank you to Sailrite Enterprises, Inc., for providing free access to back issues of Good Old Boat through intellectual property rights. Sailrite.com