Two ways to protect your investment
Issue 63 : Nov/Dec 2008
Varnish is typically not used up all at once. The more that is used, the quicker a skin forms on top of what remains in the can. When the can is opened weeks or months later, this skin must be removed and, with it, some of the important goodies in the varnish are lost.
The trick is to eliminate, or at least minimize, the quantity of air in the can above the surface of the varnish. There are two ways to accomplish this. The first method is best; the second is a quick stopgap.
Caulk gun solution
The best option is to abandon the can altogether. Transfer the varnish to empty caulk tubes from a local paint supplier or to West System’s empty epoxy tubes. These tubes have a capacity of 10 ounces. Since a pint is 16 ounces, one tube holds a little more than a half pint of varnish, and three tubes almost handle a quart. Since skin formation does not become apparent until the varnish level in a can is reduced somewhat, the contents of an opened quart should fit into three tubes without a problem.
To fill the tubes, follow these steps:
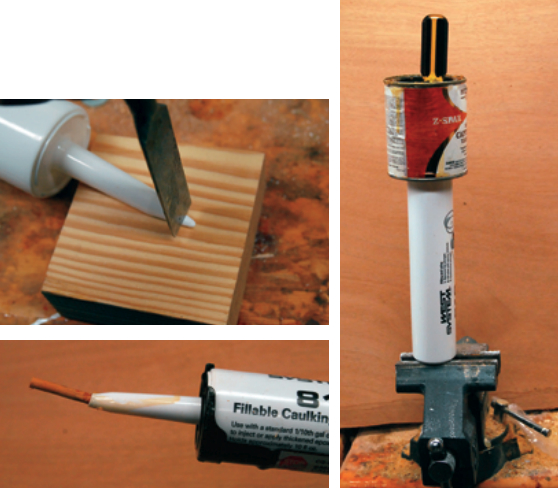
- Prepare a tube by cutting a little bit off of the end so that the hole diameter is just a bit smaller than 1⁄8 inch. Don’t cut off too much!
- Cut a small dowel to about 2 inches in length, and taper the end so that it plugs the open end of the tube. Insert the dowel securely into the tube.
- Hold the tube upright in a vise with the dowel end down, or get someone to hold it — don’t crush the dispensing end that holds the dowel.
- Take the top off of the varnish can, and place the can above the large open end of the empty tube.
- Using an awl, make only one hole in the center of the bottom of the varnish can so that the varnish drains into the caulk tube. Make the hole from above, down through the liquid. Do not pull the awl out of the hole you just made, because you may need to stop the flow when switching to a second (or third) tube. Let the contents drain into the caulk tube. If it looks like one tube won’t hold the contents, plug the hole in the can with the awl while you get ready to drain it into another tube. If more than one drain hole is made, you will have an expensive mess while switching to another tube.
- Now insert the piston into the open end of the tube, just enough so that it is secure and will not slip out. Put this varnish-filled caulk tube into the caulk gun.
- With the small end pointing up, remove the dowel and activate the caulk gun so that the piston moves the column of varnish up within the tube until just a little bit squirts out the end. Reseal the tube with the dowel.
- Now you have a varnish-storage system that prevents air from producing a skin. To use, remove the dowel and carefully squirt just as much as you need into a paper cup or other container of your choice. Do not forget to re-insert the dowel; the varnish is a liquid and it will drain out before you know it.
Quick fix
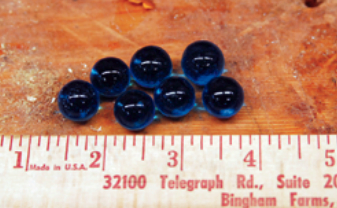
A quick stopgap method involves replacing the volume of varnish as you use it with marbles 3⁄8- to 1⁄2 -inch in diameter. This works well, but in the end the can will be full of marbles and you will not be able to reach varnish stored between the marbles. Of course, if you use this marble method, you can recover hidden varnish by inserting the awl through the marbles and varnish, then draining the varnish into a tube as described above.
Ted MacKinnon lives in Beverly Hills, Michigan, having retired from GM Truck Engineering in 1992. He sails his 1980 O’Day 22, Scherzo (which is in a constant state of upgrade), on an inland lake in northern Michigan during the summer. The rest of the year he builds small wooden boats.
Thank you to Sailrite Enterprises, Inc., for providing free access to back issues of Good Old Boat through intellectual property rights. Sailrite.com