How to turn a home sewing machine into a macho sailor’s model
Issue 28 : Jan/Feb 2003
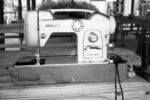
Helen lived with our family for close to 15 years before her body degenerated into a hunk of oxidized aluminum and rusty cogs and gears. A Singer sewing machine from the late 1950s, she had a Dr. Jeckyll and Mr. Hyde personality in her later years. I never was certain which I was dealing with until our sewing began. She always reserved the right to change her mind mid-stitch. Through all her inconsistencies, I managed to repair sails, sew several anchor bags, reupholster the settee, and complete numerous canvas projects during our boat’s first outfitting.
Reminiscent of my first pitch-black night watch, it was a scary, sometimes teary-eyed adventure that I went through because it was necessary. Necessary because we just didn’t have the money for a sailmaking sewing machine; necessary because she was what we had, so that’s what I used; necessary because I was pigheaded . . . even more so than Helen. I said she could sew on canvas and sail material; she said she couldn’t. With the help of my husband, Chuck, and some minor surgery, we changed her mind. Well, at least she decided to try.
Three years later, upon returning to the States after our last cruise, Helen was scrap metal. We recycled parts of her and buried her properly with a farewell prayer and a sigh of relief. Now I could look for a proper sewing machine, one that didn’t have so many personalities. With my sewing list getting longer and longer, I needed to decide. Should I buy a sailmaking machine or find another home sewing machine to adjust? Used sailmaking machines were nowhere to be found in our small town, but there were millions of used home sewing machines. And they were cheap.
Burned out
Cheap and local won out over expensive and hard to find. We found and bought a $50 Kenmore sewing machine to try. Sadly, she never made it to her naming ceremony. I burned up the motor recovering the settee cushions. But she worked well up to the time of her seizure.
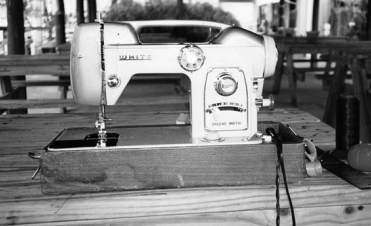
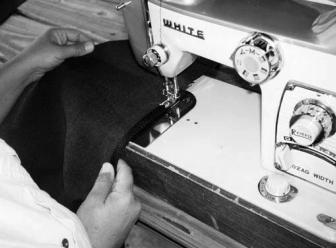
I was learning what to look for in home sewing machines. So off we went to a sewing center that had a warehouse of used machines. The owners knew immediately that we meant business. Armed with Sunbrella, sailcloth, V-69 Dabond thread, and size 18 universal sewing needles, I was prepared to try out machines. I fell for two different machines: another Kenmore like my last one and a White. Both were heavily built and had competed well in the tryouts. We made a package deal with the owner and took both home for $50. We set to work, adjusting and testing. The White sewing machine turned out to be the best and most consistent sewer. Here are a few tips we learned along the way to help get the most out of a heavily built home sewing machine:
The sewing machine
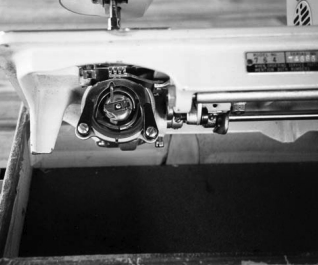
I’m talking about heavily built sewing machines. We have found that the heavy older machines work much better on the tough fabrics that sailors use on their boats. When shopping for a home sewing machine, look for older models that have no electronic parts or fancy stitches. Look for ones that have finely machined gears and parts that run smoothly without shaking at high speeds (when doing this test, do not thread the machine or put a needle in it). Also, machines with vertical bobbin shuttles seem to do better than the ones (like my old Singer) with horizontal bobbin assemblies (see illustration on Page 28).
Adjusting tension
The slippery threads used for sailmaking and repairing require a tight upper thread tension and moderate lower thread tension. First, adjust the tension on your machine to sew well on an all-cotton muslin or cotton/polyester blend fabric and regular cotton/polyester thread, following your sewing machine manual. Now, thread your machine with the sail thread you will be using. I use bonded polyester thread like V-69 Dabond UVR (for fabrics up to 6 ounces) or V-92 Dabond UVR (for fabrics up to 10 ounces) and then sew a sample line of stitching.
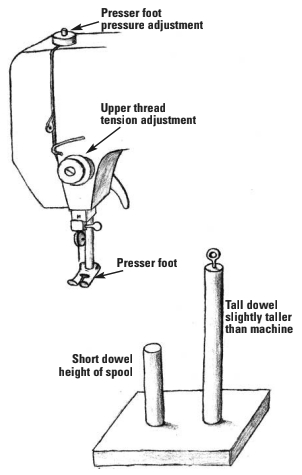
On sailcloth, the properly tensioned stitch does not embed the knot. The top thread of the stitch should be tight enough to hold the stitch knot snugly against the fabric. With other fabrics such as canvas or acrylic outdoor fabrics, the stitch knot should embed itself. Tighten the upper thread tension (according to your sewing machine user’s manual) until it is hard to pull the slippery thread through by hand (see illustration on Page 29).
If your adjustment knob doesn’t allow you to tighten the tension enough, try pushing in the inside springy part of the adjustment knob and turn to tighten. This may allow the knob to have a higher degree of tensioning. If this doesn’t work, you may need to do a little surgery. Take apart the upper thread tension adjustment knob (make note of how all the pieces go together) and add a proper sized washer to the inside assembly so that the spring inside will have to compress further. My Singer sewing machine had to have this surgical procedure done; the White and Kenmores did not.
Do not adjust the lower bobbin tension. Your lower tension rarely needs to be adjusted.
Goretex thread (now called Tenara) requires looser thread tension. Experiment to find the right adjustment. Some people recommend using a smaller needle as well, but in my experience, I didn’t find that to be the case.
Thread stand
A thread stand is an inexpensive stand that allows the thread to be pulled from the top of the spool to give a smooth feed to the sewing machine, reducing tension problems. These stands are available from sewing stores and Sailrite, a supplier of sailmaking materials.
You can also make your own by screwing two dowels, one the height of the thread spool and another several inches higher than your sewing machine, to a wooden base (see illustration on Page 29). Screwing a cuphook or screw eye into the top of the tall dowel finishes your thread stand. This hook, or eye, is what controls the feeding of the thread to the machine. When starting to thread your sewing machine, first feed the thread through the thread stand then proceed according to your sewing machine manual.
Sewing machine needles
I use universal or ballpoint sewing needles. These needles are more apt to slide into the tightly woven fabrics that you will be sewing. Because of the extreme upper thread tension, the slippery thread, and the heavyweight fabric you will be sewing, use heavy-duty needles. In fact, I found size 20 worked well when sewing three or more layers of canvas. Even though it sounded like I was punching huge holes through the fabric, the machine worked better, I had fewer needles break, and I had less thread breakage with the larger needles. But experiment with other sizes; heavier needles do make the sewing machine labor more. It is best to use the size that will give you the most power and the least bends and breaks.
General guidelines
Keep your machine meticulously clean. Periodically stop and clean any lint buildup on the bobbin assembly, beneath the machine, along the passageways the thread travels, even on the needle. A can of compressed air and a vacuum cleaner work well for this. A well-running machine can be just as addictive as that first potato chip or peanut. You have to stop yourself from oversewing on a dirty machine or you may get a bellyful of thread.
Keep the machine oiled with high-quality machine oil. Most of the older models we’ve seen have manuals that explain how to oil your machine without taking it to be serviced. I try to oil my machine every month if I am using it hard. This also helps prevent rust in machines used in a marine environment. Listen to your machine. If it doesn’t run smoothly, lightly oil all metal parts that come into contact with each other.
Go slowly with your sewing! I tend to get a lead foot at times when my machine is running smoothly. Mistakes happen too quickly to react to when you are zooming over the fabric.
When making sharp turns, stop the machine with the needle embedded in the fabric where the turn needs to be made, lift the presser foot and turn the fabric the proper amount. Then lower the presser foot and resume sewing. Turning the fabric as you sew increases the likelihood that you will bend or break a needle.
Increase the length of your stitches as you increase the layers of fabric. Stitches are too short when they start to become buried in your sewing and they become hard to discern.
Skipped stitches can sometimes be the result of a bent needle or not enough pressure on the presser foot. First, try changing your needle to see if this eliminates the problem. If it doesn’t, you may need to increase the amount of pressure on your presser foot. As you are sewing, look to see if the presser foot raises as the needle tries to come out of the fabric. If this occurs, increase the pressure. Usually, this adjustment is done by screwing down a knob or pushing down a spring-loaded button at the top of your machine in line with the needle and presser-foot assembly (see illustration below).
Fold or roll large pieces to be sewn so that you can feed them more consistently. If necessary, get another person to hold the roll as it comes through the machine. They can even pull slightly and evenly to help you keep your stitches even.
When working on large projects, set your machine on the largest table you have available to you. Don’t hesitate to take it to your picnic table outside or to a park. For even more horizontal surface, clear an area on the floor and set the machine there.
Change your needles often. If you see your needle bend slightly away from vertical, it’s time to change it. Even slightly bent needles don’t sew as well as new needles. Buy lots of spare needles to have on hand.
Visit Sailrite’s website for a wealth of information for do-it-yourself sewing. They have helpful tips on using home sewing machines and general hints and tips on sewing sail and canvas projects.
Sail fabric
My last sewing project was making a dinghy sail. I learned quickly that it helps to mark your seam allowance on each long panel of sailcloth and to use double-sided tape to keep the pieces together while carrying it to the machine and while sewing. Double-sided fabric tape, called Seamstik!, is a true miracle worker. When sewing with this tape, have alcohol and a soft rag on hand to clean your needle if it gets a gummy residue on it.
Overlap the two panels and sew a line of zigzag stitching along both edges (for a total of two lines). If your machine doesn’t have a zigzag stitch, just sew an extra line of straight stitching down the middle (for a total of three lines) and your seams will be just as strong. Use the longest stitch length possible in either case.
Window material
The challenges of sewing on window material can be overcome with the following tips:
Help the window material move through the machine more smoothly by rubbing the area to be sewn with a tiny bit of baby powder. I have even had success using cornstarch, but baby powder cleans up more easily. Vacuum stray powder out of the machine periodically. It tends to get embedded in the feed dogs.
Hold the window fabric out as horizontal as possible while sewing. It tends to drape into a bend at the base of the machine, causing it to hold up the feed dogs and not advance smoothly. Another pair of hands helps. While sewing our dodger, I had good experiences with sewing my window-panel edges with binding tape first. This tape allowed me to hand-baste the windows in the correct locations, eliminating the possibility of any movement or buckling of the panels as I sewed them on permanently.
Leather
I found leather easier to sew when I used the longest stitch length possible and a lighter presser foot tension. If you find that your presser foot is stretching the leather as you sew, decrease the presser foot tension more. Try not to pull the leather as you sew. If you pin the leather onto your other fabric, make sure you take the pins out as you approach each pin to reduce puckers at each pin site. Double-sided tape doesn’t stick for long but can help you keep your leather properly aligned without pins.
After a few adjustments, diligent cleaning and oiling, and some experimentation and patience, I was able to sew everything needed for our second refit. It was a daunting list: seven inside cushions, four cockpit cushions, an anchor riding sail, repaired foresails, a mainsail cover, a dodger and covers for all dodger windows, numerous canvas wall pockets for storage, a foresail bag, a solar panel cover, a redesigned awning, and a dinghy sail.
Once our refit was done, we sailed away. Only one project was left: finding a storage place for the sewing machines. I found new homes for our two hard workers. If you find one of them sitting on a shelf at a thrift store, give it a pat on the back for me. They both learned their new profession well. When my sewing list starts growing again, we’ll look for another older model home sewing machine and give it a new profession.
Thank you to Sailrite Enterprises, Inc., for providing free access to back issues of Good Old Boat through intellectual property rights. Sailrite.com