You can do it yourself — if you have time and courage
Note: Below the waterline you must use coatings designed for constant immersion. Two-part polyurethanes are not recommended below the waterline.
Issue 42 : May/Jun 2005
I’m going to stay out of the argument about why boats blister. I’ve heard too many conflicting “scientific explanations” over the years. However, I have been involved in recovering wooden boats and repairing and restoring fiberglass boats since the early 1960s and have plenty of practical experience in blister repair.
There is a world of difference in the technique used to repair dime- to quarter-sized gelcoat blisters and the larger saucer- to dinnerplate-sized deep fiberglass blisters. Blister repair is a task within the capability of most boatowners, and the cost is not excessive. It is time-consuming and messy though. You must also have a modicum of courage to tear up your boat and a yard that will permit you to do the necessary surgery.
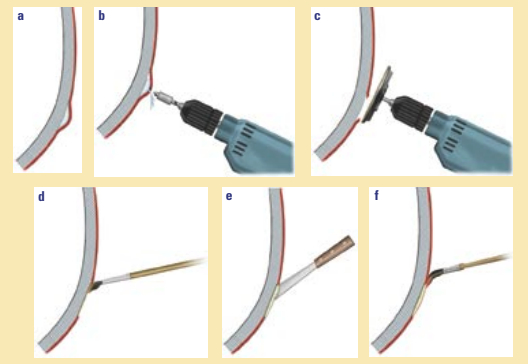
Gelcoat blisters (see illustration below) are generally well defined with easily discernible edges. When the gelcoat is removed, the fiberglass beneath is intact and shows few loose fibers. These blisters are handled by grinding the overlaying gelcoat away to an inch or two around the blister, washing and drying thoroughly, brushing on a sealing coat of epoxy resin, fairing to a smooth surface, and then re-gelcoating or painting to match the surrounding area. If the boat is pockmarked with these blisters, the best repair might be to peel the gelcoat, sand the hull smooth, epoxy coat the entire hull, and paint with a quality two-part polyurethane. This type of work is relatively reasonably priced, in the context of boat repair prices. My own yard quotes about $100 per linear foot plus the cost of the paint job.
Separated laminations
Deep fiberglass blisters are something else. When the blister is within the fiberglass, the fluid pressure separates the laminations and pushes them apart (see illustrations on Pages 54-56). A deep fiberglass blister is usually considerably larger than a gelcoat blister, and there is rarely a well-defined edge. These blisters are best located by sighting down the hull while it is still in the slings just after it has been removed from the water. A grazing angle of view will reveal protrusions on the hull that may be difficult to find after the hull has dried. Outline the blisters immediately with chalk or a marker. Some may shrink as the boat dries but will get bigger next year.
When the blisters are identified, drill the center of each one with a 1⁄8-inch bit, using a drill collar so the bit doesn’t penetrate more than half the thickness of the fiberglass hull. Wear a mask or goggles when doing this since a jet of evil-smelling brown acidic liquid will spurt out, usually catching you full in the face. In the unlikely event that you have drilled into a poorly faired bump in the hull and nothing comes out, patch the hole immediately with epoxy putty.
If the blisters are scattered over the hull and not concentrated in a critical location, spot-blister repair is the most time- and cost-effective fix. If the number of blisters is excessive, say averaging two or more per square foot over the surface of the hull, more dramatic and expensive action must be undertaken. Boatyard spot-blister repair costs from $250 to $500 per linear foot depending on the blister size and concentration. More serious blister repair involves rebuilding the entire hull, and the yard prices can range from staggering to astronomical, depending on the nature of the job. If you have a very fat wallet and/or are averse to hard physical work, read no further.
If you discover only a few blisters before launch and want to take care of the problem expediently, there is a shortcut method of temporary repair. This involves drilling small holes through the top and bottom of the blister, draining it, and flushing repeatedly with alcohol to wash out the unreacted glycol and other contaminants. After drying, inject low-viscosity epoxy with an epoxy syringe through the lowest hole, allowing it to emerge from the upper hole. Then seal both holes with duct tape until cured. This should saturate and seal the fiberglass fibers and form a hard core. The blisters will still bulge, but the hull will not be weakened. At a sailboat’s hull speed of 6 or 7 knots, unfairness in the hull doesn’t hurt too much.
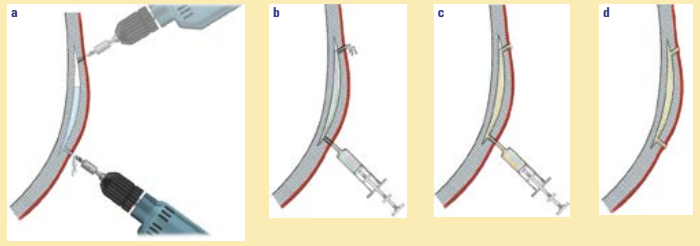
Long-term fix
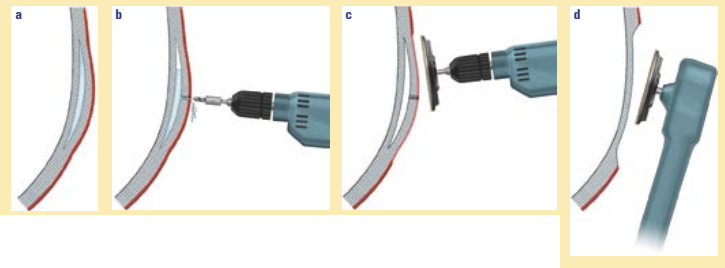
For spot repair of a blistered bottom, each blister must be excavated to a layer of sound fiberglass. Before starting, all the bottom paint must be removed down to the gelcoat. A good paste paint remover, such as Peel Away, is probably the best first step. When most of the paint is off, finish up with a sanding disc, using 80-grit paper at the finest. The best tool to use for this is an automotive body shop grinder. After the second or third day of grinding you will probably develop a deft touch with this brutal machine and not gouge the hull too badly. If you are a pro, you will probably use a 7-inch grinder, but I’ve found that these get pretty heavy after awhile; I do most of my work with a DeWalt 4 1⁄2-inch grinder. You’ll need this smaller grinder to excavate the blisters anyway.
Using the smaller grinder and 36-grit discs, grind off the surface of each blister. Once you get through the upper layer of fiberglass you’ll see a darkened, wet, and deteriorated layer. The fibers will almost certainly be loose and friable. Gently grind these away until you get to a firm layer underneath. Be careful at this point. You don’t want to get carried away and grind entirely through the hull. Bevel the edges of each cavity about an inch or so around the bad area. If the blister is 2 inches across you will end up with a depression in the hull about 4 inches across. When all the blisters are excavated and beveled, wash and scrub the cavities with fresh water. Wait a day. Then do it again. Your boat will look like a child with chicken pox. Be of good cheer. The heavy work is over.
Just go away
Now cover the boat and go away for several months. It’s best to have the boat in a heated shed or trucked to Arizona. Most of us, though, just leave it on blocks for the winter. In northern climes, the humidity drops off enough in cold weather to do an effective job of drying the hull. I’m not sure if this works in the Pacific Northwest where high humidity is endemic.
To keep yourself busy during the winter, prepare a large number of fiberglass cloth circles of varying sizes, some as small as 2 inches and others larger, in half-inch increments up to the size of the largest blister. You will need three or four of varying sizes for each blister cavity. I cut them out of 10-ounce fiberglass cloth with scissors. The edges will fray. Don’t worry about it.
In the spring, sponge out the blisters again. Don’t saturate them, just remove any exudate and residue. Let the boat dry another week. Now mix up a small bucket of epoxy resin. Go around the boat and paint each blister cavity with epoxy resin, making sure you get it into all the nooks and crannies. On the second trip around the boat lay a small fiberglass circle into the bottom of each cavity as the first coat of epoxy begins to set. Saturate the little patch with epoxy.
You will make a number of trips around the boat at half hour intervals, placing slightly larger patches in each cavity until the cavity is nearly flush with the surface. What you are doing is rebuilding the hull so that it retains its original strength. Each patch must be put in place while the epoxy saturating the immediately lower patch is still tacky. When you are done, let the epoxy set until you can just dent it with moderate thumbnail pressure. Now fair the hull with an epoxy putty, building up each blister site just a wee bit higher than the surrounding area. (Note: Use a filler recommended for below the waterline. –Ed.) Let this set moderately hard and sand it down to match the surrounding surface.
Slowing new blisters
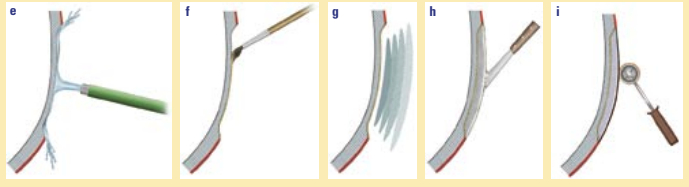
Now is the time for the application of the barrier coat to slow the formation of new blisters. There are several barrier coat formulations on the market. All have one thing in common. They are less permeable to water than polyester gelcoats. The Interprotect 2000/2001 formulation uses minuscule mica flakes carried in a heavy epoxy paint to make the water migration path longer. The technique espoused by Gougeon uses an epoxy coating, although the user can add copper flakes, if he or she so chooses. Most manufacturers make their own brand of barrier coat. I’ve used the Interprotect system because it was the most readily available at the time.
Prior to barrier coating, the hull must be uniformly sanded with 80-grit paper, then washed to remove any grit and residue. With the Interprotect barrier coat, the hull must be painted a number of times to build up a 10- to 15-mil thickness. After mixing, the two-part epoxy paint goes on with a roller just like any ordinary paint. It must be allowed to dry a minimum of six hours and a maximum of 18 hours before recoating. The process must be repeated four or five times.
Dry days with temperatures around 70 degrees are required. This means three or four days of good weather are necessary if the painting is done in the open. Before the last coat sets hard, apply a coat of anti-fouling paint. It will adhere well to the barrier coat if applied before the barrier coat dries. Almost the same technique is used with the West System, except that the hull must be lightly sanded and washed between coats to remove the amine blush characteristic of West epoxy. The system offered by System 3 is said to be blush-free, so the washing step is eliminated.
More on the way
Now you can pat yourself on the back. You are done. You have a blister-free boat — until the next time. Even after total blister repair, most blister-prone boats develop new blisters from time to time, usually no more than half a dozen a year. These can be spot repaired every few years.
What about those drastic jobs where blisters cover almost the entire hull bottom? It certainly is possible to spot repair everything, but you would end up with a hull composed entirely of patches. This kind of overall blister repair job is almost like restoring a deteriorating wooden hull. So much strength has been lost that the repair really consists of using the old hull as a form and covering it with a new outer layer of fiberglass.
If the old fiberglass hull is so riddled with blisters that it is unsafe, the first decision you must make is whether the boat is valuable enough to restore. Costs of rebuilding the entire hull may easily account for more than half the boat’s value. I wouldn’t attempt this kind of job on a 30-foot boat unless the boat was worth $50,000 or more or had other redeeming historical or sentimental values.
The process begins with the excavation of a number of blisters to determine the average depth of the delaminating layers of fiberglass. Have a commercial firm peel off the entire below-water portion of the gelcoat and the fiberglass down to the delaminating layers. Wash and dry the hull thoroughly. Spot repair blisters that extend below this layer. Then apply epoxy-bonded layers of 10- or 12.5-ounce fiberglass cloth to the entire hull, extending to just above the waterline.
Sticky business
It may take three to four layers to rebuild the hull to its original thickness. Precut the glass, coat the hull with epoxy, and press the fiberglass to the surface as it becomes tacky. The trick is to get the layers of cloth to adhere to the hull against the pull of gravity. I won’t describe how to do this in detail except to say that your clothes, hands, and hair will reek of epoxy, and you will itch from fiberglass particles for months afterward. If you get involved with this kind of project, there are a number of boatbuilding manuals that will guide you through most of the steps.
A hull resurfaced in this manner will be stronger than new since closely woven fiberglass cloth has better physical characteristics than mat or roving. The epoxy also provides greater strength than polyester resins. The Gougeon Brothers suggest this approach for the restoration of severely blistered boats, but remember that they sell epoxy resins. I have successfully covered several wooden boats with fiberglass, but the process is more involved than just slapping on a couple of layers of glass cloth.
The basic problem with covering old wooden boats with fiberglass is the expansion and contraction of the underlying wood with moisture. Wood expands more radially, across the planks, than it does axially. This is what tightens the seams when a wooden boat is launched. The epoxy encapsulation method for new construction where the entire plank is saturated with epoxy, sealing out the moisture, is impractical in older boats unless you want to fiberglass the inside as well as the outside.
The critical step in fiberglassing is in preparing the surface. The boat must be sanded back to raw wood using #36 discs. This will leave the surface rough and will provide a degree of mechanical locking of wood to the resin and fiberglass. Then impregnate the planks with polyester thinned to almost a watery consistency with styrene. This is sort of like applying GitRot to the entire boat. This converts the upper layer of wood to a polyester/wood composite.
Routing and filling
You can achieve a reasonable degree of success in minimizing plank expansion by routing out the caulking of a dried boat, then filling the seams with a buttery mixture of polyester and Cabosil. When this sets it locks the planks in position. There are some very-low-viscosity epoxy resins that will do an even better job of saturating the planks, but these are far more expensive.
The boat is then covered with several layers of 10-ounce fiberglass cloth. The cloth seams are overlapped and wrapped around the bow and transom for strength. When fiberglassing, stapling does help hold the material in place until the resin sets. Use Monel or stainless-steel staples for this purpose so you can leave them in place when putting on the next layer. Ordinary steel will eventually rust, and the stains will migrate to the surface. The resin should be a thixotropic polyester to permit working overhead.
Each layer of glass should be applied while the lower layer is still tacky. If your budget permits, an epoxy resin would probably be better, but polyester will usually prove adequate. After fairing and sanding, paint the boat with a quality marine finish. If you keep the bilge reasonably dry, there will be no problems with delamination.
My wife and I covered our first boat — a lovely Sid Davis wooden sailboat — in this manner, learning on the job. This was in the early 1960s when the technique was evolving. We kept the boat for a decade, then sold it to buy a bigger boat. Like a first love, we have very fond memories of that boat.
However, unless you do the work yourself, today’s high labor rates make covering a wooden boat for restoration impractical unless it has a significant historic or sentimental value. Better to use the hull as a mold and make a new fiberglass one-off boat. Either that or donate the boat to charity for salvage and take a tax deduction.
None of the steps I’ve described is intellectually challenging. Boatowners who are capable of sanding woodwork and applying bottom paint are fully equipped to repair most hull blisters. Material costs for a good job of spot repair are only a few hundred dollars. The job is very labor intensive, however. That’s why the yards charge so much. But if you have the time, the courage, and plenty of old clothes, you can repair all the blisters on your old boat, and we need never bring up the subject again.
Thank you to Sailrite Enterprises, Inc., for providing free access to back issues of Good Old Boat through intellectual property rights. Sailrite.com