Cam cleat brings an ancient art up-to-date

Issue 29 : Mar/Apr 2003
Swigging up a halyard can be a bit daunting for youngsters, since it takes coordination. At the other end of the age spectrum, older sailors may face physical limitations. Setting a taut jib — essential for windward work — is difficult for arthritic hands. Faced with both contingencies, I came up with a swigger, a homemade device combining a belaying pin and a cam cleat. It’s even useful for those whose ages fit somewhere in between. With the help of a swigger, tightening a jib halyard is easier for everyone. (An additional illustration of swigging on a traditional craft is on Page 34 –Ed.)
What’s needed
Scrap hardwood (locust, ash, cherry, and so on), a couple of screws and a torsion spring. Your existing belaying pin needn’t be altered. The swigger shown can handle lines of 1⁄4 inch to 3⁄8 inch and is fitted to a belaying pin of 9⁄16 -inch outside diameter.
The finished assembly comprises four parts:
- A fixed-toothed cam, slid onto the underside of the belaying pin in its rail.
- A moveable toothed cam with lever.
- A torsion spring, right or left.
- Wood screws.
Making your swigger
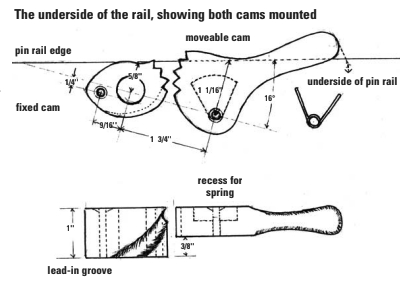
After selecting the wood, lay out the outline as shown in the illustration at right. The wood used for the fixed cam needs to be 3⁄8 inch thicker than the moveable cam. This allows for cutting in a lead-in groove. Drill the hole for the belaying pin first, then cut the teeth with an electric saber saw or a dovetail saw. In a pinch, use a hacksaw. Use a rat-tail file to cut the lead-in groove on the fixed cam, so the line can smoothly enter between both cams. Don’t go too far or the ability of the teeth to hold the tensioned line will be compromised.
You may ask where one gets a torsion spring. You don’t have to look too far unless you’re a bit fussy. I cannibalized mine from a small spring clamp found in most hardware stores. It’s of ferrous metal, but I can replace it with a new one anytime. For the more sophisticated, a brass or stainless-steel spring is available from Rich Industries, Inc., or your neighborhood Home Depot. Determine what hand — right or left — you want, as it makes a difference. A right-hand spring is illustrated.
Cut the recess in the movable cam with a router set to the depth thickness of the spring plus a little. The recess should pinch the spring closed about 1⁄8 inch. The pivot hole is for the pivot screw and the torsion spring. The spring should be a loose slip fit on the screw. Cut out the outline shape including the teeth. Round out the handle with a knife or rasp. Sand all to smooth out the rough spots but leave a decent point on the teeth. Apply several coats of varnish to both cams.
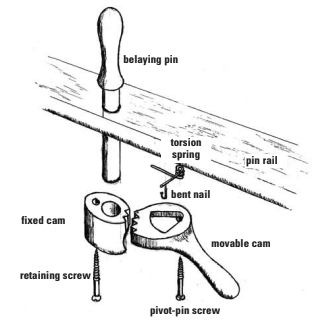
The illustration on Page 60 shows where things go. Notice the torsion spring. One extended arm must lie flat on the underside of the pin rail. It is held in position with the bent nail. The other arm rests snugly against the wall of the recess in the moveable cam, enabling the moveable cam to constantly bear pressure on the halyard.
Assembling your swigger
Assemble the whole unit on a scrap piece of wood to establish the working relationships of all the removable parts and check that it works smoothly. Once this is established, make a template of the holes to transfer to the underside of the pinrail.
After you mount the fixed cam, remove the pin. This will allow the fixed cam to be moved slightly so the moveable cam can be mounted. Later it will be locked again by the insertion of the pin. Place the moveable cam according to the dimensions given in the illustration or by your template. Pre-drill for the pivot-pin screw. Position the spring with the screw, predrill for the bent nail, and tap it into place to hold the spring.
Remove the pivot-pin screw and put it through the moveable cam. Screw down the moveable cam. As you come close to tightening down, the other arm of the spring will bear up against the wall of the recess. Just turn the cam a little, and it will snap into place. Do not overtighten. Now swing back the fixed pin and insert the belaying pin to lock it in position.
Using your swigger
It’s easier then you think. After raising the sail, lead the fall around the back of the pin, guiding the line into the groove on the fixed cam. Then just swig up in the usual fashion. The spring-loaded cam does the rest, clamping up on the line and allowing you to leisurely tail off and take in the slack. Once the desired tension is achieved, the line can be made off on the pin in the traditional way. Open the cam with the lever. This will put the load on the pin and the rail where it belongs.
When you’re ready to lower the sail, remove the made-up coils of line from the pin. Spring tension on the moveable cam will re-engage the line to be cast off the pin and hold the halyard in place. When all looks clear for running, press in on the moveable cam’s lever, and the sail will come down. If a more controlled, slower lowering is desired, cast off the line from the pin, and slide it out of the cams and on the pin itself below the cam.
Thank you to Sailrite Enterprises, Inc., for providing free access to back issues of Good Old Boat through intellectual property rights. Sailrite.com