A cup of resin . . . a bag of flour . . . and Thou . . .
Issue 1 : June 1998
If you’ve ever attempted to replace your boat’s plastic rubrail, you’ll know it’s one of those jobs that’s a whole lot more difficult than it looks. Luckily, there is an alternative — a way to halt deterioration and make it look better than new. And you don’t even have to remove the rubrail.
Thousands of old production fiberglass boats have vinyl plastic rubrails to protect their hulls from bumps and scratches and hide those ugly hull-deck joints. But over the years, the sun’s ultraviolet rays destroy vinyl plastic. The surface crazes, becomes chalky, loses some of its flexibility, and begins to look very sorry for itself.
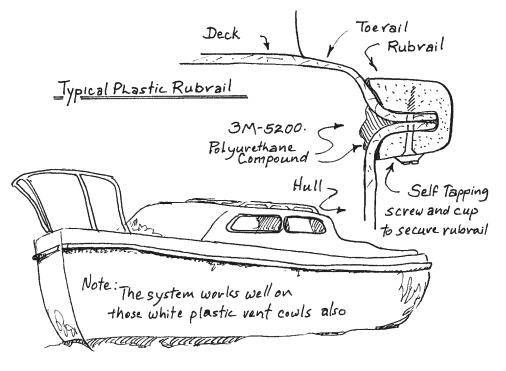
Many boat manufacturers used 3M’s 5200 polyurethane sealant as a flexible bedding compound for the rubrail. Now 5200 is a very powerful glue, but just to be safe they also held the rubrail in place with self-tapping screws and cup washers, screwed into the projecting fiberglass flanges from beneath.
It can be awkward and sometimes difficult to get to those screws when you want to remove the rubrail, especially if corrosion has set in. And even when you do manage to get them all out, there is often a worse problem: how to pull the glued plastic free of the hull-deck joint. If it tears, which is quite likely, you are left with the time-consuming task of physically scraping the bits of strongly adhering vinyl and old polyurethane compound from between the bolt heads that fasten the hull-deck flanges together.
As if that weren’t bad enough, a replacement rubrail can be expensive and difficult to find in the exact extrusion you need. Throw in the problem of fitting it around the sharp bends at the bow and stern quarters, where it refuses to lie flat at top and bottom, and you begin to realize that replacing a rubrail is not the simple job it appears to be.
Take heart. Thanks to modern technology, there is a better, easier, cheaper way: paint it.
Materials list
- Two-part polyurethane brushing enamel
- Two part polyurethane primer
- Compatible thinner, if needed
- Compatible brush cleaner
- Waterproof silicon carbide sandpaper: 100-, 220-, and 600-grit
- Longlife masking tape
- 1″ or 1 1/2″ bristle brush
- Epoxy resin
- Household flour
- Acetone
- Clean cloth
- Clean 14- to 19-ounce mixing containers
- Plastic measuring spoon or old tablespoon
Here’s how:
Wipe the rubrail with acetone on a lint-free cloth to remove all traces of dirt, grease, and wax before sanding. Don’t sand first, or you’ll force those contaminants deep into the plastic. Sand the rail with 100-grit waterproof paper, preferably used wet to keep down dust. Rinse with fresh water and allow to dry.
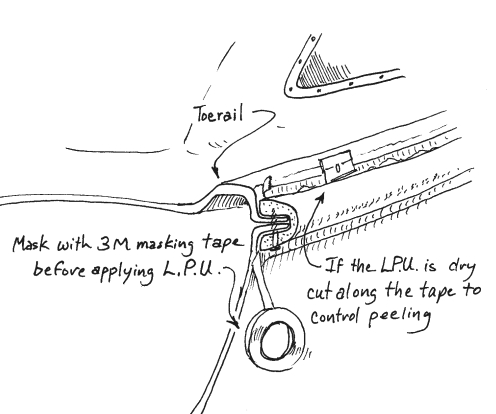
Mask the top and bottom edges of the rail with long-lasting masking tape.
Fill deep scratches and small gouges with epoxy resin thickened with enough household flour to give it the consistency of peanut butter. Let it cure. Sand fair with 100-grit paper. Carefully remove all sanding dust by brushing and wiping with a damp cloth. Allow to dry.
Now brush on a coat of two-part polyurethane primer paint. Let it cure, and sand it smooth with 220-grit waterproof paper used wet. Use two coats if necessary.
Wipe briefly with an acetone-soaked cloth once more, then brush on a finish coat of high-gloss, twin-pack, linear polyurethane (LPU).
White LPU is best because it shows the imperfections least, but if you want to use darker colors, you should apply a minimum of two coats of LPU, sanding in between with 600-grit wet paper.
The resulting finish is strong, flexible, attractive, and very resistant to abrasion and degradation by the sun. Maintenance is easy: simply paint over bad scrapes.
By the way, this system works equally well on those white plastic ventilator cowls that turn yellow and sticky after a couple of years on deck. It makes them look shinier and better than new, and they’ll last indefinitely. Even old plastic-covered horseshoe and ring lifebuoys respond to this treatment.
Don’t mix and match
Not all the new high-tech paint systems are compatible with each other. Be sure to follow the paint manufacturer’s recommendations about what primer, filler, and brush-cleaning materials to use.
On my boat, Tagati, I used Interlux’s Interthane Plus 2300 two-part polyurethane enamel over
Interlux’s 2100/2101 Multithane primer, but there are many other good systems to choose from.
Mix adequately small portions of primer and LPU by counting spoonfuls, in the proportions given in the instructions, into clean tin cans.
Wear a mask while brushing LPU and primer, and work where the ventilation is good. Note, however, that toxicity while brushing LPU is low compared with spraying, which is not recommended to amateurs.
Thank you to Sailrite Enterprises, Inc., for providing free access to back issues of Good Old Boat through intellectual property rights. Sailrite.com