Two oldtime devices – a chip log and a sounding lead – will be there even when the power’s out
Issue 6 : May/Jun 1999
When it comes to electronics, owners of good old boats never seem quite as dazzled as others might be. Yes, a GPS is a wonder to behold. And an ongoing video of who, what, and how the landscape passes underneath our boats is indeed a modern marvel. But we all know what the battery giveth, the battery “can taketh” away.
So as my boat enters her 40th year, I still keep aboard two simple, vintage devices for checking the boat’s speed and the water’s depth. If you know how to use them, a chip log and a sounding lead are two small, but very useful, contraptions. Indeed, in light air and at slow speeds, the chip log will be far more accurate than most GPS readings of speed through the water. Additionally, the sounding lead has the advantage of being useful aboard a dinghy or any other non-electrified boat, thereby allowing you to squeeze into shallow anchorages or up creeks that you might not otherwise attempt.
Finding these two gizmos in a marine catalog is like looking for buggy whips at your local service station. But you can easily fashion your own version of a chip log or a sounding lead. And using them is as simple as hoisting the jib.
Making a log from a chip
Invented by the English sometime in the 1500s, the chip log uses the simple equation of distance divided by time to determine speed. As we all learned in grade school, if you know how far you traveled and how long it took, you can figure out the speed you were going.
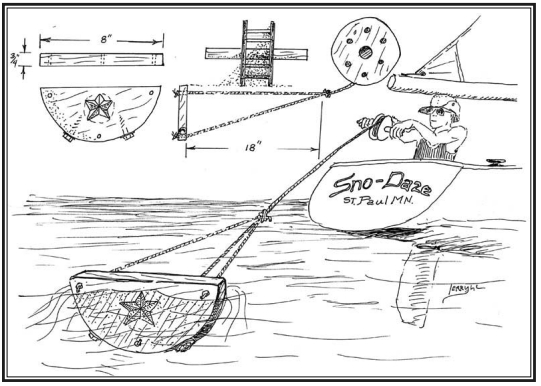
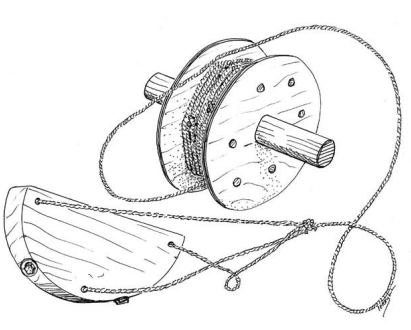
To make a chip log, use an old scrap piece of 3/4-inch softwood, like pine or cedar or even exterior-grade fir plywood. The idea is to have a piece of wood that floats easily. Cut the scrap into a half circle 8 inches in diameter. This must then be weighted at the midpoint of the arc of the semicircle. Originally, the weight was some molten lead poured into a cavity drilled at the midpoint. But I’ve found a couple of galvanized iron lag bolts (3/8 inch will do) screwed into the arc equidistant from the midpoint serve just as well. Their weight holds the board vertically in the water, creating enough lateral resistance to make the chip log line pay out uniformly.
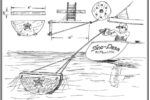
For chip-log line, I’ve found used cod line about 1/8 inch in diameter works best. Old line is better, because new line tends to kink up as it pays out. If you don’t have access to used cod line, just about any small-diameter, low-stretch, braided polyester line will do. To age it, leave it in the sun, wind, and rain for a week or two. Attach the line at the three points indicated in the sketch at left. The three attaching lines should be about 18 inches long, joined and then secured to one long cod line. The single length of line must be a minimum of 140 feet. For easy handling, the log line is kept on a reel.
I’ve made a little wooden reel that I hold on a dowel and allow to unwind. To make a reel is easy: cut out two round discs about five inches in diameter with a 3/4-inch hole in each. Connect the discs with three 2-inch x 3/4-inch x 1-inch lengths of pine and wind the line up on the reel. To allow it to unwind, stick a 1/2-inch dowel through the hole and dump the chip overboard.
Using the chip log is simple. The standard nautical mile is 6,076 feet. For a vessel to travel that distance in one hour, it would have to move about 101 feet every minute or about 17 feet every 10 seconds. That’s not very fast, but sometimes it’s the best can you expect on a mid-summer’s day. And of course, moving one nautical mile in one hour works out to the boat moving at one knot.
With these numbers in mind, mark your chip log line at 17-foot intervals. In the old days, these intervals were marked with knots tied into the line, one knot for the first 17 feet, two knots at the second 17 and so on. Knots were used because sometimes the log was used at night. Since 14th-century flashlights were notoriously unreliable, mariners just felt for the number of knots in the line to determine the speed. Thus a boat was said to be moving at so many “knots.”
Of course, most of the time the log line will not stop exactly on a mark. Mariners solved this problem by holding the line between outstretched hands, which is a distance of six feet or one fathom. There are roughly three fathoms in 17 feet of line. Thus many old log books noted the boat’s speed as “one knot, two fathoms,” “four knots, half fathom,” and so on. I’ve learned to settle for notations of 4 1/3 knots and the like. It’s not digital, but it’s reliable.
The chip log is best used by two people, one to keep the time and steer the boat, the other to tend the log. The logkeeper is stationed on the boat’s transom. The timekeeper makes the call of when to drop the chip and when to halt the progress of the line paying out. To account for the delay in reactions, as well as the time it takes for the chip to actually fall, hit the water, and begin paying out, the timekeeper generally adds a second to the requisite 10. The logkeeper keeps a hand close to the reel to stop it immediately on hearing from the timekeeper. Just a couple of practice runs with a chip log will make you as professional and accurate as any speed indicator yet invented.
At bottom, no sinking feeling
Ancient Greek sailors were among the first mariners to drop a weighted object to measure the depth of the water. The modern age of the sounding lead began shortly before Columbus made history and continued until just before World War II. Considered an essential part of seamanship, sounding with a lead was taught by the U.S. Navy right along with rowing techniques and basic use of the compass.
Today, a sounding lead still has many practical uses, even if you already have a reliable depthsounder aboard. If you run aground, you already know where the shallow water is. But the depthsounder isn’t going to tell you where the deep water is. Someone with a sounding lead and a dinghy can. A sounding lead can also be loaned to someone whose depthsounder has temporarily gone on the fritz. And a sounding lead can also tell you what the bottom is made of, thereby assisting in navigation and anchoring.
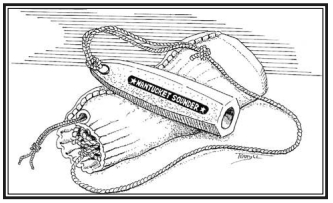
The basic sounding lead is indeed made of lead. In fact, until about 10 years ago, you could buy a genuine sounding lead from one or two of the old-time marine catalogs. The WoodenBoat Store and Landfall Navigation catalogs still sell them, but you may want to make your own. It’s a project that will take a couple of hours and cost about $12 but be well worth the time and money since a sounding lead will last a lifetime.
In truth, I must admit I’ve used items other than a proper lead to get soundings. In a pinch, a sawed-off iron window sash weight has served well. In my most poverty-stricken years, a heavy-duty link of iron chain also did the trick. But the drawbacks in both of these options are: 1) they rust and make a mess in their storage areas; 2) they cannot be “armed” with wax for bottom sampling; and 3) they don’t go to the bottom or come off the bottom as easily and efficiently as lead.
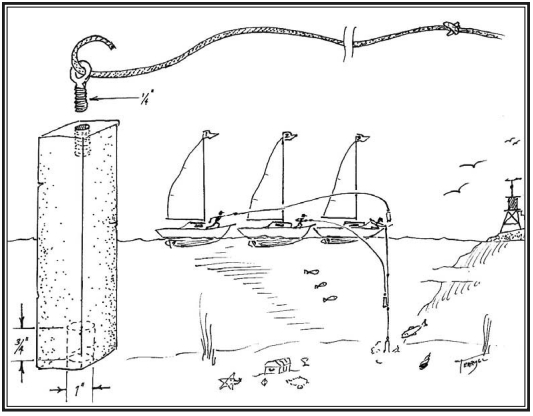
It’s easy to make a lead sounding device. Metal scrap yards, boat construction yards and marinas will sometimes have raw lead ingots lying around. Many of these ingots come in bar form, around 6 inches long, 3 inches wide, and 2 inches thick. The bars generally weigh around 5 pounds and should cost no more than $1 per pound. This size and weight is perfect for a sounding lead.
In one end of the bar, drill a 1-inch hole about 3/4 inch deep. This is the pocket in which you can put wax for sampling the composition of the bottom. When the lead is cast and it travels to the bottom, the wax strikes the seascape and picks up shells, mud, sand, gravel, or whatever is there. Charts are marked with the composition of the bottom, primarily to help mariners figure out where they are. Moreover, some anchors work best in sand and gravel (yachtsman and Danforth), while others are better suited to mud (plow, Bruce, and mushroom). Knowing which anchor to drop is always helpful if you don’t want to drag in the middle of the night.
At the other end of the ingot, drill and tap a hole to accept a stainless steel screw eye. The screw eye should have a 1/4-inch shank and a cast — not bent — eye. Attach your lead line to this eye. I recommend a light, non-stretching line like 1/4-inch Dacron. Nylon is too prone to stretching and polypropylene is too prone to tangling. I use a 60-foot line and rarely have to pay out much more than half that.
Marking the lead line is quite similar to marking the chip log line. I tie knots into the line every 10 feet. The tradition is every 6 feet. But it’s your lead line, so do whatever you like. It’s also more traditional to weave a small piece of marline into the lead line at the intervals and knot it instead of the line itself.
On the bow, throwing out
It doesn’t take long to get the knack of throwing the sounding lead. There are, however, a few essentials to remember. First, it’s always best to reduce boat speed to around two or three knots. If this means lowering the jib, so much the better. Throwing the lead on the foredeck is easiest when you don’t have to worry about fouling jib sheets, fluttering sails while tacking, and the like. A slower speed also means more accurate readings. Position yourself at about the stemhead and make sure you know where there’s something to hold onto at a moment’s notice. Both your hands will be occupied with throwing and retrieving the lead, so be careful. You may even want to consider a safety harness and/or a lifejacket (see sketch above). In your left hand, hold the lead line loosely coiled. In your right hand and outboard of the rail, hold the lead lightly and gently begin swinging it for an eventual underhand throw. Don’t even consider an overhand throw. Doing this repeatedly can damage your shoulder and wear you out in very short order. For good soundings, you’ll throw the lead at least a half dozen times. (Obviously, if you’re left-handed, the positions described here will be reversed.)
Once you’ve built up some swinging momentum, give the lead one mighty heave forward and let the line pay out at will. Ideally the lead will land at least a full boat length ahead of the bow. Once in the water, it will head to the bottom surprisingly fast. It will also let you know when it hits the bottom. A definite “clunk” feeling is transmitted to your hands through the line when the lead hits bottom.
As the lead descends, the boat will be sailing up on it. The job of the leadsman is to take in enough line to make it perfectly vertical when the boat sails over the point at which the lead has hit bottom. Two or three throws will give you the knack for this. Once the line is perfectly vertical, note the knots showing above the water and do the multiplication. Subtract or add the appropriate amount for the fractional distance between knots. The result is the depth. It never fails. Batteries not included.
Thank you to Sailrite Enterprises, Inc., for providing free access to back issues of Good Old Boat through intellectual property rights. Sailrite.com