The fine art of achieving small victories over the ravages of time
Issue 9 : Nov/Dec 1999
The joy of installing new equipment in your good old boat is sometimes turned into teeth-gnashing frustration when removing the bad old equipment. Disintegrating metals, frozen bolts or screws, and remarkably persistent adhesives can drive you right into the arms of a $50-an-hour professional boat mechanic or, worse, into skipping the new equipment installation altogether.
But don’t despair. With a few specialized tools and techniques, you can remove almost everything, from an obstinate alternator to an intransigent handrail, quickly and efficiently. This not only makes upgrading your boat easier, it adds value that might otherwise be lost to big yard bills. And to be completely honest, when you finally do conquer a particularly ornery fitting, there’s always a small, fine feeling of victory over the ravages of time.
Bad bolts and sullen screws
At the heart of most obstinate old gear are the bolts and screws holding them in place. Usually, once these are removed, dislodging the rest of the object is relatively easy. It doesn’t matter if the fastener is made of plain old iron, silicon bronze, or stainless steel. Sooner or later, all metals commonly found on pleasure boats will corrode and freeze in place, requiring extra attention to remove them.
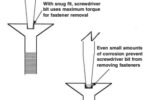
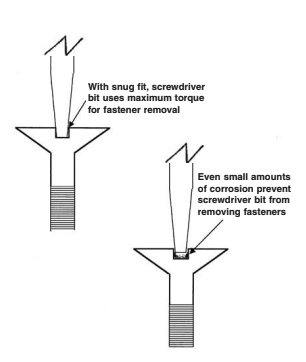
Initially, try to remove bolts and screws by simply reversing the manner in which they were installed. But before doing so, take some basic steps to stack the odds in favor of success. First, be certain all corrosion, paint, and rust on the head of the fastener is removed. This is particularly important with slotted screws. Any amount of corroded material or paint left in the slot virtually guarantees your screwdriver will “walk out” of the slot, and you will fail to remove this fastener. When a screwdriver point walks out of a slot, it usually destroys the slot, forcing you to move on to more complex removal methods.
With all debris removed, be certain the screwdriver you choose fits as snugly as possible in the slot. A loose fit will again allow the screwdriver’s point to walk out of the slot. If available, use a brace-and-bit instead of a hand screwdriver. With a brace-and-bit, you can apply much more downward pressure while at the same time providing turning torque. Do not, however, be tempted to use any sort of electric screwdriver. They prevent you from “feeling” if the screw is moving or not, which again leads to the tip walking out of the slot.
Before you attempt to turn a slotted screw head, apply some hammer power to the effort. Do this by inserting the screwdriver tip in the slot and rapping lightly several times on the end of the screwdriver handle. These shocks are transmitted to the screw and help break the bond between the screw threads and the material into which it’s inserted, whether it’s wood, a nut, or an engine block.
In general, these preliminary techniques should be applied to any type of bolt or screw head you face, including Phillips-head, square-socket, Allen, and both common hex- and square-head cap screws. In all cases, the crucial factor is getting a snug fit between the fastener head and the tool you’re using to remove it.
One good turn
After all the preliminaries, actual removal comes down to good technique, rather than strength and sweat. Go slowly here. For successful removal, applying consistent, even, counter-clockwise pressure is much more important than a sudden burst of torque. If you’re using a brace-and-bit, “knocking” the screw may help. This is done with short, low-pressure turns of the brace that tend to send small “torque shocks” through the screw to help turn it.
If your first attempts to turn the screw fail, give it some more raps with the hammer and screwdriver team. Keep alternating back and forth between brace-and-bit and hammer shocks until it moves . . . or until you’ve messed up the fastener’s head to the point where it’s no longer possible to keep the bit’s point in position.
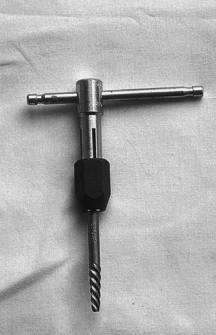
Once the fastener’s head is bollixed up, don’t worry. It happens to everyone. Other excellent options are still available. One of the best alternatives is using what’s commonly known as an easy-out. They are also called screw or bolt extractors. To use one, you need to first drill a hole through the head and into the shank of the fastener.
The drill bit size you use for this operation is important. Too big, and the fastener will crumble when the easy-out is inserted. Too small, and the easy-out will lose its grip when torque is applied. The drill bit should be about half the size of the shank of the fastener. A 3/4-inch bolt would therefore take a 3/8-inch drill bit, 1/2-inch would take 1/4-inch and so on. Once you’ve selected the drill bit size, get the corresponding easy-out size. All easy-outs are sized for a certain range of drill bit sizes.
The hole should be as deep as the length of at least half the spirals on the easy-out. I try to have on hand two appropriately-sized drill bits, one for the actual drilling and one for heating. Although heating a fastener is not always necessary, it certainly stacks the odds of removal in your favor. And when the fastener is badly corroded or made of a material similar to the material in which it’s inserted (such as iron bolts in an iron flange), heat is indispensable. Of course, mechanics often will heat a fastener directly with an acetylene torch. But in the confined spaces of boats, this is often unsafe or impractical. So heating without a torch is necessary.
Have heat, will travel
Heating a fastener without using a torch is based on the physics of friction. When drilling the hole, some heat will be transferred from the drill bit to the fastener due to friction. But it’s rarely enough heat. To increase the heat, you switch from a sharp drill bit to a dull one after you’ve drilled the hole in the fastener to the desired depth. You can dull the cutting head of a drill bit quickly with a file or grinding stone. Don’t worry about the cost of this. Inexpensive drill bits can be obtained for a couple of dollars.
To turn up the heat on the fastener, you simply start “drilling” with the dull bit. Although the hole doesn’t get any deeper, a tremendous amount of friction heat is transferred to the fastener. The heat then helps break the bond between the fastener and the material through which it passes or into which it’s inserted. Be careful when a fastener passes through a particularly volatile material, like some foam cores. Friction heat rarely becomes intense enough to result in a fire, particularly in a fiberglass or wooden hull. But if you have doubts about a foam core, check with the boat’s designer or manufacturer before proceeding.
Once the fastener’s heated, move quickly to the use of your easy-out.
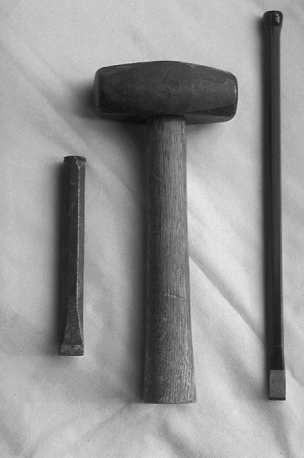
An easy-out works on the principle of a square peg in a round hole. In fact, some easy-outs actually are tapered squares instead of the tapered counter-clockwise spiral. In any case, easy-outs are made of extremely hard steel. This allows you to gently hammer it into the hole you drilled, which forces the sharp edges of the easy-out into the walls of the hole. This makes it possible for the easy-out to “grip” the fastener from the inside. Moreover, with spiral easy-outs, the more torque you apply, the deeper the edges cut into the walls of the hole. Torque is best applied using a T-handle wrench specially designed for the easy-out.
Tapping the easy-out into place is an art form in itself. Avoid hitting it too hard. This may cause the fastener to split, which will make it much harder to extract. On the other hand, it must be tapped firmly into place to be effective. More tapping is better than less, since tapping also helps break the bond.
Once the easy-out is in place, slowly apply torque in a counter-clockwise direction. I usually tap gently on the head of the T-handle wrench as I increase the torque. This also helps break the bond. Once the bond breaks, the easy-out continues to hold onto the fastener until you have it backed all the way out of its hole.
Going nuts on the nuts
Sometimes the head of a fastener is either inaccessible (as in ballast bolts or other embedded fasteners) or should not be drilled (as in rudder pintles or other specially designed thru-hull fixtures). In these cases, removal of the available nut is best. But that, too, requires special procedures.
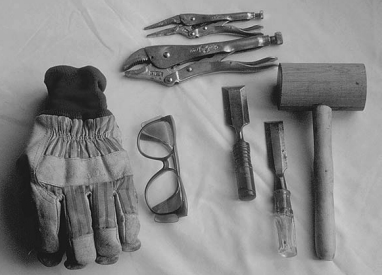
It is rare to be able to fit either the properly sized wrench, socket, or even a pair of Vise-Grip pliers on a corroded nut. That’s because nuts not only corrode around the perimeter, but also from the top down. Moreover, if they are snugged up against a bulkhead, hull, or flange, you’d have to hold the handle end of the wrench or pliers far enough away from the structure to get your hand around it. This angle, and the awkward positioning of your body, reduces the amount of torque you can apply to the nut. The only solution here is to slowly and methodically destroy the nut.
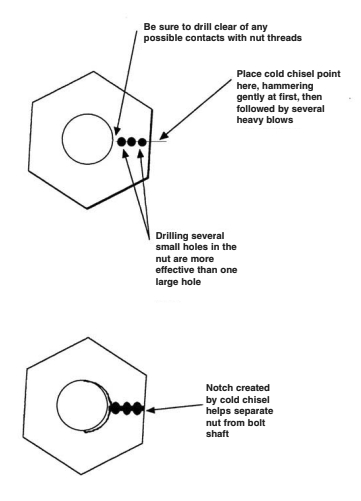
The tools for this process are an electric drill, drill bits, and a cold chisel. In my experience, drill bits should be sized on a 6-to-1 ratio relative to the nut. That is, a 3/4-inch nut will take a 1/8-drill bit, and so on. I found this works best because small holes generally are easier and quicker to drill than large holes. Also, you’re trying to create a fault line with your holes (see sketch on Page 26), not a crater.
Cold chisels can be found at most good hardware or auto parts stores. Try to get one with a long handle (12 inches is best) and a fairly narrow head (about 3/4 of an inch wide). This will allow you to get into tight places but still have room to swing a husky hammer.
When drilling, be certain to stay clear of the threads in the nut. If you drill into them, you will probably take out part of the threads of the fitting itself, thus weakening it and possibly forcing you to replace it. Nor should you get carried away with drilling your “fault line” holes. Just a couple of holes (see sketch on Page 26) will sufficiently weaken the nut and allow the cold chisel to do its job. Use drilling oil to speed up the operation.
Once the holes are drilled, grab your chisel. With the business end properly sharpened, place the chisel’s point on the drilled holes and, at first, lightly tap on the chisel. This should give you a cutting line depression, which will help the chisel stay in the position for best results.
Then, with a two-pound hammer or better, give the chisel end a couple of good hard blows. This may or may not break the nut at the fault line. Regardless of whether it breaks, the blows and the notch created by the chisel point will rearrange enough of the metal in the nut to break the bond of corrosion which locks the nut onto the shaft. Then the nut will back off easily with a pair of Vise-Grips. If it doesn’t, a little more pounding of the cold chisel into the notch will do the trick. Altogether, it’s a very satisfying procedure.
After the fasteners’ fall
Once fasteners have been removed, it’s sometimes necessary to use a little more persuasion to actually remove the object in question. This is particularly true of any hardware that has been bedded down with adhesives or other goop. There are two basic approaches to this: the Take-No-Prisoners policy or the Save-It-For-A-Rainy-Day approach.
The Take-No-Prisoners technique works best with wooden objects like handrails, dorade boxes, and the like. But it can also be used on low-quality metal gear too, especially cheap aluminum alloys. Basically, you destroy the object by cutting or chiseling it into smaller and smaller pieces. This is less time-consuming than it seems. With just a hammer and wood chisel, I removed all the dilapidated handrails on our 30-foot sloop in a matter of a half an hour. Once you cut the object into small parts, then you chisel the smaller parts down to the deck or bulkhead.
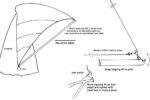
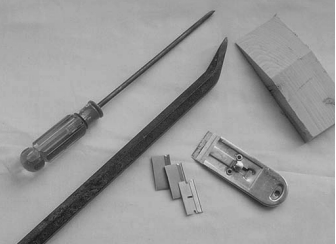
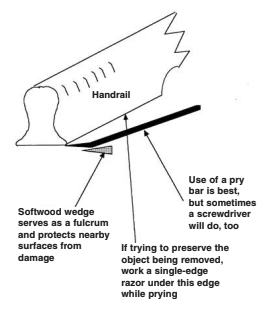
The same general approach works with low-grade metal objects except that a hack saw is used to cut it up. The individual pieces can then be pried up with a screwdriver or pry-bar and wedge (see sketch at right). When working on lightly built fiberglass boats, be certain to use a softwood wedge such as pine or spruce. Hardwood wedges transfer too much pressure to the surrounding surface and may crack it.
The Save-It-For-A-Rainy-Day approach requires a little more time, usually two people, and some delicate work. In this case, you must pry at the object just enough to slip a razor blade under one edge (see sketch below). Then you pry a little more, cut a little more bedding adhesive, pry some more, cut some more, and pretty soon all the adhesive is cut away and the object has been freed. Don’t be tempted to use solvents during this process. Very often, the same solvent for removing an adhesive will also turn your gelcoat into putty.
Throughout all these processes, remember that tiny pieces of cut metal have the uncanny ability to leap great distances and find an unprotected eyeball. So always wear protective goggles. As in any maintenance chore, the best war stories are those in which you’re not wounded, only victorious. And victory is particularly sweet when you triumph over what was once considered an immovable object.
Editor’s note: We bet our readers have more tricks yet. Send them in, and we’ll print them.
Ken Textor has lived and worked aboard boats for 22 years. In addition to work he did for the former Small Boat Journal, he contributes to a number of sailing magazines and has written a book, Innocents Afloat: Close Encounters with Sailors, Boats and Places from Maine to Florida.
Thank you to Sailrite Enterprises, Inc., for providing free access to back issues of Good Old Boat through intellectual property rights. Sailrite.com