Supplement your galley stores with delicious dried produce
Issue 22 : Jan/Feb 2002
Snacking on dried apple rings, zucchini chips, or salmon jerky brings thoughts of sailing to mind. Dried foods are a wonderful addition to a boat’s larder. With 80 to 90 percent of the moisture removed, dried foods take up less space and weigh much less than hydrated foods. Dried foods are not dependent on any power to keep them from spoiling. Plus, there is no loss of food if containers break. The only drawback to having dried foods on board is the requirement of additional liquids either for re-hydrating the foods or for drinking.
Drying foods on a boat can be accomplished through open-air (sun) drying or oven drying. On land, where unlimited AC power is available, dehydrators can be used. Speaking of dehydrators, they don’t actually dehydrate foods. Dehydration means eliminating 96 to 98 percent of the water in foods. This can only be done commercially. Home/boat drying can only accomplish an 80- to 90-percent reduction in moisture.
Sun drying requires hot sunny days with low humidity in a pollution-free environment. Successful drying can occur on a boat while at anchor with a breeze to help whisk that moisture away or at a dock in a dry climate such as the Baja Peninsula of Mexico.
Oven-drying on a boat can be successful if your oven has a very low setting or pilot light that will keep the temperature between 140 and 150°F.
The best foods for drying are fruits and vegetables, but meat and fish can also be dried in an oven. Food preservation specialists do not recommend drying meats in the open air because of the danger of bacterial contamination and incubation during the drying process.
Why drying works
Properly dried foods do not support the growth of spoilage organisms. Molds, bacteria, and yeasts are only capable of surviving on or in foods that contain a certain amount of moisture. Highly acidic foods, such as most fruits, are successfully preserved when 80 percent of their water is removed. Low-acid foods like vegetables and meats require 90 percent of their water to be removed. This reduction of water creates a hostile environment for bacteria, yeasts, and molds.
Sometimes salt is used in the drying process, as in the case of jerky and fish. The salt helps by drawing the water from the cells of the food, which shrinks the cells and hastens drying. The salt that remains after the drying is completed protects the food by creating a hostile environment for unwanted organisms.
Bacteria, molds, and yeasts are not the only factors in food deterioration, though. Enzyme action in some foods can result in undesirable flavors, colors, and textures. Because of this, some foods require pre-treatment before drying to destroy or slow down these enzymatic actions.
Drying inside the cabin
Some open-air drying can be done inside your cabin. Chili peppers are easily dried by stringing them by their stems and hanging them between handholds in the cabin of your boat. Apple rings can also be dried this way.
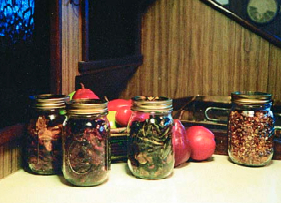
Fresh herbs are best dried in your cabin by tying their stems into a bundle and placing them upside down in a clean brown paper bag. Close the bag a round the stems and tie tightly. Hang this bundle in an out-of-the-way corner. The bag will catch the leaves that fall as they dry. Since herbs should be dried in the dark to retain their flavors and aromas, the bag also provides that protection. In a few weeks, when the herbs are dry, shake the bag to dislodge any remaining leaves. Store them away from the heat of the stove in small glass jars.
Preparation of foods
The first step in preparing food to be dried is in the selection. It should be as fresh as possible and at the peak of ripeness. It also should be as clean as possible. Scrub it under running water. If produce is bought in a third-world country, soak it for 5 minutes in a bucket of lightly bleached water (1 capful of bleach for 5 gallons). Then rinse in clean water.
After a thorough wash, inspect your produce for soft spots or signs of spoilage. Cut these areas out. Leaving bruises or soft spots will increase the chances of your produce spoiling during the drying process. Next cut away all tough areas like cores, stems, and seeds. Some foods, such as winter squash, should have their skins removed as well.
Foods are then cut into slices appropriate for drying. Depending on the type of produce, the thickness of the slices may range from 1⁄8 inch to 3⁄4 inch. Fruits can generally be left in larger pieces than vegetables since less water needs to be removed. Cut all produce into uniform pieces so the time required to dry each type of food will be the same.
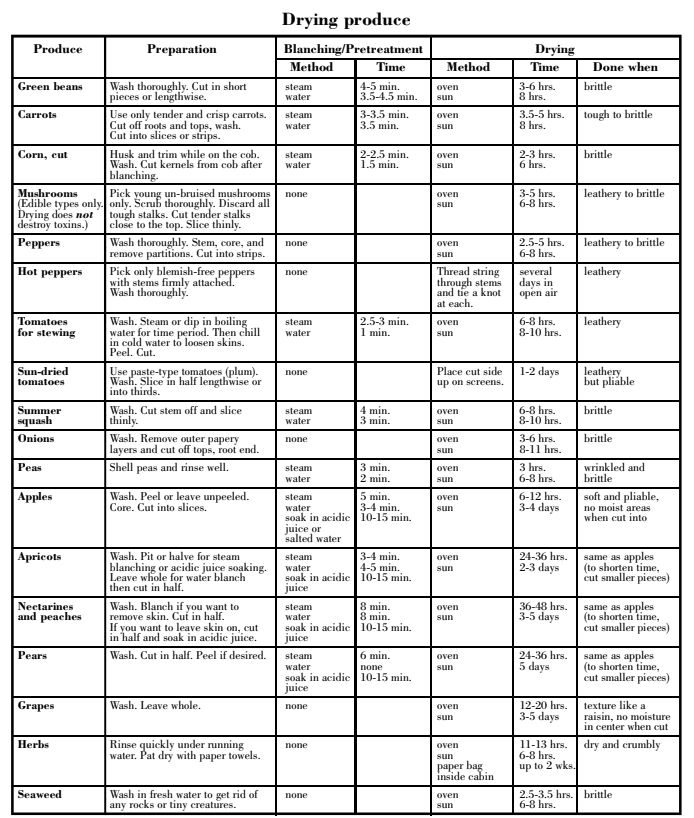
After cutting foods into their proper size for drying, perform any pretreatments that are necessary. Some produce will need to be blanched. Some fruits will need to be soaked in an acidic fruit juice or salt solution. Some, however, are ready to dry right after slicing. See the table on Page 43 for procedures.
To blanch or not to blanch
After produce is washed, inspected, and cut, it is blanched if necessary. When an enzyme action can cause bad flavors, odors, or colors, blanching is necessary. During the blanching, the cell is killed. This makes the cell walls more permeable, allowing water to escape. Blanched foods are easier to re-hydrate also. However, the main benefit of blanching is stopping unwanted enzyme processes. In some cases enzymes are needed to help create desirable flavors and odors. This is true with garlic, onions, and horseradish.
Most of the vitamin and mineral loss during drying occurs during the blanching process. Vitamin C, in particular, is destroyed by high heat. So only blanch food when necessary. (Dried foods have much more nutritional value than canned foods since the canning process is much longer and uses such high temperatures.)
There are two ways to blanch produce: with boiling water or with steam.
Water blanching
In a large pot, bring to a boil enough water to cover a double layer of produce. Quick removal is essential if you are to retain the nutritive value of the food. Produce which is simply dropped into boiling water is difficult to remove without some pieces getting overcooked, so it is advisable to use a colander or steam basket to keep the pieces together. Or you can use netting or cheesecloth to hold the produce tied as a bundle.
Immerse your produce in the boiling water and begin timing immediately. The water may not return to boiling before your time is over. This is OK. For specific times for water blanching fruits and vegetables, see the table.
Steam blanching
Blanching produce with steam takes a bit longer because the steam must penetrate all pieces. But steam blanching retains more nutritive value since the produce does not sit in water, allowing vitamins and minerals to leach out.
In a large pot, bring an inch or so of water to an active boil with a good amount of steam. Use a steaming basket to keep your produce out of the water or suspend your bundle of produce in a large piece of netting or cheesecloth just above the water. Another way to steam produce is to use an aluminum pie pan with holes punctured in the bottom. The edge of the pie pan should rest on the pot’s edge to hold the produce out of the water. Specific times for steam blanching fruits and vegetables are given in the table.
After blanching (with water or steam), plunge the food immediately into cold water for the same amount of time as the blanching. This stops the produce from cooking any further. Produce is then taken out and spread on toweling to dry for a few minutes.
Now your produce is ready to be arranged in a single layer on your drying trays so that no pieces overlap or touch. It is best to put pieces of uniform size together on the drying trays.
Pre-treating some fruits
Fruit that is to be dried with the skin still on and not blanched should have the skin pricked with a sharp-tined fork before being sliced into pieces. Pricking the skin helps with moisture loss, thus hastening drying.
Unpleasant color changes that occur in some fruits can be slowed or avoided by a soaking the fruit in an acidic fruit juice like lemon juice, unsweetened pineapple juice, or in a salt solution (4 to 6 tablespoons of salt for each gallon of water). By slicing the fruit right into a bowl of juice or a salt solution, it gets immediate protection from browning. Let these pieces soak for 10 to 15 minutes. After soaking, spread the pieces on toweling to dry for a few minutes. Now your fruit is ready to be laid on drying trays. Arrange them in single layers with no pieces touching or overlapping.
What to dry in open air
Authorities warn against drying protein products such as eggs, yogurt, and meats in the sun. Staphylococcus and salmonella bacteria thrive on these foods. There is no way to test the safety of the food.
Fruits are generally easier to dry in the open air than vegetables. The following guide may help:
Fruits easier to dry – Apples, apricots, cherries, coconut, dates, figs, guavas, nectarines, peaches, pears, plums, prunes.
Fruits harder to dry – Blackberries, bananas, breadfruit, grapes.
Vegetables easier to dry – Chili peppers, sweet corn, sweet potatoes, onion pieces.
Vegetables harder to dry – Asparagus, beets, broccoli, carrots, celery, greens, green beans, sweet peppers, squash, tomatoes.
Open-air (sun) drying
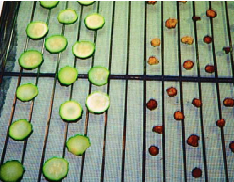
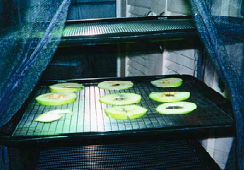
Arrange food on your drying trays. The trays need to be kept off the deck an inch or two to allow for air circulation but low enough to allow the deck’s light color to radiate the sun’s rays back to the food. To protect the food from bugs and other contaminants, cover the trays with cheesecloth or netting so that it doesn’t touch the food. Check the food periodically and turn the pieces a few times a day. To avoid evening dew, bring the trays in each night at sundown and out again as soon as the sun begins to warm the deck. Timing only takes place when food is outside. On the second day of drying, begin to check the foods for doneness. The table tells you what each food should be like when done drying. Drying times are approximations.
If the sun is too intense for your foods, you will need to move them into the shade of an awning so the outsides of the food do not cook. It is a good idea to bring the trays into the shade when the food is about three-quarters dry anyway. You will get a tastier and better product.
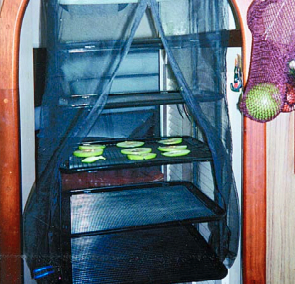
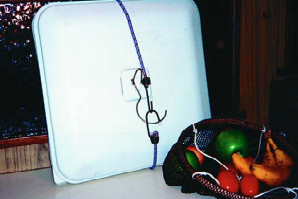
On board Lindsay Christine we carry a portable hanging food dryer called a Food PANtrie. By sewing a loop on the two opposite bottom edges, it hangs easily in the rigging by its top hook. It can be controlled in light winds by tying it by the two bottom loops to handrails. The black netting around the four trays protects the food from contamination and increases the temperature inside the drier, allowing us to dry foods in less than hot conditions. When not in use, it folds up into its top plastic cover with a plastic bottom that we bungee on. It is small enough to stow under our settee. The trays are made of food-grade plastic and are easily removed for washing. This handy dryer has a double duty as a sprouter when we aren’t drying food.
Pasteurization
If there is any chance that bugs or airborne microorganisms contaminated your food while it was drying, pasteurize it before storing. Preheat your oven to 175°F. Spread the food loosely on trays or netting, using no more than two trays at one time. Place the food in the oven. Small pieces should be heated for 10 minutes; larger pieces for 15 minutes. Remove the pieces from the oven and spread them out on clean toweling. When it is thoroughly cool, package up your food.
Drying trays
Drying trays can be made with netting and unfinished 1 x 2s or stretcher bars (pieces of wood used to stretch painting canvases as a framework, found in arts and craft stores). Do not use metal screening for the bottom. Aluminum discolors food, copper destroys vitamin C, and galvanized screen is treated with zinc and cadmium, which would be dangerous near food to be consumed. If you have no choice other than to use metal screening, protect your food by placing clean muslin over the screen before arranging the food. This will reduce the air circulation around the food, but it will give you a safer product.
Even fiberglass, with its tiny splinters, can be hazardous to use as a bottom. If you use vinyl-coated screen, make sure it is food grade and will handle temperatures up to 140 to 150°F for oven drying.
Cloth netting is the best choice for tray bottoms as long as the mesh is no bigger than 1⁄2-inch. Mosquito netting will work unless it is made of a plastic that can’t take 140°F. Cheesecloth can also be used if doubled over for extra strength, but it is difficult to clean for reuse.
With unfinished stretcher bars, make a rectangular or square frame. If you will be using the trays in the oven, the size depends on the size of your oven. The frames should be at least 1 1⁄2 inches smaller all around than your oven interior to allow proper heat and air circulation.
Cut the netting to overlap the frame by 2 inches all around and double it over before stapling or tacking the edges to the frame. If you need more support, string lines diagonally under the frame.
A light coating of vegetable oil spray applied before food is arranged can prevent foods from sticking to the netting.
Drying meats
We often saw fish drying on tin roofs in cities on the Mexican Pacific coast when we were cruising that area in 1995 and 1996. And being from the Pacific Northwest where salmon is commonly dried and smoked, I am used to the idea of drying fish in the open air or over a smoky fire. But it is not believed to be safe to dry your own meat outside these days. At least that is what the USDA and extension food specialists say. Why? With the rise in occurrences of e. coli, salmonella, and other bacteria showing up on meats sold in the United States, food preservation specialists have become cautious in their guidelines. And with good reason. Raw meat can incubate bacteria easily and quickly, even when we sanitize our preparation area and wash our hands well.
Because there is no known way to tell if the meat you dried outside is safe, those making the guidelines are hoping people will stay on the safe side, using the guidelines explained below. In fact, these days the authorities are only giving directions for drying meats as jerky. As for that huge fish you just caught while reading this, it is up to you how to preserve it. I know of many who swear they can dry fish by hanging it in the rigging. If you choose to be counted as one of those, remember that the cleaner the area is where you process your raw meat, and the quicker it dries, the safer your product will be.
Dry only very lean meats since fat will eventually become rancid. If you wish to dry wild game or pork, freeze the meat for several weeks to kill any of the tiny worms that cause trichinosis.
Making jerky
Jerky is a popular snack. You can make your own jerky by following a few simple procedures:
- Freeze your jerky meat to make it easier to slice. Jerky can be made from any type of low-fat meat such as beef, poultry, pork, wild game (remember to freeze this meat for several weeks first), or even fish.
- Slice partially thawed meat into 1⁄4-inch thick slices, across the grain for tender jerky or with the grain for tougher jerky
- Prepare a marinade made from soy sauce with a little pepper, garlic powder, and onion powder or whatever spices you’ve got on hand.
- Bring the marinade to a full boil and add a few slices of meat at a time making sure that the marinade covers the slices.
- Bring this back to a full boil then remove the jerky slices with tongs. Drain the slices on paper toweling then transfer them to your oven to dry at temperatures between 140 and 150°F. Line the bottom of your stove with aluminum foil to catch any drips.
Jerky is done when a cool slice will crack but not break when bent. There should be no moist spots on any slice. When done, refrigerate or cool it overnight in a plastic bag. If there is any moisture in the bag, dry it further. Store jerky in a cool, dry place away from sunlight.
Food preservation specialists have begun advocating precooking your meat slices before drying, due to an outbreak of food poisoning after several people ate homemade jerky that had been dried in a home dehydrator. They found that home dehydrators do not bring the temperature of the meat high enough to kill all possible bacteria.
Nor is presoaking in a marinade overnight advised since bacteria can spread throughout the galley when the slices are drained. So pre-cook your meat and do your marinating in a boiling marinade.
What to dry in the oven
Meats and fish are easier and safer to dry in the oven since the temperature can be controlled better. Because oven drying is twice as fast as open-air drying, it makes a better product. I prefer oven drying for the harder-to-dry fruits and vegetables as well as for any fish or meat jerky.
Oven drying
When oven drying, you need not have drying trays. Just stretch netting tightly around the oven racks and pin or temporarily stitch it in place. Line the bottom of your oven with aluminum foil to catch drips. Preheat your oven to 140°F before placing food inside. Place food in the oven so air can circulate around it. Leave the oven door slightly ajar to allow moisture to escape if you are using a gas oven. Stir or turn the food halfway through drying to help keep the drying even. Times given in the table depend on your oven temperature, the humidity level, and the level of moisture in the food. It helps to have good air circulation; running a fan nearby can hasten the time. Never dry foods overnight when using a gas oven due to the danger of asphyxiation.
Storing dried foods
It is important to store your dried food in containers that will protect it from moisture and bugs. Storing dried foods in small quantities will limit the amount of food lost if spoilage occurs. Glass jars or double-bagged resealable plastic bags work well on board. Plastic freezer bags inside glass jars protect your food even further. Protect glass jars with padding or by placing each inside a sock. Store dried foods in the coolest, darkest place on board. Dried foods stored at cool temperatures tend to retain more of their vitamin content than those stored in hot conditions. Nutritive value depends on the length of the storage time, so if you are in a very hot climate, eat your dried foods in a timely manner. That’s not hard to do anyway!
In the first week or so after drying your food, check it daily for signs of moisture. If there is moisture on the food or in the container, finish the drying in the oven at 140°F. Later, check your dried foods weekly to make sure they have not become damp, contaminated, or moldy. If dried vegetables show any signs of mold, throw them out! Some molds on vegetables produce aflatoxin food poisoning.
In optimum conditions (40 to 60°F in a dark, dry environment), dried fruits and vegetables maintain taste and nutritive value for up to a year. Meat and fish can be stored for three to six months theoretically. But boats rarely provide such optimum storage conditions since cabin temperatures can fluctuate sharply. Temperature fluctuations can cause condensation to form inside storage containers. So, it is important to check your dried foods periodically.
Dried foods add another dimension to eating on board. They are wonderful to add to cooking when fresh fruits and veggies have been consumed. And they are great to snack on during night watches or on the first part of a passage when you need to eat lightly. Weighing less, saving space, longer storage . . . hmmm . . . that sounds pretty great! I wonder what else I could dry around here?
In another life long, long ago and far away, Theresa was a home economist specializing in consumer education. After receiving her BA in home economics at the University of Montana, she went on to become a master food preserver with the co-operative extension office in Montana. Theresa and family live and cruise aboard Lindsay Christine, a Mercator Offshore 30.
Thank you to Sailrite Enterprises, Inc., for providing free access to back issues of Good Old Boat through intellectual property rights. Sailrite.com