It may be quick and dirty, but it’s also cheap and handy
Issue 26 : Sept/Oct 2002
Many years ago, when the sailing sickness first hit me, one of the first things I did was to buy a nice new copy of Chapman’s Piloting, Seamanship and Small Boat Handling and set out to work my way through it from one end to the other. I didn’t make it, of course, but truth be told, I did learn a lot, and I’m not one bit sorry for the effort I put into it.
Knowing how to advance an LOP, calculate a tide, or predict the effect of a current are valuable skills that no serious boater should lack. The practical fact, though, is that we very seldom have any occasion to use many of those skills, and like any skill that goes unpracticed . . . well, you know where this is going. My Chapman’s is way back there with our other purely “reference” books. The skills I remember are the skills I use; Chapman’s is there for all the rest of it.
In fact, the majority of texts on piloting that I’ve ever seen, Chapman’s included, appear to be aimed at the guy (ever noticed that it’s always a guy?) who does his piloting from a “bridge” and who I always imagine to be standing behind a helmsman, hands clasped loosely behind his back, occasionally murmuring, “Steady as she goes.” None of them raise an image of a guy who would ask, “What do you think, honey, could that jib halyard stand a little tug?”
The day-to-day piloting we do on Persistence is a rough-and-ready kind of thing. When we emerge into open water, we need to identify several distant points. In unfamiliar territory, we often need to verify that the headland on the chart is the headland that we see over there. Our weather is often terrible and, under way, the chart lives in the cockpit in a Plexiglas holder. The only course lines on it were drawn at the galley table last night at the latest. Parallel rules in the cockpit? As the kids say, “Give me a break!” I can barely manage the dividers and the hand-bearing compass. What we need is something simple, with no moving parts. Oh, and cheap, because it will go overboard.
Which way up?
I tried one of those stiff, clear plastic plotters with a lot of numbers and lines radiating from a protractor-like item on one edge. I could never remember how to orient it on the meridian (or did it go on the parallel?) or which set of numbers to read. Then there was always the “correcting add east” business: “. . . so, let’s see, that means I subtract the variation from the plotter reading to get magnetic? Or add?” You get the drift. It’s not for nothing that Wendy refers to me as “Captain Luddite.”
Then, several years ago, the magazine Messing About In Boats printed this little item, and things got a whole lot simpler. The “guy on the bridge” wouldn’t like it, but it has proven its usefulness to us over many, many miles of cruising, lots of it in remote areas of British Columbia and Alaska. I pass it along to you — one sailor to another. It’s no substitute for the parallel rules when critical work is required, but it’s plenty accurate for 90 percent of the chart work most of us actually do.
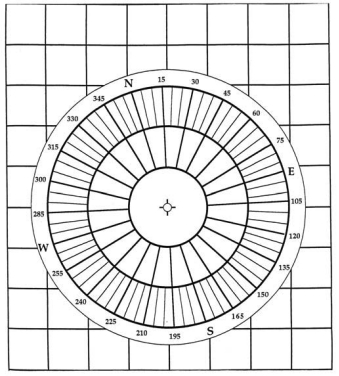
It is little more than a clever transparent compass rose that you can put anywhere on the chart and get direct magnetic bearings. The cleverness lies first in its being transparent, and second in the background grid that allows you to easily orient it on the chart. Here’s how to make one.
Cut out the rose and position it on the grid so that the variation for your usual cruising ground is “dialed in.” Hold the two pieces in position with tape or glue. Take the assembled item to a copy shop and make a photocopy on plain paper. Clean up any broken lines and white-out any spots on your paper copy. Then have the copy shop make several copies of that copy on acetate film — the stuff they use for overhead projectors.
You will now have a usable instant plotter. Handle it carefully because the printing ink does not adhere well to the acetate film. Having the copy shop folks laminate the acetate solves this. You will have a choice between a thicker or a thinner laminating film. The thicker stuff will yield a more durable plotter that is somewhat easier to handle, but the process may leave the plotter a bit lumpy.
Not big bucks
Different shops seem to have different levels of success with this step. The thinner film will be smoother but less stiff. We are not talking big bucks here, so have them do a couple of each. Save the paper original and save the extra acetate copies to be laminated later.
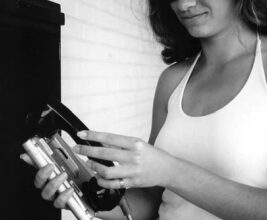
After using the original version on charts for a while, I made a reduced-size copy of the original that fit over the screen of our radar. Now, by holding the smaller version over the radar screen, rotated so that the ship’s magnetic heading is at the top of the rose, I can directly read the magnetic bearing of anything I can see on the screen. It’s a whole lot quicker and more intuitive than moving a cursor around and reading numbers off the screen — not as precise, of course, but great for those times when quick is better than precise.
You will find your own ways to use the plotter but here are a few of mine. Grab a bearing with the handheld compass; position the plotter so that number is on the known (or tentative) landmark, keep the plotter square on the chart, and you will have a quick and dirty LOP. I’ve found that, more often than not, one decent LOP, coupled with a bit of judicious looking around, will give me a position that is reassuring — if not dead accurate.
We cruise areas where navigation aids are sometimes few and far between, and I often rely on the bearings of natural ranges. When any two points are in transit or when a point has a certain bearing, I have a usable LOP. Our charts have a lot of these drawn permanently on them and nothing, of course, beats a straightedge and a sharp pencil for this work. Still, I will often grab the instant plotter for a quick position check. I even eliminated any initial fumble to get the plotter’s correct side face up by writing “north” with a heavy felt tip pen on the top edge.
A final note: by playing around with the image size of the acetate copy, you can make the background grid of your plotter yield any convenient distance scale. With a little practice, you’ll find this quick and dirty plotter to be a valuable piloting tool.
Thank you to Sailrite Enterprises, Inc., for providing free access to back issues of Good Old Boat through intellectual property rights. Sailrite.com