Transforming a sloppy paint job into a safe and spiffy deck
Issue 38 : Sept/Oct 2004
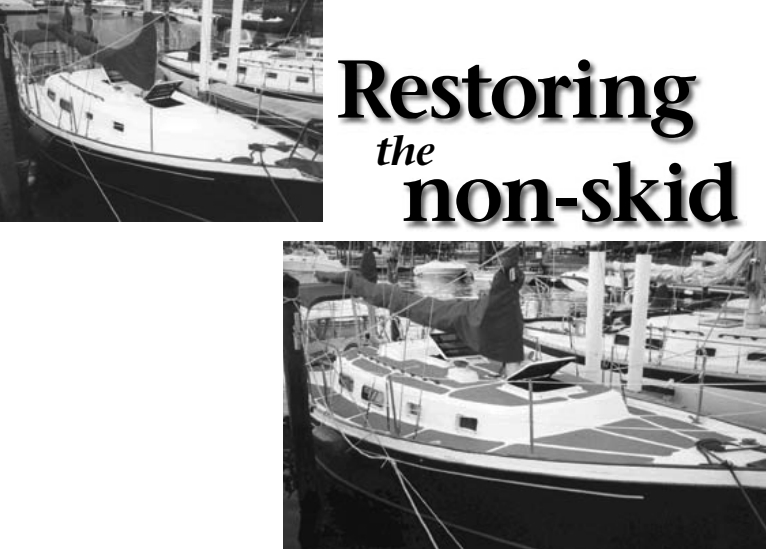
A few years ago, my friend, Gil, and I searched for an Allied Seawind II at a good bargain price. We found several prospects just outside our budget. After some near misses our hopes began to fade; that is, until I encountered the boat that looked like she had been dipped in deck paint before being put on the market. As best as I could tell, she had not been sanded or prepped in any way. Someone had simply gooped snow-white paint from stem to stern, obliterating her previously well-done factory non-skid.
While studying the corpse of her deck looking for forensic clues as to the murder weapon, I was torn. It might have been a hurried roller or perhaps a mop. After a sea trial and a thorough survey, the only explanation for this Gillmer design listing substantially below her value was her painted deck. Surely, underneath it this good old boat was worth a fix.
Gil and I could not resist, so the purchase was made and the refit began. We contracted the proper repair of the expected usual items. Then we ran out of money, splashed her, and brought her home hoping to tackle the deck sometime. I comforted the Wind Ketcher, “Don’t worry, I will change your deck. If you take it easy on me for a while, I’ll set aside some money and you’ll get a new dress.”
About six months later I was singlehanding in heavy air and dousing the rails, when she gave me a little reminder. Heeled over to the hilt, standing askew on the cockpit coaming and scrambling for footing on the goop paint job, I slipped on that white slime. She dished out, fell into irons, and bounced up and down on the bay chop like a porpoise laughing at me, whispering in the wind, “Where’s that new dress?”
Scary job
Applying non-skid sounded complicated and scary. However, a marina’s bid for a new painted grit surface was motivational (more than $5,000 for a 32-footer). Enter the highly recommended Don Casey library, particularly Sailboat Hull & Deck Repair. Perhaps instead of a new deck, I could use an overlay product and reduce the deck prep, knock down, and fairing required. The unknown to me was how well an overlay might adhere. And appearance was a concern as well. A Good Old Boat article showing Casey’s own boat (an Allied Seawind) with photos of Richard Cory’s deck where he utilized the Treadmaster overlay was encouraging (March 2002). Seeing the guru’s own choice for his very attractive boat sealed the deal.
The project summary is rather straightforward. The materials, including the overlay, the recommended glue (both can be purchased online from Marisafe.com or SailNet.com), sheet metal scissors, masking tape, brushes, box cutter, 4-foot ruler, disposable gloves, sandpaper, and some permanent markers was approximately $1,500 (excluding Scotch and cigars). The project took 29 hours in labor, plus two for planning. It also involved a much-needed helper (I recommend a soft-spoken brunette).
Treadmaster comes in 3-foot by 4-foot sheets and is directional. This is important. You will want to cut your largest pieces first and hope to make use of remnants elsewhere. But with the curvature of the deck area, sometimes even large remnants that remain after your first cut will not accommodate a smaller piece, due to the direction in the diamond pattern. This design feature forces some waste but creates a soft shadow in the grooves of the texture. Plan ahead; at more than $6 per square foot, it’s worth some paper and pencil lead to avoid wasted material.
Rough sketch
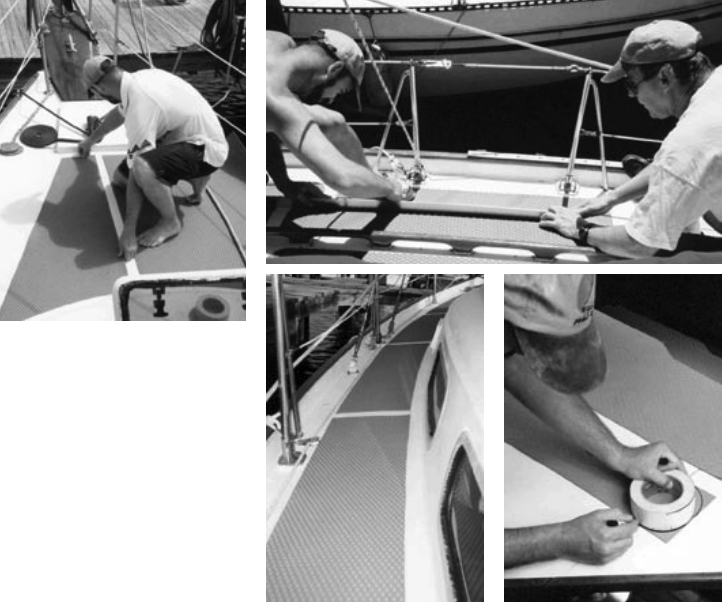
I measured for a rough sketch of my boat’s deck. Laying 4-foot rulers on deck fore and aft and photographing from the masthead is a real help. Keep in mind — both when making your deck sketch and later when cutting pieces — that boats look symmetrical, but aren’t; ours varies in places by more than an inch. I sketched various layout patterns (always allowing about 3 inches of extra material at the edges for error on sheet placements). I picked my favorite layout, cut scaled miniature templates, and placed them directionally on scaled 3 x 4 drawings of the Treadmaster sheets to calculate the number to order. I wanted to order all of the sheets at once, fearing dye lot color variation. However, when I needed one last sheet a few weeks later, a separate order matched exactly.
Once I had the material, I marked the centerline of my boat with pencil and began working with the real thing. I used a 2-inch relief between sheets and around deck hardware and a 1-inch relief along the curvature of the cabin. I found it best to work from the bow, where my biggest pieces and longest straight lines made use of factory-cut edges.
I considered Don’s recommendation to make kraft-paper templates to allow for marking on the flat back side of the pieces. However, I preferred to work directly with the material. On the first piece, I used a factory corner to start me off plumb. I placed it with the side edge along a marked pencil line 1 inch outboard of the centerline and its fore edge upon a perpendicular beam line as far forward as possible. When I kneeled on the piece in place, the Treadmaster would lay flat and curl up or roll over obstructions. It could be trimmed quickly with a box blade to within 1⁄2 inch of any obstruction or outer edges. Once thus trimmed and lying flat, the piece was now in position with two straight factory lines a given and only these rough edges needing a final trim. These could now be easily marked in pencil on the top side of the Treadmaster using the 4-foot ruler.
Angles and curves
Because the side decks wrap around the cabin, these pieces have no perpendicular corners; they are curved on two sides. To shape these, I used the top factory edge of the sheet (aligning it 2 inches aft of the tail of its neighbor) and trimmed the curved sides as closely as possible to the anticipated outer edge, once again achieving a piece with two original factory edges (fore and aft) without cuts and two sides that need trimming up to fit the side contour. I measured and marked my desired clearance from deck hardware or the toerail every foot or so on the top side of the sheet while it was in position. The aluminum 4-foot ruler, turned on edge and bent with three hands, made for a good tool to mark long slow curves.
When a piece was completely fitted, I left all corners square at first. This way there was more line area to aid positioning adjacent edges. Working aft from the first piece’s trailing edge helped keep the diamond pattern properly aligned with the spine of the boat. I suggest cutting the pieces for the forepeak and decks back to the cockpit before the cabintop and letting them be fully 4 feet long. This creates easy symmetry to establish relief breaks for your drain areas. Then you can plan the cabintop (likely busier with obstacles) to align with the pattern of relief gaps on the deck below. I made holes in the material to surround the Dorade boxes. However, for pieces requiring tricky convolutions I definitely endorse Don’s suggestion of a kraft paper template.
Once a piece fit properly and looked right, I outlined its position on deck in pencil and labeled the back in permanent marker with a code for position and direction, and I marked my drawing to act as a key. For example, “PC-1” for Port Cabin Top #1. Now the pieces could be stowed to allow for a quick sail. After labeling one, I would flip and test it as a template for its beam sister. It worked once or twice but not often.
Rounding corners
When all of the pieces were cut and passed an inspection, I chose a radius. The impact of radius cutting to round the corners is astounding. It hides errors between pieces. Too tight a radius will make cutting more difficult, leave an edge likely to dislodge over time, and be less effective in soft transition between lines. But too large will create gaps of exposed deck on acute angles. I went with the masking tape roll (about 4 inches diameter) for most everything. In about four key places I decided on a smaller radius (Scotch bottle — single malt) for a tighter clearance, but not where it would be adjacent to the larger radius cuts. I marked the material’s back side, finding it easier to cut curves looking at the unshadowed reverse side.
Preparing the deck is boat-specific. I decided to try sanding down and fairing the existing deck for a trial piece. One of the benefits of the goop paint job was how it adhered incredibly well and faired the previous non-skid. I’m sure there are some situations that would require total deck rehab, but part of my motivation was in hoping we could cover over the goop with minimal deck prep. After a knockdown and rough up with 60-grit paper, I vacuumed and wiped an area with acetone and tried a test piece.
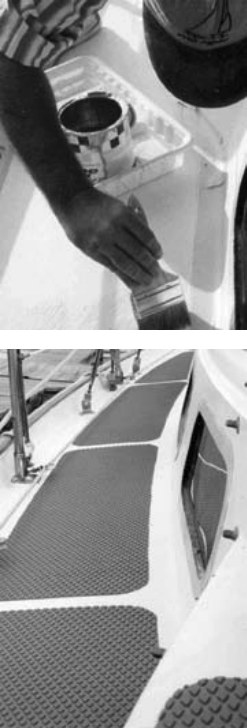
The glues recommended were either a two-part epoxy or a contact adhesive. I tried the latter, after testing it on a small area to ensure it would not emulsify the surface. I applied it according to the instructions to separate surfaces to be joined together, the back of the trial piece and the tape-masked deck area, allowing the glue to dry to a light tack before joining them. When working the glue, I tried a roller and a serrated trowel before learning to prefer a paint brush. It dried quickly to a medium tack. Remember that cheap latex gloves are your friends and also to avoid getting the glue on the surface side of the Treadmaster. Don’t scrimp with regular hardware-store vinyl contact adhesive. It is thinner and does not bond well enough to withstand the expansion/contraction of outdoor use with Treadmaster.
Gently rolling
When joining, some recommendations called for pressing a piece from the center outward to avoid air bubbles. I found this to be nearly impossible when dealing with long pieces, especially those along the sidedecks where access to the center is difficult. I had success with starting with a corner and gently rolling a piece into place. Air pockets were rare, but these were easily worked out with gentle squishing. A small roller would have been nice, but not essential, for pressing. Once in place, but before it has completely set, I gently lifted the masking tape to clear away any excess glue along the edges. Any mess remaining could be wiped easily with a dab of acetone-rich cloth.
Within minutes the material was down firmly enough to take weight. I then tested the entire edge of each piece in turn. Because of the previous paint, there were a few edges that let go and curled up. On these, I peeled back the weak edge, gave a quick Q-Tip surgical insertion of glue, and resealed it. In less than an hour, the glue had firmly set, leaving only sanding the relief areas and patching any blemished paint to finish the job.
If your boat has a bad deck, I warmly recommend this project. Practical Sailor’s February 1, 2003, issue compares the optional materials for painted and glued-on non-skid treatments and selects the Treadmaster overlay as best. The manufacturer’s website discusses industrial manufacturing situations that indicate its durability. I have found it to be supple and incredibly effective as a non-skid surface. It will cause waffle knees but is comfortable on bare feet and does not rip clothing. Also it does not get unbearably hot in the sun (color-dependent, I’m sure). The change in the Wind Ketcher packs a wallop in appearance and safety. Before now I have never hung wallpaper or laid vinyl material.
Once in a while, it pays to buy a lady a new dress.
Postscript
While skirting a minor thunderstorm in Tampa Bay, Gil and I suffered a broken bobstay under full headsail. The genoa ripped the pulpit, forestay, lifelines, and anchors away to leeward. To save the rigging, I was required to spend time on Wind Ketcher’s naked forepeak with the bow bucking in whitecap chop and 20-knot-plus winds. For more than 10 minutes I needed both hands to lash down the offensive broken rigging. The safety of the vinyl overlay came home to me then. Gritted sand surfaces or textured fiberglass factory non-skid areas are no comparison. The Treadmaster was soft and gooey against my deck shoes, even while wet and with a hostile bow motion. Here was a real safety test. I could not have stayed aboard and done the job without it.
Thank you to Sailrite Enterprises, Inc., for providing free access to back issues of Good Old Boat through intellectual property rights. Sailrite.com