Homemade bearings make launching easier
Issue 53 : Mar/Apr 2007
Sometimes on improvement creates an opportunity another. To make it easier to launch my Com-Pac 16 when the tide is low, I installed a tongue extension on the trailer. To ensure that the tongue extension would be strong, I made it from a 2 1⁄2-inch square galvanized steel tube with a 1⁄4-inch wall thickness. The 10-foot section weighs more than 70 pounds.
The tongue extension functioned exactly as I had hoped . . . except for one thing. It was sometimes quite difficult to slide it out for launching and retrieval, and it was almost as hard to slide it back in for travel.
I determined that, because both square tubes were straight and there was ample clearance between them, surface friction between the somewhat rough and irregular outer surface of the galvanized tongue extension and the inside surface of the outer tube was the problem.
My solution to the friction problem came from a section of the Fiberglass Boat Repair and Maintenance booklet from Gougeon Brothers, Inc., the makers of West System epoxy. It describes the use of resin thickened with graphite and colloidal silica to create a new bearing surface to repair worn rudder bearings.
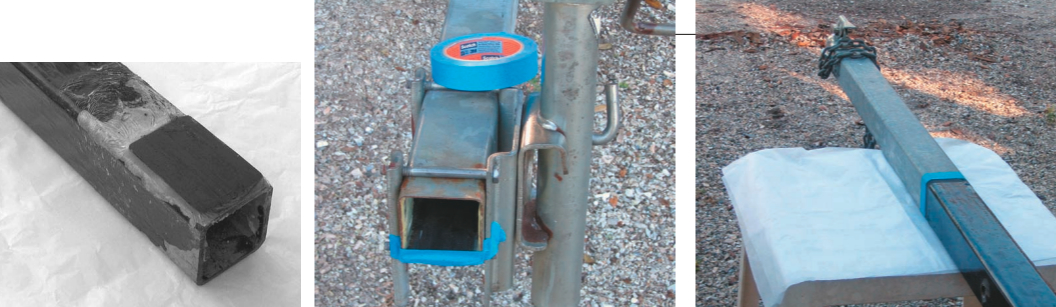
With that in mind, I first removed the tongue extension from the outer tube and cleaned it with acetone to prepare the surface. Then I mixed up a batch of epoxy resin that was slightly thickened to a “catsup consistency” with a mixture made of equal parts colloidal silica and graphite powder. The graphite powder was there to reduce the friction, and the colloidal silica was there to improve durability and resistance to abrasion. Then I painted the galvanized tongue extension with the thickened resin. When finished, the resin-coated tongue extension had a smooth and shiny black surface.
Resin bearing
While the resin on the tongue extension was setting up, I turned my attention to the outer tube. My plan was to make a resin bearing surface on the bottom face — on the inside of the outer tube near the front end — to allow the tongue extension to glide smoothly in and out.
To accomplish this I put some tape across the bottom of the open end of the outer tube so that it made a little “dam” to prevent the mixture from running out. I mixed a smaller batch of resin and added the same mixture of colloidal silica and graphite powder. This slightly thickened resin mixture was then poured into the outer tube using a paper tube as a funnel and allowed to “self level” behind the tape “dam.” The bottom inside face at the front of the outer tube now had the same smooth shiny surface as the tongue extension.
When I inserted the tongue extension into the outer tube, there was a definite reduction in the amount of effort required to move it in and out.
However, I noticed that when I pulled it out beyond halfway, the weight of the tongue extension caused it to shift, like a teeter-totter, so that the inside end of the tongue extension was pressed upward and there was contact between the top surface of the tongue extension and the inside of the outer tube. When that happened, there was more friction, and the effort required to slide the extension out increased considerably. To reduce this unwanted friction, I decided to make a bearing surface of resin and graphite for the point of contact between the top of the tongue extension and the inside of the outer tube.
Mold for bearing
I found a plastic package, 2 1⁄2 inches by 3 inches, to use as a mold for the bearing. I waxed the inside of the plastic tub and placed a piece of fiberglass cloth in the bottom. Next, I mixed another small batch of the same resin, colloidal silica, and graphite and poured the mixture into my mold to a depth of just over 1⁄16 inch.
After the resin had set, I removed the new bearing from the mold, cleaned off the wax that was used for mold release, and bonded it to the top side of the tongue extension.
When the resin bonding the new bearing to the top of the tongue extension had set up, I reinserted the tongue extension into the outer tube. The difference was amazing. It can now be moved in and out very easily. It was almost as if it were on ball bearings.
Only time will tell how long the bearing surfaces will last. However, because it works so well and because it was so easy to do, I will not hesitate to redo the job when it becomes necessary in the future.
The total cost of this project was approximately $10 and it is well within the capability of anyone who can stir a cup of resin.
Thank you to Sailrite Enterprises, Inc., for providing free access to back issues of Good Old Boat through intellectual property rights. Sailrite.com