Bonding teak veneer to plastic cabin sides
Issue 58 : Jan/Feb 2008
Lovers of classic sailboats would agree that a teak coach house is a beautiful sight. However, as time has progressed and cookie-cutter fiberglass boats have become the norm, teak (and the upkeep it requires) has disappeared like a ship going over the horizon.
There are still a few with fiberglass classic boats who love a teak-sided coach house. They don’t mind the upkeep associated with it, believing that the beauty of teak far outweighs the winter upkeep required to keep it looking new. One of these sailors is Richard Charette, a friend of mine. I have been working with Richard on the restoration of his 1984 Sea Sprite 30, Panache.
Obviously, rebuilding the coach house, or siding it with teak planking, is not an economical way to create the classic look. Teak veneer, with its workability, became an economical alternative, but what would be the best way to bond veneer panels to the sides of the coach house? The answer: vacuum bagging. This process is, in our opinion, the easiest method of clamping irregular or large laminates and veneers. The ability to clamp irregular shapes makes vacuum bagging the logical choice for bonding veneers. It also works well if you’re considering adding teak strips to your cockpit seating area.
What is vacuum bagging?
The process of vacuum bagging uses a polyethylene/polyurethane sheet to apply pressure to the materials beneath it. This is made possible by sealing the poly to the surface to be bonded to with an airtight material called tacky-tape, a mastic-type sealant, which is very pliable, easily shaped and cut, and can be removed cleanly.
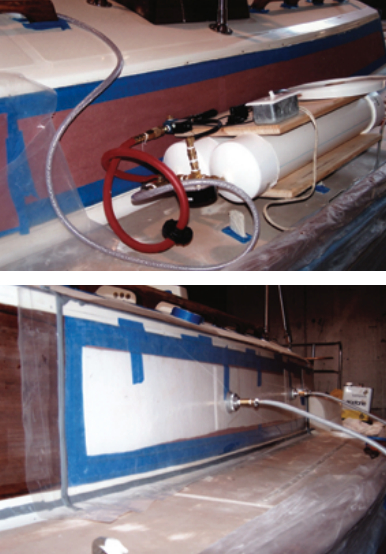
The perimeter of the area to be bonded is outlined with tacky-tape, and then the poly is sealed to the tape, while taking care to press the poly as smoothly as possible, thereby creating an air-tight seal. The heart of the system is the vacuum pump or generator. The pump supplies vacuum to the poly by means of a manifold, a two-sided disk with a seal in between that, when connected on both sides of the poly, creates a port for the vacuum line from the pump to be connected. Then it evacuates the air inside the poly and creates an even surface of clamping pressure. This whole process is best visualized as a “seal-a-meal machine” for clamping. When you remove the air from the inside of the bag, the atmospheric pressure squeezes the outside.
For our teak veneer project, we first removed the teak trim on the top outside edge of the coach house, then filled and faired all screw holes with thickened epoxy. As the trim was replaced, and we were installing the mounting screws in different locations, the need to have the mounting surface air- tight (watertight) necessitated filling the old holes.
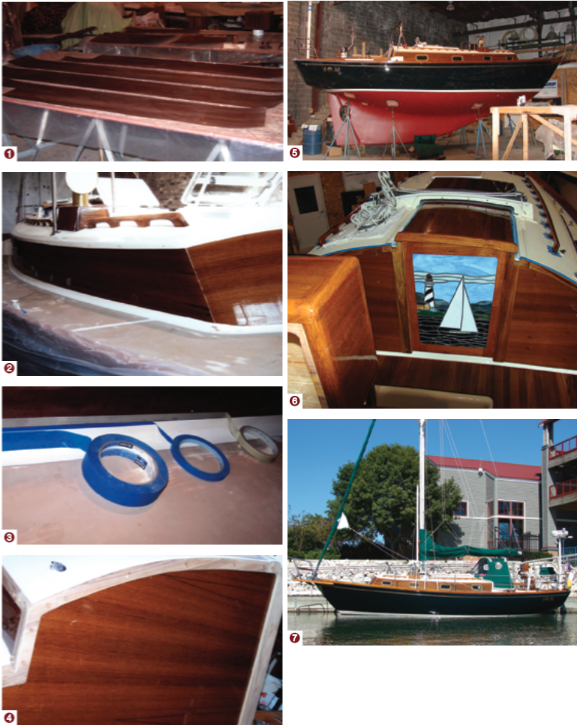
The next step was to lay out the shape of the veneer. For this, we applied common contact paper (wood-grained shelving paper) to the cabin sides, lining up the top with the old screw holes and trimming the bottom edge by marking the contact paper with a magic marker, using a template made to follow the same radius up from the inside line of the deck non-skid. Once the final shape was established and cut on the contact paper, we removed it and transferred it to sheets of cardboard of a like thickness of the veneer.
Transferred the shape
We then did a dry-fit of the cardboard, doing any final trimming, taping off the outside edge, top and bottom. Then we removed it from the boat and prepared to transfer the shape to the teak veneer. One of the tricky parts of this project was lining up the templates on the veneer to best use the materials while still keeping the grain pattern running straight. The cabin side has a curvature as it goes in, going forward, and it also curves up so the panels don’t just lie flat. Once all veneers were laid out, I cut the material using heavy-duty scissors. Then I sanded the lower edge and butt joints and coated all veneers with System Three Clear-Coat epoxy resin.
After the epoxy cured, we taped the outside edge all around and covered the veneer with rosin paper. We taped a layer of breather fabric, a felt-like fabric that allows air to be pulled out evenly beneath the bag, onto the paper-covered veneer panels.
As we had already taped off the outside of the templates, it was time to prepare the cabin sides to which the veneer panels would be bonded. We wiped down all surfaces with acetone, sanded them with 80-grit paper, then wiped them down again. The tacky-tape was then applied around the outside of the taped-off area of the cabin side. Due to the length of the panels, we bagged one at a time (two panels on the port and starboard side, one on the bow, and one on each side of the companionway, see photo, top right). We paid special attention to the areas over portlight openings. The ports had been removed for polishing, so the openings had to be sealed from the inside. We used 1⁄4-inch plywood cutouts to fill the ports and applied tacky-tape along with the poly to accomplish the seal.
Adhesive filler
The veneer panels and cabin side were then wet-out with epoxy and allowed to “tack-up.” Then we rolled a light coat of resin with adhesive filler on the panel. The panel was then carefully set in place, held by 2-inch tape tabs at the top. The poly sheet with the manifold installed in the center was evenly placed over the panel being bonded, and the outside of the poly was pressed firmly onto the tacky-tape.
The seal is of utmost importance. Without a good seal the pump will not be able to fully evacuate the air inside the bag. When the poly bag is sealed up, the pump (vacuum generator) is turned on and the vacuum is applied. At this time, the poly bag will be pulled against the cabin side, squeezing the veneer in place. Now is the time to make sure that the veneer is positioned exactly. We marked the placement by making marks on the tape around the outside edge of the veneers and then placing tape outside the panels on the cabin side. When everything was positioned properly, we checked the bag for leaks. This is best done with a stethoscope, listening for the hiss of air being pulled into the bag. All leaks must be sealed, so one must force small bits of tacky-tape into any voids that may be leaking. The edge of the plastic can also be taped down. When all leaks are sealed, one must leave the vacuum applied until the epoxy is cured. We repeated this procedure with each panel.
New veneer revealed
The moment of truth comes when the bagging is completed and the masking paper is removed, revealing the now bonded teak veneer. As Panache was also getting a new Awlgrip paint job, the veneer was finished off on the bottom edge by first taping the veneer, then laying down a strip of 1⁄4-inch fineline tape, with a strip of 1-inch tape below that (see photo on facing page). After the three runs of tape were laid down, the 1⁄4-inch tape was removed, leaving a space that was filled with thickened epoxy in a radius cove shape, with the help of a rounded pallet knife. It was allowed to cure, then the epoxy cove was sanded fair and the Awlgrip was applied. This created a smooth transition area on the bottom edge of the veneer. The top edge was treated to a new teak trim all around (back side of trim recessed to fit over veneer) and the butt-joints, forward and aft corners were trimmed out. Once caulked, the veneer was sealed from water intrusion. Then we cut out the portlight holes using a Roto-Zip tool and the veneers were ready for more than 10 coats of Interlux Schooner varnish.
The final result is stunning and sure to turn the heads of those who fancy the beauty that only a teak-sided coach house can provide. The process itself is rather easy, but like everything in life, it’s the planning stages that ultimately help to deliver a quality finished product.
Scott Senkbeil has messed around with boats since boyhood, sailing and fishing on Lake Michigan and inland waters. In 2003, he started a yacht restoration business,S.S. Marine. He resides and does buisness in Sheboygan, Michigan.
Thank you to Sailrite Enterprises, Inc., for providing free access to back issues of Good Old Boat through intellectual property rights. Sailrite.com