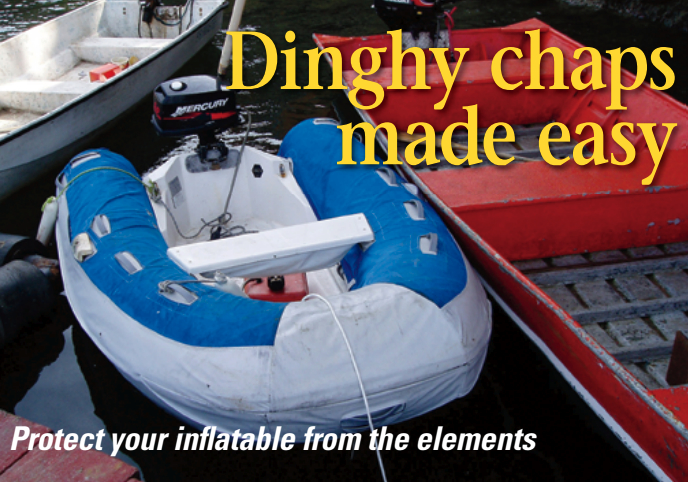
Protect your inflatable from the elements
Issue 63 : Nov/Dec 2008
Inflatable dinghies, sport boats, and roll-ups are the most common types of cruising boat tenders in use today. Their popularity is related to the fact that they can get up on plane and cover great distances when driven by large outboard motors. Their large inflatable tubes also make them inherently stable, allowing for easy entry from a boat, a dinghy dock, or the water after snorkeling or diving. Many inflatable dinghy design options allow for stowage in a small space on deck or in cockpit lockers
Most inflatables are constructed of fabrics coated with Hypalon (chlorosulfonated polyethylene) or polyvinyl chloride (PVC). Hypalon dinghies are much more resistant to the sun’s ultraviolet (UV) rays and abrasion than PVC.
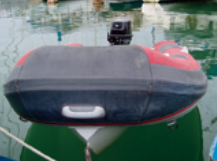
Yet all inflatable sport boats that are used regularly will eventually suffer from UV exposure, especially when used in the tropics. To preserve these inflatable tenders, it is necessary to cover them with chaps constructed of a durable, UV-resistant fabric.
UV protection is the main reason for chaps, but there are other benefits as well. A cover will also protect the inflatable tender’s rubber structure against abrasion and dirt from dinghy docks, hulls, and fuel spills. In addition, because rubber surfaces of inflatables get extremely hot in the tropical sun, a cover constructed of an appropriate material will protect passengers from discomfort or burns. Deteriorated rubber tubes can also become very sticky, leaving ugly, dirty stains on anything they touch. Maybe the best reason for dinghy chaps, from a practical standpoint, is that they allow for the incorporation of pockets for dinghy anchors, personal flotation devices, hand-held VHF radios, flashlights, and other gear.
The many inflatable boat designs available on the market today have made it impossible for mass production of dinghy chaps, so construction of a set of chaps is a custom project. Your favorite canvas shop will accommodate your needs and you’ll get a wonderful product, though prices vary widely. We think the better option for budget-minded cruisers with modest skills is to make their own dinghy chaps. All you need is a sewing machine, a few supplies, and a little time and patience.
Note: many cruising friends have used tapicerías (upholstery shops) in Latin America to produce an acceptable set of chaps at a modest cost. Others weren’t so pleased with the results, so if you choose this option, ask for cruiser references before committing to purchase.
Choosing materials
Pattern – You need clear, non-porous, low-stretch plastic patterning material (polyester) with enough thickness to maintain shape when tugged snugly and taped down. Clarity is critical because details for the location of seams, cuts, hems, and cutouts are drawn directly on this pattern and pattern pieces can be overlaid to match seams and create a tailored fit. In Latin America, we have found suitable materials in convenient widths up to 10 feet at modest prices (27 to 70 cents per foot) in upholstery shops and hardware stores.
Cover – Choose a cover material that provides maximum UV protection. It is also important that the material is easy to work with, is water- and stain-resistant, and won’t become slippery when wet. Lighter colors are preferable since dark colors absorb more heat and can be hot to the touch, though bright white can create uncomfortable glare in the tropical sun. A solution-dyed acrylic material, such as Sunbrella, is a perfect choice. However, materials as diverse as cotton/polyester blends and waterproof denim have also been used successfully. Another option is Vivatex, also known as Sunforger, which has a nice soft hand and is easy to work with. If expense is an issue, generic solution-dyed acrylic materials are available, although we’ve observed that the water resistance of these materials is poor.
Thread – A high-quality UV-resistant thread in appropriate weight is necessary. Bonded polyester in V92 weight (or B92 depending on manufacturer) is commonly used with fabrics such as Sunbrella. We prefer to use white thread for all applications, but many colors are available.
Chafe guards – For reinforcement and edge finishing of details such as handholds, inflation ports, or oarlocks, use premium marine tanned leather or a heavy exterior-grade vinyl. Leather is more durable but more expensive and difficult to work with.
You may also wish to use leather or vinyl to finish the exterior of cutouts in combination with a less expensive material, such as Shelter-Rite or reinforced dry bag material, to finish the interior. Webbing may also be used for finishing edges of cutouts, but use only nylon or polyester webbing for maximum life; polypropylene webbing (the type commonly used for sail ties) will disintegrate quickly in the sun.
Also beneficial to long service of dinghy chaps is the incorporation of a generous chafe guard completely around the outside to prevent damage to chaps from dinghy docks and barnacle-encrusted pilings. Exterior-grade vinyl or wide heavy webbing may be used for this purpose.
Tube ends aft – For tube ends aft, you may also need a swatch (approximately 1 yard) of open-weave synthetic mesh material, such as the vinyl-coated polyester, Phifertex. Mesh allows water to escape when the dinghy is under way prior to getting up on plane. Otherwise, water may be caught under the chaps and inhibit forward progress.
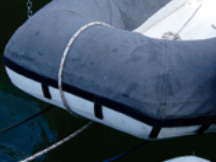
Securing chaps to the inflatable – You may use spur grommets (attached with die and installation tools), snaps (cloth-to-cloth or cloth-to-surface), webbing and side-release buckles, or- Velcro or shock cord (for the external hem), depending on your design. Most cruisers utilize a shock cord or line that runs through a channel around the outer perimeter of the chaps to secure the chaps to their dinghies.
Taking measurements
Minimum material width – With the dinghy in the water and loaded normally, measure the circumference of the inflated tubes from the waterline, up and around the tubes, to the desired hem height inside. Then add a minmum of 6 inches to the measurement to allow for hems. This will determine the minimum width of patterning and cover materials required for your project.
Estimating pattern material – Measure the total length of the dinghy’s tubes around the outside of the dinghy at its widest point. If the dinghy has a rubrail that stands proud, this is a good place to measure. Purchase a length of pattern material (of suitable width) that is at least 75 percent of this length. For example, if the total outside dimension of the dinghy at its widest point is 22 feet, purchase a length of pattern material that is at least 5 yards (15 feet). The reason that you do not need a full length of pattern material is that mirror-image panels of the dinghy can be cut from the same pattern piece, so only the bow panel and the panels of one side require a pattern.
Estimating cover material – For cover material, take the total length of the dinghy’s tubes (as determined for the pattern material) and add approximately 50 percent to determine the overall length of cover material needed. For our theoretical dinghy that is 22 feet around at its widest point, a minimum of 10 yards (30 feet) of material length should be purchased. This generous amount of cover material will allow for proper alignment of fabric pieces to avoid bias stretch, to account for cutting errors, and for construction of accessories such as pockets, plus a bit of extra material for future patches in high-abrasion areas.
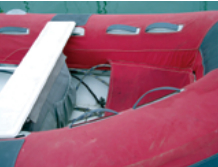
Estimating finishing supplies – For finishing edges of cutouts for oar-locks and towing lines, measure each cutout, then add 4 inches to the length and 4 inches to the width to allow for borders. Convert this area measurement to square inches and double this value to determine the minimum amount required in square inches. We advise purchasing 30 percent more of the material than this calculation to account for cutting or sewing errors, plus additional or future abrasion patches. This amount of material will allow for reinforcement patches on both sides of the cover material at each detail. Note: a yard of 45-inch material consists of 1,620 square inches (36 inches per yard multipled by the 45-inch width).
To add a perimeter chafe guard, add a quantity of reinforcement material that is approximately 6 inches wide times the total length of the outside dimension of the dinghy, plus a 1-inch seam allowance for each seam. For our theoretical dinghy with an outside dimension of 22 feet (264 inches) and reinforcement material that is 60 inches wide: 264 inches/60 inches = 4.4. Therefore, five pieces that are 6 inches wide by 60 inches long, joined by 5 1⁄2-inch seams, would be sufficient. This would be 7⁄8 yard of 60-inch-wide material. If you are using wide webbing for this purpose, 7 1⁄2 yards would be sufficient (264 inches/36 inches per yard = 7.33).
Tube ends aft – Regardless of the size of your dinghy, a yard of mesh material should be sufficient.
Other supplies – To facilitate the patterning process, make sure you have a roll of high-quality duct tape, sharp scissors, and a set of water-resistant markers in at least three different colors. Note: markings made with green markers have, for some unknown reason, faded very quickly.
You will also need a stiff ruler, available from sewing stores, or a small 6-inch hand-held steel ruler with an adjustable sliding reference point (Snap-on Tools, ruler 602; also available at fabric stores), which allows for more rapid and accurate marking of seam allowances. A plastic bucket is also useful for carrying these items and for holding small pieces of cut duct tape prior to their use.
Making a pattern
Accurate patterning of the tubes is critical. Some tailoring is generally necessary after the panels are assembled, but an accurate pattern will reduce the effort necessary for final fitting.
Assemble a team of at least two others to help you make your pattern. Bring your dinghy to a place where you and your helpers can easily walk around and climb inside it. Select a cool, calm day since strong afternoon breezes make working with plastic pattern material a challenge and the hot sun can make duct tape sticky and messy.
For inflatables with blunt bows, make a pattern for the bow section and only one side since the dinghy’s structure is symmetrical and side sections are mirror images. So both sets of side panels may be cut from one set of patterns. Inflation ports and other features may not be present on both sides of a dinghy, but cutouts for these may be incorporated into the cover at a later stage in the construction.
For dinghies that are configured with a point joined by a seam at the bow, begin at the bow seam and pat-
tern each tube section on either the port or starboard side. As with a blunt-bow dinghy, one set of plastic patterns can be used to cut mirror-image pieces for the other side.
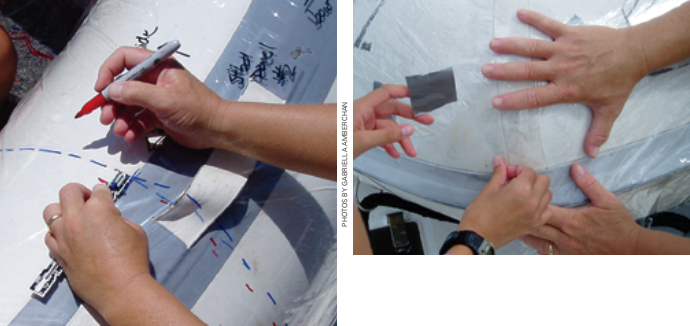
Beginning at the bow, cut a piece of pattern material roughly the shape of, but much larger than, the bow section. Begin by laying this on the bow and taping it to the rubber dinghy tubes with small (roughly 2-inch) pieces of duct tape. This is the most difficult pattern piece to make. You will do quite a bit of manipulation before you get it placed where you want it. The goal is to mimic, in this plastic, the individual tube sections of your dinghy from inside at deck level, completely over the top, and down to the waterline. As a design feature, you may also wish to consider securing the chaps at the bow to the tow ring using a strap or an additional piece pattern. You should make this decision before determining the cut line of the bow-section panel.
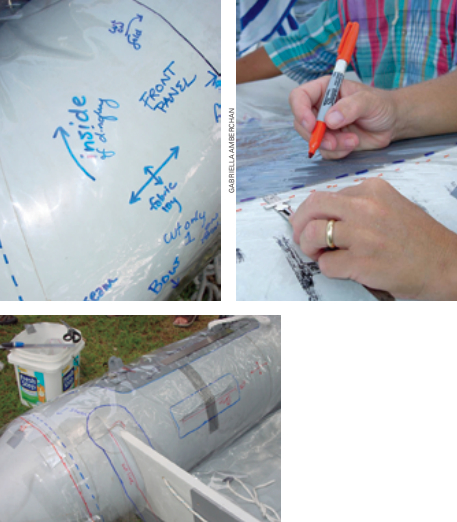
Provide for a wide margin (3 to 4 inches of pattern material) for the overlap onto adjacent sections of tube. Excess material can be cut away later. Fold back areas of excess pattern material, and cut slits, if necessary, for details such as handholds. The trick is to lay the pattern plastic flat.
Note: if it seems impossible to lay a pattern piece flat over the entire surface of a blunt-bow section, it may be necessary to pattern exactly half of the bow section. When it comes time to cut your fabric, you will lay this half-pattern on a folded edge of fabric (a doubled piece of fabric) during cutting to acquire a full piece.
Next, label the pattern piece with helpful hints such as the name of the piece (e.g., “bow section”), orientation (using arrows to indicate starboard, port, inside of dinghy, bow, or stern), and a large cross to show the linear lay of the fabric for layout. Also note on the pattern material how many of this particular panel you will cut: one only or two as mirror images.
Using a different colored marker, begin making a dashed line on the pattern material down the center of the boundary between the bow section and the adjacent section. This will be your seam line, so label it as such. Note the marker color you have chosen for seams and always use this color for drawing seams. Once seams are drawn, take a ruler and yet another color of marking pen, then mark on the pattern material the seam allowances 1⁄2 to 1 inch outside of the seam lines. Label these as cut lines. Use that marker color only for cut lines.
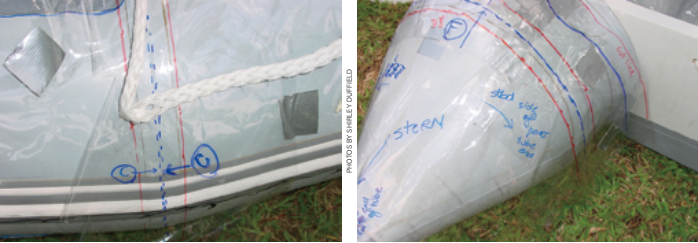
To align where panels intersect, use letters and arrows to indicate the meeting point, A to A or B to B and so on, writing the first matching letter on one piece and the second on the adjacent piece exactly where the pattern pieces match. We cannot emphasize enough the importance of information written directly on pattern pieces since, once removed from the dinghy, the pattern pieces by themselves become a difficult puzzle.
Next, outline design details (safety lines, oarlocks, filler caps, seat supports) that require cutouts, and label them appropriately in yet another color of pen. Also note whether the design element is present on both sides (port and starboard) of the inflatable. Make slits or holes in the pattern to accommodate elevated design elements while allowing the pattern material to lie flat. Optionally, tape another piece of pattern material over the panel pattern and trace on it the outline of the reinforcement patch. This creates a separate pattern for leather or vinyl reinforcement pieces. Note on the pattern the border of reinforcement or abrasion patches you will add to your chaps.
Next, climb inside the dinghy, tug the pattern material snugly, and mark the inside hemline in yet another color marker. Depending on your cover material, you can then determine how much you need to allow for a hem. Materials such as exterior vinyl may not require hemming, while Sunbrella requires a generous hem or edge finishing to avoid unraveling. For Sunbrella, 4 inches is generally sufficient. Measure and mark the cut line below your hemline in the color of pen you have designated only to be used for your cut lines.
To complete this panel’s pattern, step outside the dinghy and determine the outside chap border that best suits your dinghy’s design. If you have a rubrail that stands proud, this feature offers a natural boundary. Allow at least 4 inches of fabric below this desired outside border for your cut. Measure and mark your cut line.
Without removing the pattern you just created, move down the port or starboard side of your dinghy to the next panel, lay pattern material over the next section, roughly cut a piece that completely covers this next panel (inside floor to outside at the waterline), and generously overlap the panel you just made. Cut, fit, and tape this pattern material until it is flat and secure, making sure you have not affected the location of the first panel pattern. Give this panel a name and generously label the piece with helpful hints about orientation, again using arrows (to indicate such things as port, inside of dinghy, bow, and stern), then generate a large cross to show the linear lay of the fabric. Indicate mirror images, if appropriate.
Through this new pattern piece, you will see the seam line you drew on the first pattern piece at the intersection of this panel and the adjacent panel. Using the color marker you selected for seams, trace the seam line of the first panel onto the new pattern piece. Label the seam line. Then, using a stiff ruler, measure and mark the seam allowance (1⁄2 to 1 inch beyond the seam line) in an appropriate marker color, and overlap the first panel. Label this as the cut line. Measure and mark for inside and outside hemlines and cut lines as described above.
Continue this sequence for all tube sections of the dinghy, leaving all pattern pieces taped in place while you work. Continuously check pattern piece alignment to prevent shifting during the manipulation. When you reach the transom, place a vertical slit in the pattern material to accommodate the transom’s thickness. This allows you to continue this panel beyond the transom to its natural boundary. This slit will require reinforcement with vinyl or leather material.
The final panel, at the stern end of the inflatable where the tubes narrow to a rounded or pointed end, is best constructed of an open-weave material, such as Phifertex. Create a cone shape in the pattern material (including the seam allowance to the adjacent cover panel) with a snug-fitting cap that can be secured with shock cord or strapping. Don’t completely encircle the end piece since it may catch water while under way.
Finally, if you wish to create patterns for the vinyl or leather abrasion patches, make them by layering and taping pattern material over the panel patterns while the panel pattern is still taped to the inflatable.
Before removing the pattern from the dinghy, walk around the whole thing and confirm that every seam, hem, cut, and dinghy design detail is labeled. Then, beginning at the last pattern piece you made, gently lift the duct tape from the dinghy and fold the excess tape under the edge of the pattern piece. Do not try to remove the duct tape from the pattern piece. Lift the pattern pieces and gently fold them.
Creating the layout
Trim all pattern pieces of excess material but avoid cutting away any labels you made. Place your cover fabric on a flat surface and lay out all your pattern panels (except the end caps, if they are to be made from a different material), making sure to follow the guides you made for pattern orientation relative to the linear orientation of the fabric. Mirror-image pieces may be cut from a double thickness of cover material. However, if the material has dissimilar properties top and bottom, the like sides need to be facing each other to create mirror-image panels. Generously staple or pin the plastic pattern panels to the fabric and carefully cut out along your cut lines. (If you’re using a fabric such as Sunbrella, seal the cut fabric edges with a hot knife.) Using pins or a long-arm stapler (available at office-supply stores) facilitates cutting panels from the pattern. Leave the pattern pieces attached to all pieces of cut fabric until assembly.
Cut reinforcement pieces from leather or vinyl, two per detail to allow for reinforcement of both sides of the fabric. You may use leather or vinyl on the outside and a reinforced rubberized material on the inside.
Assembling the chaps
Preparation – Adjust your sewing machine tension by sewing test scraps of cover material fabric in a thickness that represents the thickest layers your project will require. Consider replacing your machine’s needle with a new one and using specialty cutting needles (such as Schmetz DI or SD1) for leather or vinyl detail-reinforcement material.
Panels – Begin with the bow section or sections. If your bow is constructed as part of two mirror-image side panels, join these panels by sewing them together at the bow. Then proceed to the next set of panels. A double row of stitching will ensure long seam life. After each set of panels (port and starboard) is sewn to the previous pieces, test-fit your unfinished chaps on the dinghy. It is easier to fix major mistakes while the assembly is in progress.
Tube ends aft – After all panels are assembled but not yet hemmed, add the tube end caps of mesh material. Rounded tubes may have a darted end piece, while pointed tubes may require an open-ended design. Either way, this piece may require the greatest amount of creativity to achieve a snug fit. Phifertex and similar mesh fabrics are easy to work with and may not require hemming, so if you are not satisfied, reworking of tube ends is not onerous.
Reinforcement patches – Assemble all panels, including mesh-material tube end pieces, before adding any detail reinforcements since a slight shifting of location can occur. It will likely be necessary to cut an X-shaped opening in the cover fabric to accommodate oarlocks, rings, fill ports, and other details.
After all the pieces are assembled and fit to your satisfaction, cut the final openings for cutouts using a hot knife, and sew on reinforcement patches. Stapling or pinning leather or vinyl reinforcement pieces to fabric is preferred but gluing is also possible. Be careful: excess glue will permanently stain dinghy chaps. Working with leather or vinyl can be tricky, as it may not move easily through your sewing machine’s feed dog mechanism. To mitigate this problem, sandwich waxed paper or plastic bag material above and below the material and reinforcement pieces during sewing. The paper or plastic can be torn away later.
Hems – Once the pieces are assembled and reinforcement patches have been added, measure and pin or staple the inner hem. Unless you finished your fabric with a hot knife, a double hem is advisable for woven materials such as Sunbrella, though webbing may also be used to finish raw edges. You could also use a zigzag stitch around unfinished fabric edges before sewing the hem.
Chafe guard – If you wish to incorporate a sacrificial chafe guard around the perimeter of your finished chaps, add this before completing the outer hem. A wide strip (approximately 6 to 8 inches) of exterior-grade vinyl, sewn with its lower edge along the desired exterior hemline and abutting the tube end caps, is perfect for this application. Once this piece is in place, finish the outside hem.
Exterior hem – It is common to incorporate a piece of shock cord or line into the exterior hem to allow the chaps to be secured to the dinghy, particularly at a pronounced rubrail. The location of the channel to contain this shock cord or line will have to be determined by fitting the chaps to the dinghy.
Sewing shock cord or line into the channel during assembly is easier than trying to pull the cord through the channel after sewing. Add large grommets to the outside of the chaps to allow the shock cord to exit the channel and to facilitate shock-cord adjustment once the chaps are completed.
Extras – A splash guard or a covered pocket at the bow creates a convenient place to stow water-sensitive equipment (such as cameras and phones) and towels, plus anchors, chain, cables and locks. Interior pockets may also be designed to carry equipment.
Enjoying your handiwork
May your new dinghy chaps protect your inflatable tender from damage by sun, chemicals, fuel, and abrasion!
Leslie Linkkila and Philip DiNuovo, cruising sailors since 1991, dreamed for years about sailing out of the executive fast lane. In 2003, they and their cat, Jake, moved aboard their Mason 33, Carina, and cast off their docklines in Kingston, Washington, on an open-ended international voyage. Their experiences have made them strong proponents of cruisers helping other cruisers, as shown by the hours spent on their sewing machine. And although they have helped many cruisers construct dinghy chaps (and repair canvas and sails), their own tender, ironically, is a stitch-and-glue nesting dinghy, the second they have built themselves.
Thank you to Sailrite Enterprises, Inc., for providing free access to back issues of Good Old Boat through intellectual property rights. Sailrite.com