Better backing plates restore rigidity
Issue 108: May/June 2016
When a concentrated load is applied to a structure, that load must be distributed widely enough that the surrounding structure is not overloaded. Clew patches on a sail are a visible example. Sailmakers add extra layers of cloth to carry the point load at the clew, and reduce the number of layers as they move away from the corner so the load per layer will be relatively constant. Sailors likely assume that the builders of their boats took the same precautions when mounting hardware on their decks, but that is not always the case, as we learned on a recent cruise when seemingly well-mounted winches on a well-found boat began to wiggle after 18 years of use.
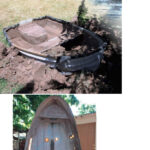
Years before, we’d experienced a failure with a winch mounted by the boat’s previous owner (PO). While three of the cockpit winches were located on purpose-laid solid fiberglass pads, the fourth, as we discovered, was mounted on a cored section of the structure with only lock washers under the nuts and with no fender washers or even plain washers to spread the load. Knowing this, perhaps the PO had avoided using this winch for the genoa. I loaded up the sail on a breezy day and the winch nearly flew out of the deck.
After transferring the load to another winch, I removed the leaning winch to a safe location below. Repairs ultimately required dropping the overhead, replacing the core with solid material, and laying up a new inner skin. We added a backing plate (of the same material as described in this article) and it has since given no trouble.
Repeat performance
Our surprise, however, came years later, when one of the secondary winches, mounted in solid glass at the factory, began to wobble. Blasting to windward in a nice small craft advisory on the first day of a short cruise, we noticed the winch was lifting 1⁄16 inch clear of the deck and that spider cracks, originating at the bolts but previously hidden under the winch skirt, were suddenly growing. What had changed? It may have been the result of years of wear and tear, but it’s more likely the increased load imposed by a new inside genoa track made the difference. In other words, an upgrade we made resulted in increased loads, and there were consequences.
I tacked to relieve the pressure and realized the other secondary had the same symptoms. I routed the sheet to the primary and limped to our destination under reduced sail.
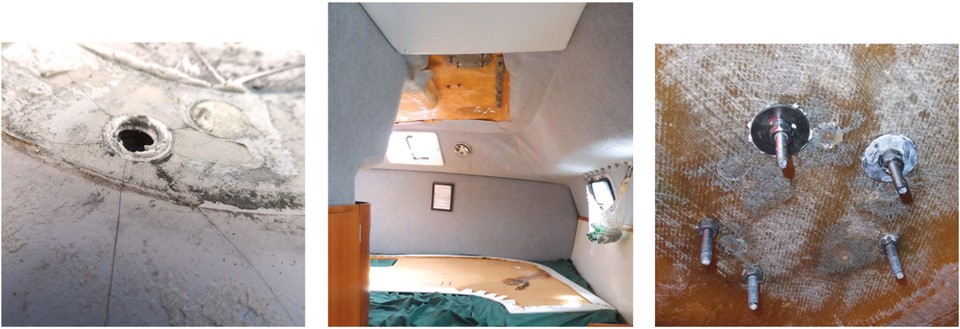
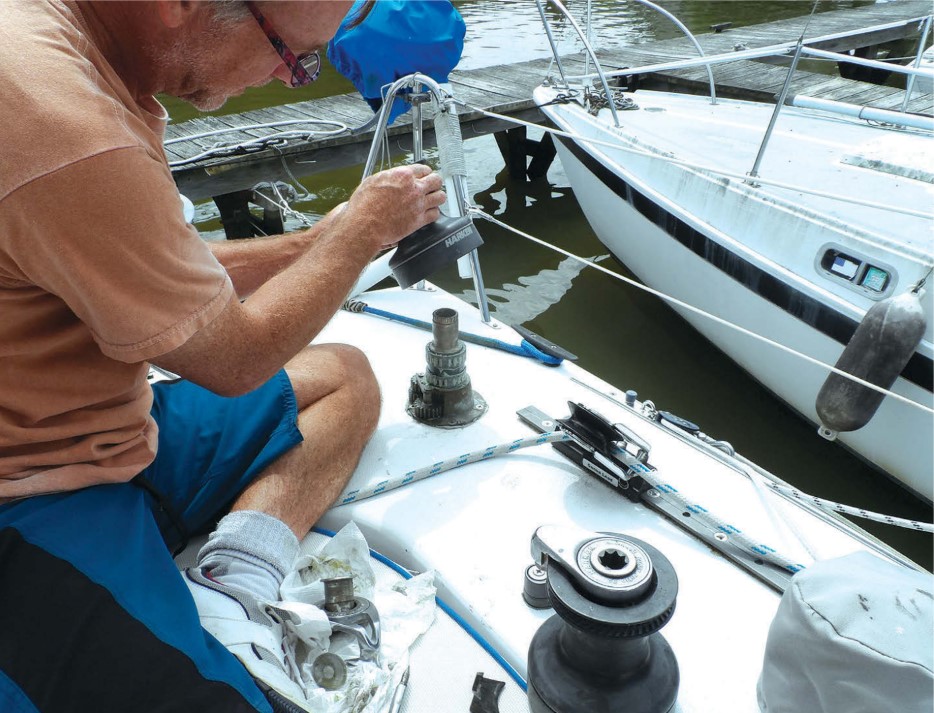
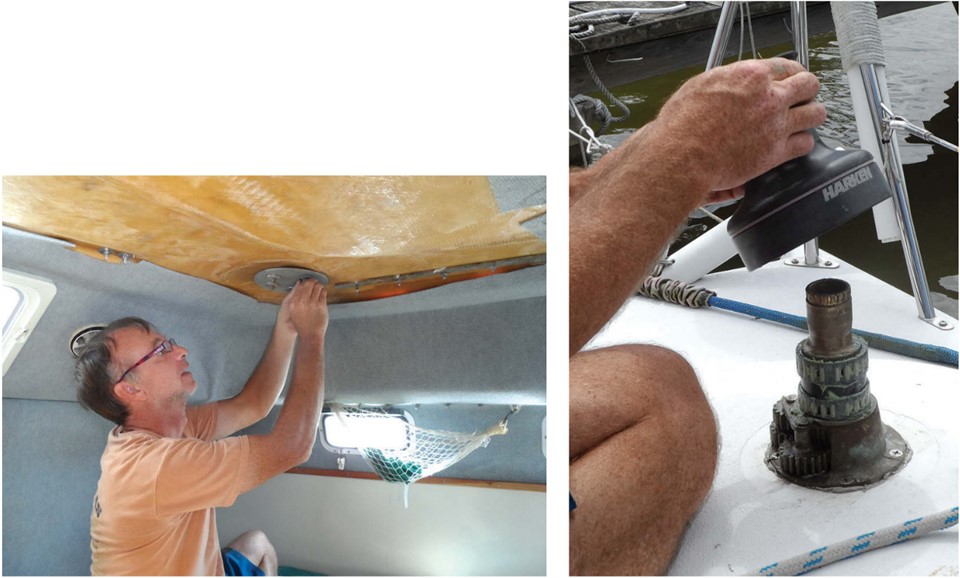
That evening, I went straight to work, primarily to prevent water from leaking into the overhead. While the boat bobbed at anchor, I dropped the overhead under each winch, removed the bolts (which, under the failed winch, were not even finger tight), removed both winches from the deck, and covered the resulting holes with duct tape.
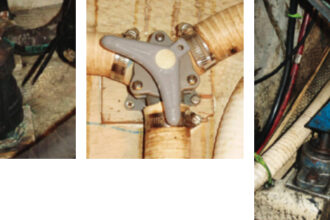
The bedding under the winch was silicone caulk (a bad choice by the PO) and gave no resistance. I also noticed there were extra holes. Further investigation revealed that all of the winches had been relocated by a PO, bringing into question what the factory mounting practice had been.
We finished our weeklong cruise using the other pair of winches, which are fortunately the same size, for sheeting the genoa.
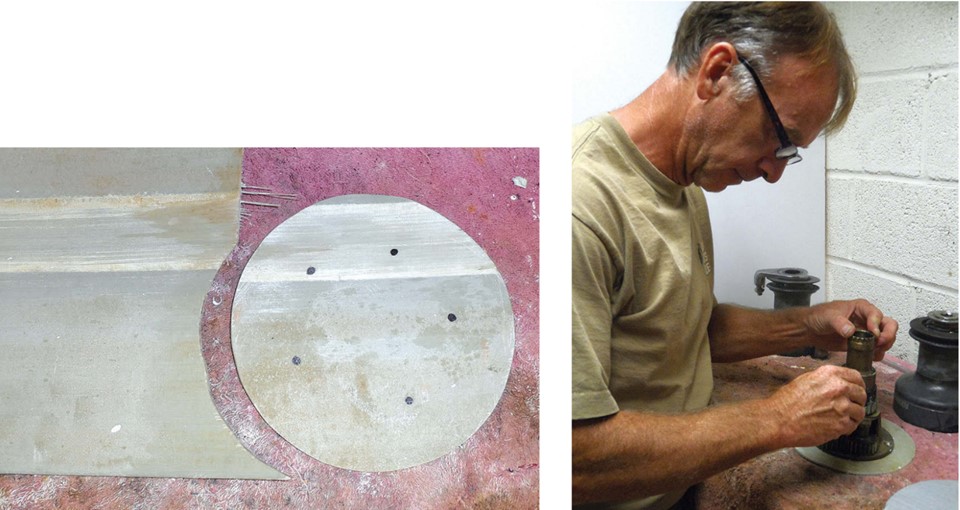
Upon returning home, I started by breaking the winches down, cleaning and greasing them as should be done every few years. They were due. I then fabricated backing plates for each of them, about 2 inches larger in diameter than the winch base — as large as would fit in the recessed solid-glass area on the underside of the deck.
Fiberglass backing plates
The material I had at hand was a scrap solid-fiberglass panel (not cored) salvaged from an abandoned boat that had been cut up by a local marina. To my way of thinking, this is basic recycling, giving the bones of a not-so-good old boat another chance at life. It is well proven that fiberglass that has been kept out of the sun does not really age. My scrap was cut from a bulkhead.
Absent scrap, small sheets of precast structural-grade fiberglass are available from many sources. Higher-grade fiberglass panels, such as Garolite G10, are also available (for about twice the price). These are useful for highly loaded applications where threading may be required because there is no room for protruding nuts or separate backing plates.
Fiberglass is easy enough to shape once you learn a few simple techniques. It can be cut with an ordinary carbide-tipped circular-saw blade, but leave a 1⁄4-inch allowance for chipping. An abrasive cut-off wheel in a right-angle grinder works well without chipping.
Grind the cut plate to shape with an 80-grit sanding disk on a 5-inch right-angle grinder, smoothing the edges as needed. (Use respiratory protection and vacuum-equipped tools whenever cutting or grinding fiberglass.) Mark the holes by holding a Sharpie vertically and making circles in each hole, and drill 1⁄32-inch oversize to allow for alignment and angled drilling errors (both yours and those in the holes already in the deck).
Use plain washers with a backing plate or extra-heavy fender washers (0.063-inch minimum for 1⁄4-inch bolts). I used a hole saw and drill press to make my own 1 1⁄2-inch washers from 1⁄8-inch aluminum plate.
To bond or not to bond?
For most good old boats, a backing plate made of 1⁄4-inch-thick pre-cast fiberglass and about 2 inches larger than the winch is adequate. However, bonding that fiberglass backing plate to the deck with thickened epoxy increases the strength considerably beyond that of the individual components. It also assures better load distribution and increases stiffness. On the other hand, it requires some additional work and is often overkill if the deck is sound and the backing plate is thick enough.
There are two circumstances that demand bonding: if the surface is not level and the backing plate will not spread forces evenly, and if there is significant laminate damage that can be stabilized by bonding.
In that case, proceed as follows: Taper the plate edges 12:1 to avoid any hard spots. Drill 1⁄4-inch holes in the center of the proposed winch location and the center of the backing plate. Prepare both mating surfaces by sanding, then coat both surfaces with thickened epoxy and clamp them together with a 1⁄4-inch bolt in the center. After the epoxy has cured, drill mounting holes through the deck and plate and plug the center hole with thickened epoxy. Bed the winch in the usual manner.
Core sealing
When reinstalling the secondaries, I was working in solid glass. If you are drilling though cored laminate, remember that a portion of the core must be removed around the bolts and this area refilled with epoxy. The core cannot sustain the bolt loads, and water in the core can lead to rot in balsa and freeze/thaw damage in any core material. Inspect the existing holes for damage. Even if they were previously sealed, it can’t hurt to smear a little epoxy inside the holes to fill any cracks.
Bedding preferences
Silicone has no place bedding deck hardware. It has poor bonding properties and complicates repairs — nothing else sticks to it, including more silicone. Medium-strength polyurethane sealants, such as 3M 4200 or Loctite PL S40, work well, although they can be messy to work with and removing the bedded hardware later may be a challenge.
I have learned that excess bedding compound under the pins holding the side gears on a winch will push them up as the bolts are tightened down. The pins and gears then have to be removed so the excess can be cleaned out. This is easily done.
I like butyl sealant for hardware items that have a large bonding area, may be subject to movement, and are well secured by bolts. It never leaks, has a long shelf life in the toolbox, and is always easy to pry loose. Though some of the butyl will ooze out over time, it is easily trimmed with a plastic knife and, since it never hardens, smears or residue can be removed at any time with paint thinner.
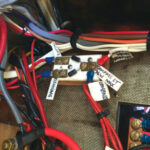
Some butyl construction products contain fibers. They harden over time and do not have the same bonding characteristics. Butyl should be sticky with a consistency like Silly Putty and a nearly unlimited ability to slowly stretch without breaking. I purchased a roll at an RV center parts department 10 years ago, but the safe bets are Bed-It Butyl Tape or LifeSafe Butyl Caulking Tape.
When bedding hardware, do not apply sealant inside the boat. When the joint leaks — and someday it will — this will only force the water into the core and delay discovery of the leak. Trapped water will also accelerate corrosion of the bolts and metal backing plates. Apply sealant only on the outside.
Learning experience
Our winches are now more solid than ever and the gelcoat cracking has stopped, but I learned some lessons along the way: upgrades can introduce new stresses and we need to address these, boatbuilders don’t always do what they should in hidden places, and previous owners can subvert a good design. Materials for projects can be free, if you like the idea of recycling old boats. And don’t expect much from fender washers — you are much better off with a backing plate.
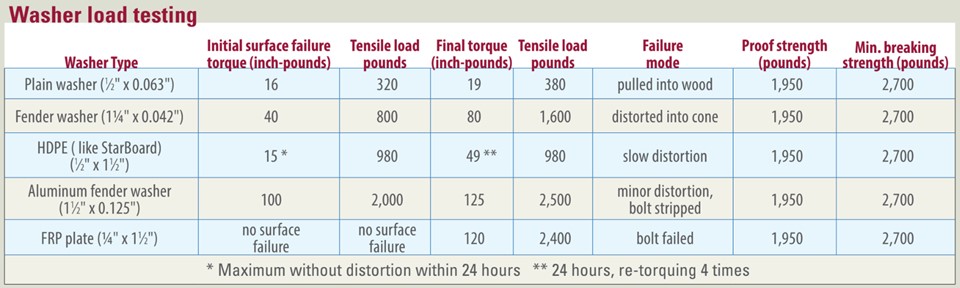
Backing materials under test
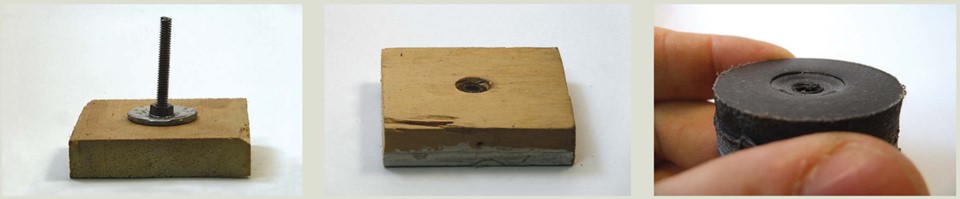
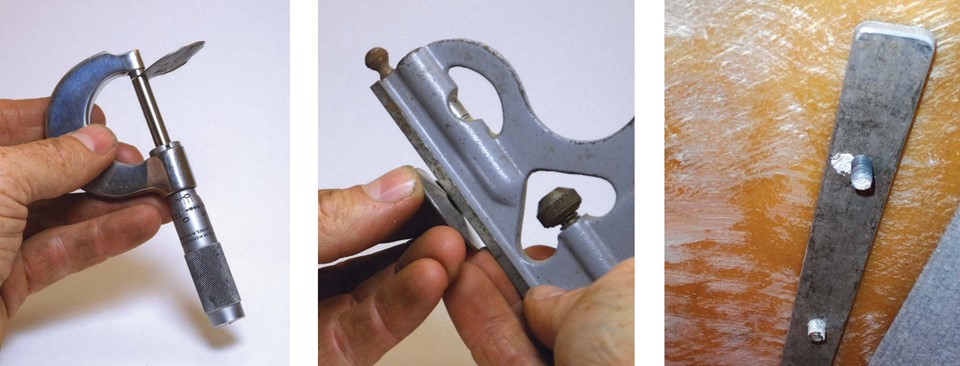
I performed a simple experiment to compare how backing plate materials hold up under load. Using 3⁄4-inch pine as a simplistic surrogate for a soft deck and the same 1⁄4-inch x 20 tpi (threads per inch) bolts that secure our Lewmar 40 winches, I tested several types of washer and backing plate materials. The results are in the table below.
For comparison, the maximum working load on the bolts securing a Lewmar 40 winch with a strong grinder is about 500 pounds. This requires a bolt strength of 2,500 pounds for a 5:1 safety factor.
Alternatively, with properly tightened bolts (about 60 inch-pounds), the clamping force is 1,300 pounds or slightly beyond the failure point of stainless-steel fender washers. Not surprisingly, our winch-mounting fender washers failed over time.
Simply put, 1⁄4-inch bolts are sufficient only if the washer/backing plate design can transfer 100 percent of the load to the bolt without damaging the deck, which only 1⁄8-inch metal plates and 1⁄4-inch fiberglass achieved. Specific test results depend on the bolt size and deck material, but the trend is clear: fender washers are not suitable for high loads.
The solution? Make your own washers out of 1⁄8-inch aluminum or 1⁄4-inch fiberglass using a hole saw in a drill press.
Backing plate materials
Many materials are used for backing plates. Some are suitable and others are not. I have seen and used a variety. Here are the results of my experiences.
Suitable
Solid hardwood – Easy to fabricate and cheap, hardwood can be very strong if close-grained and 3⁄4-inch thick. Since rot is an issue if the bedding is not watertight, it’s best to coat the wood with epoxy, which reduces the savings in cost and time. Hardwood tends to crack if the bolts are within 1 1⁄2 inches of an edge, and space can be a problem when refitting under a close-fitting overhead. Longer bolts will be needed because of the thickness.
Plywood – Splitting is less of a concern, so 1⁄2-inch plywood is generally enough as long as it is of high quality and made with waterproof glue and coated with epoxy. Rot is still a concern in the long term.
Aluminum – Easy to fabricate with common tools, light, and compact (1⁄8 inch is a typical thickness), aluminum is generally very durable. It will bend rather than crack and is suitable for exposed locations if painted or polished . . . but see some caveats below.
Precast fiberglass – Corrosion-proof, easy to fabricate, compact, and cheap, fiberglass has the additional advantage of bonding well with epoxy, after which it becomes part of the deck. This is particularly beneficial when the deck is thin or the surface very irregular. A thickness of 1⁄4 inch is adequate, and 3⁄16 inch is good if it’s bonded.
Additional fiberglass lay-up – I later tested cored panels with 3 or 4 additional layers of 17-ounce biaxial-cloth reinforcement in the loaded area. Just as strong as 1⁄4-inch precast, it is better for irregular deck surfaces because it is bonded to the skin.
Stainless steel – It’s the ultimate in durability, but stainless steel is expensive and fabrication is far more difficult. While usually overkill, it’s a good choice for critical items. A thickness of 1⁄8 inch is typical, or 1⁄4 inch for larger bolts.
Threaded insert plates (in the laminate) – Some builders incorporate threaded plates into the layup. An advantage is that hardware can be replaced later without access to the reverse side. There are downsides, which I have experienced several times. If the bolts seize, you are in a bad place, and if the plate corrodes, it can expand and crack the deck. Although I would like to ban these plates, I’ve installed them a few times because of severe access problems. I strongly recommend stainless steel.
Threaded backing plates (not in the laminate) – I have found these very handy in tight spots where getting nuts onto bolts was a real challenge. Fabrication is more complex and, because the bolts must be turned, in theory it is possible to break the bedding seal, although I have not experienced this.
Unsuitable
Fender washers – I see fender washers under deck hardware all the time. They were originally conceived to distribute light bolting loads over thin sheet-metal fenders, but boatbuilders often use them inappropriately. Used as backing plates to anchor high rigging loads to fiberglass structures, they frequently distort, which leads to deck damage. While they are acceptable for mounting blocks on racing dinghies, they have few valid uses on cruising boats.
Every failed mounting I have investigated had a cone-shaped, distorted fender washer at the root of it. As the load came on, the washer simply bent, the fiberglass cracked, or the core material crushed, resulting in loose hardware, leaks, and laminate damage. Often, the holes elongated as movement increased. Some of the washers were frighteningly thin — only 0.024 to 0.026 inch — but even standard 0.042-inch stainless-steel fender washers bend under heavy loads. ANSI (American National Standards Institute) requires 0.063 inch for 1⁄4-inch bolting washers, but that is for bolting to rigid metal surfaces. (For larger sizes, the loads and required thicknesses all go up with the square of the fastener diameter.)
High-density plastics – HDPE, StarBoard, and synthetic lumbers deform slowly under high sustained loads and are also prone to splitting (see the table “Washer load testing”). In the crush test, we had to keep tightening the bolt for 72 hours, as it kept loosening as the plastic slowly deformed. Fine cracks appeared two months later. While these materials, although difficult to bond and seal, can make acceptable mounting blocks, they are not appropriate where high point loads are present.
Galvanized steel – Almost always, issues arise with galvanized steel because of mixing dissimilar metals. There are better choices.
Aluminum in damp locations – When exposed to salt and coupled with other metals, aluminum becomes sacrificial and corrosion can be severe. This can lead to failure in damp locations such as anchor lockers, and is a problem anywhere if the bedding leaks. Using anodized plate or treating aluminum with Alodine 1201 can be helpful.
My favorites
I like aluminum for its availability on the scrap pile, simplicity of fabrication, compact thickness, and unbreakability. I use it for small plates in dry locations (under cam cleats and Bimini mounts) and for backing hardware subject to impact (mooring cleats, stanchions, and jackline anchors). Stainless-steel plate is nice if you are comfortable drilling and cutting it. For larger plates, I like fiberglass for permanence and the ability to bond it to the hull. For damp locations, only stainless steel and fiberglass are sure to last.
Drew Frye cruises Chesapeake Bay and the mid-Atlantic coast aboard his 34-foot catamaran, Shoal Survivor, searching for out-of-the-way corners known only by locals. A chemical engineer by training, 40-year climber and 30-year sailor by inclination, he brings a mix of experiences to solving boating problems and writing about how he does it.
Thank you to Sailrite Enterprises, Inc., for providing free access to back issues of Good Old Boat through intellectual property rights. Sailrite.com