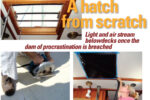
Is it real? Is it laminate? No, it’s paint!
Issue 116: Sept/Oct 2017
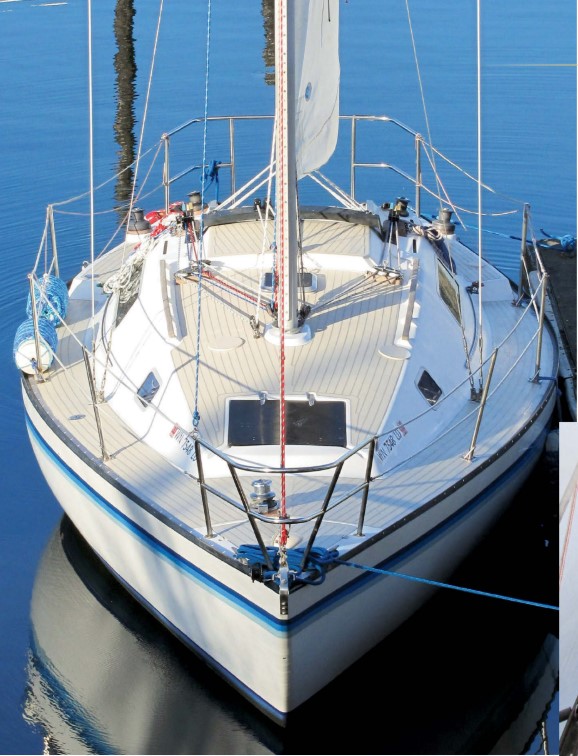
My good old boat is a 1979 San Juan 28, a plastic production-line IOR fin-keeler. When I had her hauled one recent fall for a multi-month stay in the local boatyard, one of my goals was to somehow improve the look of the non-skid surfaces — 11 panels of orange-peel texture molded into the fiberglass deck. They were coated with a tan finish that contrasted with the white of the surrounding margins and cabin sides. However, the tan color seemed to have been unevenly applied and had faded over large areas, revealing an underlying black that degraded the overall appearance of the boat.
Preparation
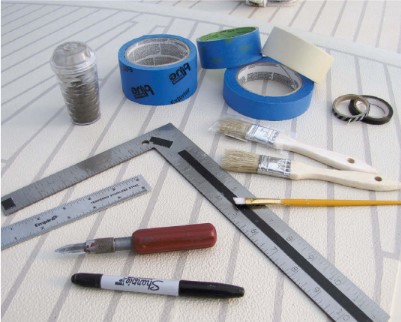
For the primary restoration, I chose a single-part polyurethane (Pettit EZ-Poxy) in a tan color similar to the original, mixed with a flattening agent to dull the finish. After scrubbing the decks with soap and water, followed by acetone and circular strokes of a stainless-steel wire brush, I masked the perimeter of each textured panel in turn and brushed on the paint. Within a few days I had a new coat of semigloss tan on all the non-skid deck surfaces.
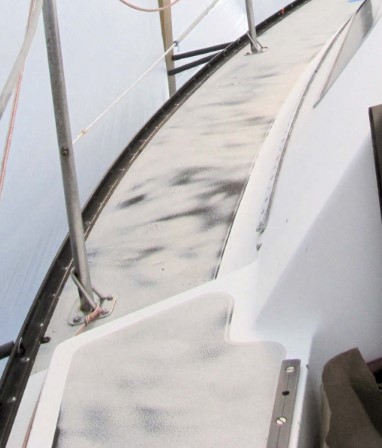
Before the new paint had a chance to fully harden, I’d already begun imagining how I might add darker “caulk lines” to suggest the appearance of a wooden deck. I’ve always loved the look of a well-done teak deck, especially the graceful sweep of the planks curving with the toerail and the sawtooth edges of a king plank along the centerline near the bow. Such a deck contributes a layer of visual complexity that I think dramatically enhances the overall beauty of a good-looking boat.
Plenty of synthetic deck-surface options are available, but all of the faux-teak deck products, never mind genuine teak, have one major drawback: high cost. Fortunately, being recently retired, I happen to have time to spare and an open schedule, so I decided to see what I could accomplish with a little paint.
Color
I wanted a contrasting color for my faux caulk lines, but I worried that the obvious choice — polysulphide black — would be a bit too harsh-looking and perhaps uncomfortably hot for my granddaughters’ little feet on sunny days, so I chose a medium brown.
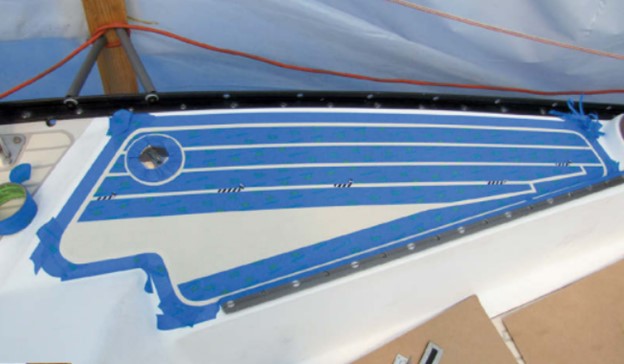
I started small, experimenting first on the anchor-well cover. On a sunny afternoon I measured the painted triangular cover and laid down masking tape to reveal a simple design of caulk lines, which I painted with medium brown. When I removed the tape, I was more than pleased with the result. It then dawned on me that I’d begun just the first phase of an enormous project. I wouldn’t fully appreciate the scope of that effort until weeks later!
Layout
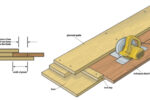
To simplify laying out the planks, I decided that their width would be determined by the width of the tape I chose to use. From among the various widths offered at the local big-box home-improvement stores, I selected 1.41-inch (36mm) masking tape for the planks, as anything narrower or wider seemed wrong for the appearance I hoped to achieve. (The handsome teak deck on a ketch that happened then to be in the boatyard sported planks about 1.25 inches in width.) In addition, the 1.41-inch-wide masking tape is available in several types — more detail on that later. For my wider king planks and some margins, I simply laid two strips of my standard tape side by side.
I used 1⁄4-inch-wide craft tape as a spacer to separate each “plank” from its neighbors. I found this tape in a craft store and at an office-supplies outlet. I saw 1⁄8-inch tape on the shelf, but I felt it was too narrow. (I think 3⁄16-inch tape would have been ideal, but I couldn’t find any locally.)
One key practical aspect of the layout of actual wooden decks and, I think, crucial to the appeal of a wooden deck’s appearance, is the shipwright’s practice of “nibbing,” or notching planks that join at narrow angles. Of course, on a painted deck, simulating nibbing would involve some extra effort while serving no practical purpose, but I hoped it would enhance the visual interest of the result. Indeed, in several areas (including in and around the cockpit and on the companionway sea hood) I chose to angle my planks rather than simply lay them in a more obvious fore-and-aft orientation. This required more nibbing in those areas, emphasizing its visual contribution.
Painting
When taping, I realized that painting the caulk lines was going to be at least a two-step process. I found this to be vital.
Especially on textured non-skid surfaces, it seemed there was no way to completely seal the many and lengthy edges using tape alone, and this was so regardless of the type of tape I tried. So, for my first step, with a very wet brush, I flooded all the masked edges with the background (plank) color. This did an amazing job of filling and sealing the voids and spaces where I didn’t want my caulk color to bleed.
After painting the caulk lines with the plank color and letting them dry (or at least nearly so), I went over them with the darker color. Once that coat was at least tacky (patience is required here), taking up the masking tape left amazingly crisp lines almost everywhere.
Touch-up
Even with my diligent attention to base-color repainting, my darker caulk color did bleed under the masking tape in some places. Fortunately, these flaws were easy to fix. After a panel was dry, I had no trouble going over it with a small detail brush, touching up the planks or caulk lines as needed.
Also, perhaps due to inconsistent preparation, my background color pulled away from the deck in a few spots when I removed the plank masks. In those areas, I gave the plank another quick scrub with acetone and a small stainless-steel wire brush before touching up.
Non-skid
Throughout the cockpit area, I used a salt shaker to sprinkle sandblasting grit along the caulk lines while the first light-color coat was still wet. The subsequent coat of caulk color sealed that grit into the surface for a good non-skid texture. (To keep loose grit out of my caulk-color paint, I kept a small amount of that paint in a separate container for use in finishing the grit-treated lines.)
Beyond the cockpit, I planned to assess later the need to apply any paint-and-grit non-skid. Since launching, a couple of wet, slippery trips forward have suggested I have yet more non-skid work to do.
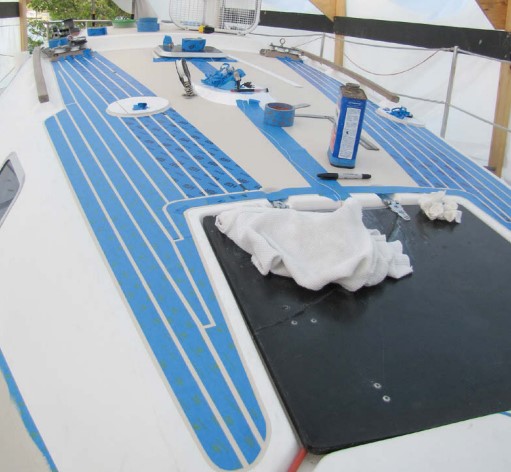
Laying out curves
As some of the photos show, I used short lengths of 1⁄4-inch craft tape to establish the separation of my planks (that is, the width of the caulk lines). For relatively straight runs, a 1-inch strip of 1⁄4-inch craft tape placed every 18 inches or so was enough to let me easily lay the planks parallel while maintaining the desired separation. (I folded over one end of each short strip of craft tape to simplify taking up the strips and relocating them for masking subsequent areas.)
Amidships, where my planks curve to follow the toerail, closer placement of those craft-tape strips helped me to lay down smoother arcs with consistent spacing. (In retrospect, I wish I’d used even more of the spacing strips than I did, as I can now discern some occasional straight-ish segments along the sections of my painted planks where they curve the most.)
Working on a masked deck
Especially with the narrow, slanted sidedecks I found myself crawling all over my mask lines even as I was laying them down. After just a little traffic, some of the edges began to wear and curl away from where I wanted them. With my boat on the hard and no scaffolding, there seemed no way to avoid this. The best I could do was wear clean soft knee pads, move gently, and tread on the tape as little as possible.
Indeed, even initial adhesion of the masking tape was at times problematic on the high-traffic sidedecks. I eventually made it routine to give the painted areas and gelcoat margins a quick gentle wipe-down with acetone, to clean the surfaces and prepare them before laying out the masking tape.
Types of masking tape
At the local home-improvement stores I found several styles of masking tape, and I tried most of them. By the time I was done, I was using the semi-translucent 3M 2080EL in a wider style over tight corners, as its see-through quality let me more easily cut the tightly rounded corner arcs with my razor knife. I also learned to use styles labeled “safe release” along the panel edges, where I was applying tape to the white gelcoat. Early on, I found that tiny circular bits of my boat’s aging gelcoat tended to pull away in some areas, most noticeably along the side edges of the cockpit sole, leaving me with several new and different resurfacing projects.
By the time I was working on my last non-skid areas, I had decided the older-style tapes, ScotchBlue Original painter’s tape and the traditional off-white or tan-colored tape, performed best for plank masks. Either had enough stretch that I could lay down a gentle curve and, most important, a strong-enough adhesive to stay down overnight and in warm weather. The blue contrasted best with my plank color, so that is what I used for most of my photos, but the less-expensive tan stuff did fine too.
Mind the tape width!
Toward the end of my project, I found things were substantially out of line where I was masking the foredeck near the cabin. I was puzzled until I realized that the roll of tape I was using was actually 1.5 inches wide, not 1.41 inches. The accumulated error had reached a point that I decided to rip off and start over my layout on the port sidedeck, a significant loss of time and material.
Asymmetry in the deck
Even with a consistent tape width, at several points my plank and caulk lines didn’t exactly match port and starboard, and this quickly became noticeable in places where differences caused obvious problems with visual symmetry. Such places included at the mast step, on the cabintop to either side of the fore hatch, and where the inward-progressing plank lines met the center king plank on the foredeck. Careful measurements revealed that, despite the production-line origin of my boat’s deck and cabin, the structure wasn’t perfectly symmetrical side-to-side, and I was forced to make subtle adjustments in my layout.
In most of these cases, I chose to make small increases or decreases in the plank widths, such that the eventual plank-and-caulk pattern would appear symmetrical (or more nearly so) about those fixed locations. Happily, in the process of making these subtle adjustments, my roll of 1.5-inch tape became a valuable asset. When I needed to make up for what appeared to be more space on one side than on the other, I laid several slightly wider planks to bring things into harmony.
Paint-drying times
Starting out in cooler weather, and working in the cockpit first, I had the opportunity to worry that maybe the whole idea of painting lines on decks was a bad one. I was laying several thick layers of polyurethane one upon the other without giving each layer adequate drying time. While simply climbing in and out of the cockpit, I was smearing and peeling my non-skid and caulk lines with alarming ease. But time and warmer days had a way of sorting that out and, with fully cured paint and a season of use now behind me, I’m confident that my new deck treatment is very durable.
Tape-adhesive residue
Although the masking tape seemed to have come away clean in most areas, some dirty-looking and gooey lines and spots appeared after only a little use. It seems that at least some of the many tapes I’d tried had left behind adhesive, which quickly caught dirt and started looking bad. (Some of the worst spots were on sidedeck planks, upon which I’d crawled fore and aft repeatedly during layout and painting.) It was nothing that a little acetone and paper towel couldn’t solve, but much more of this cleanup was necessary than I would ever have suspected beforehand.
Conclusion
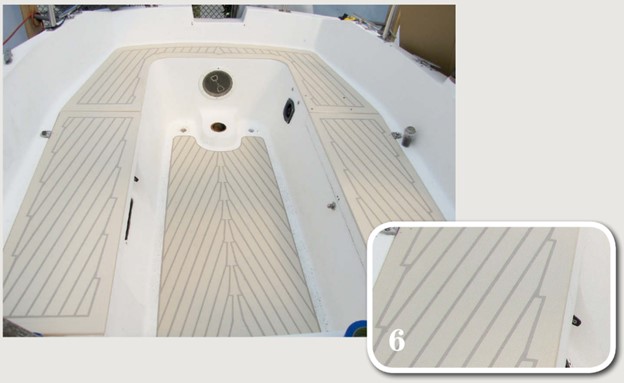
On launch day, I was genuinely astonished at the degree to which the new deck treatment had improved the overall appearance of the boat, and a full season of active use has only enhanced my satisfaction with my effort. Beyond the improved non-skid and a re-sealed cockpit sole, the entire boat is a bit more pleasing to the eye.
Despite its share of cosmetic flaws, I have received many compliments on her appearance, some of which have come from people who, I believe, don’t realize precisely what it is that makes the boat stand out for them. Naturally I’m biased, but I think the deck patterning is a subtle but significant addition to the overall presence of what would otherwise be just another fiberglass sailboat.
Nibbing variations
A search on “king plank layout” on the internet and a walk through a marina will make it clear that nibbing may be implemented in a variety of styles. When working in wood, nibbing avoids ending the planks in sharp narrow points that have a tendency to split and are difficult to fasten securely.
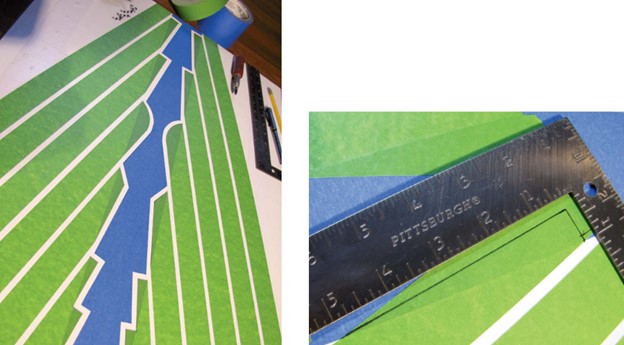
I mocked up different styles on a painted board, with the king plank blue and the angled planks green. The outermost planks simply run off the end of the board.
The next two plank pairs are nibbed with the relatively simple 1⁄2-inch right-angle notch that I used on my boat.
The fourth pair illustrates a style I’d seen on a teak deck at the boatyard, with a circular termination for each plank.
The fifth pair of planks is notched using an obtuse angle instead of the right angle.
Each of the last pair of planks is double-notched, with two smaller nibs for each plank.
When using masking tape and paint, styles need not be limited to planks and their intersections; nor even to only two colors. Designs are limited only by the imagination and patience of the painter.
Painting the cockpit seats, step by step
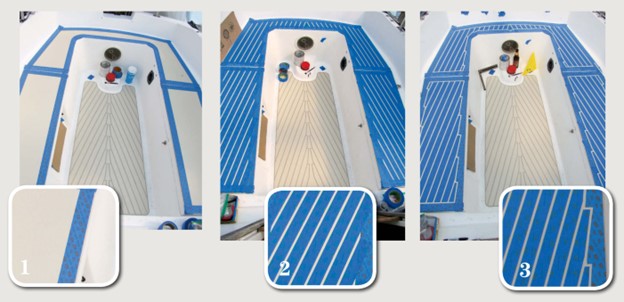
2. He followed up by laying masks for the planks.
3. Using a carpenter’s square and a craft knife, he nibbed the intersections where the planks met the perimeter tape.
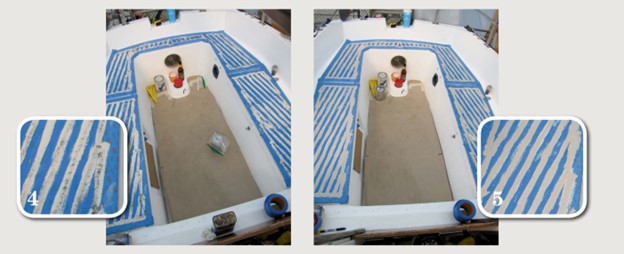
5. He finished by painting over the caulk lines and grit with the darker caulk color.
Paul Brogger spends most of his retiree’s spare time sailing his San Juan 28, Mid-Life Cruises, out of — and back to — Olympia, Washington. Occasionally, he works on her some as well. He’s particularly proud of his 40-year-old patched-up sails, because he does the patching himself.
Thank you to Sailrite Enterprises, Inc., for providing free access to back issues of Good Old Boat through intellectual property rights. Sailrite.com