Home canning is the answer for fridge-less cruisers
Issue 46 : Jan/Feb 2006
On Lake Superior’s north shore one brilliant sunny day we met a lovely young couple who informed us that, in spite of having 10 days left for their holiday, they had to cut their cruise short and go into town (40 miles away) for supplies. It wasn’t lettuce, tomatoes, potatoes, and other produce they needed. They were out of fresh meat.
This wasn’t the first time we had heard of cruises being cut short because of the limiting time/distance factor of keeping fresh meat. Next to fuel, keeping fresh food, primarily meat, has been one of the biggest limiting factors in many cruises, particularly into wilderness areas. For those going on long passages or cruising in areas where fresh meat is not readily available (such as in some Caribbean ports), it’s even more of a problem.
Many boats have iceboxes but when the ice is gone, the ability to keep food fresh quickly follows. Some sailors have solved part of the problem by adding refrigeration to their boats.While this certainly extends the life of fresh produce, unless you also have a separate freezer, keeping meat is still limited. With most refrigeration units there is only a small area next to the cold plate to keep small amounts of frozen meat and then only for a short time as they slowly thaw. Many sailors start out with seven or eight days of frozen meat and then turn to commercially canned meat. Those who have followed this path know there is only a limited amount of canned tuna fish, hams, and Dinty Moore Stew that one can take. Certainly, freeze-dried foods help, but there’s nothing like a tasty hot meal made with basic meat recipes, especially after a day of vigorous sailing or exploring in the wilderness. There is, however, an alternative, one we have used for more than 30 years, even with refrigeration and a freezer. We cruise with home-canned meat.
Preserved in jars
It’s an old idea. When beef or hogs were slaughtered in the old days, the meat was preserved by smoking, drying, and putting it up in jars.
The theory behind pressure canning is that the temperature of boiling water goes up with pressure: at 5 pounds pressure it is 228°F; 10 pounds pressure, 240°F; 15 pounds pressure, 250°F. Canning at 10 pounds pressure at lower altitudes (0 to 1,000 feet) and at 15 pounds pressure at higher altitudes (1,000 feet and above) is sufficient to destroy potentially harmful bacterial spores. In fact, the U.S. Department of Agriculture recommends pressure canning as the only safe method for canning low-acid foods such as meat, poultry, and vegetables. When the jars are removed from heat a vacuum seal is formed with a rubber compound on the underside of their lids as they cool. This prevents any new microorganisms from entering and spoiling the food.
The process for canning your own meat is simple: pack it in glass canning jars and cook it at 10 or 15 pounds of pressure, depending upon your altitude, for 90 minutes.
Most kinds of meat can be home-canned. We have successfully canned chicken, meatballs, roast beef, pork roast, round steak, pork chops, ground beef, ground turkey, and a basic ground beef/tomato paste mixture that can be used for making chili or spaghetti sauce. It is also possible to can seafood: various kinds of fish, clams, and crabmeat. An added benefit of canning meat is that you don’t have to use expensive cuts because the canning process tenderizes the meat. It also enhances the flavor, especially when spices are added in the canning process.
Basic tools
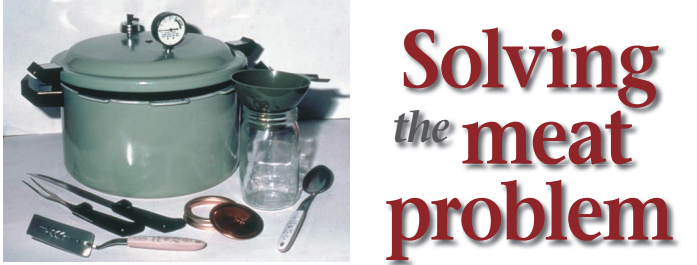
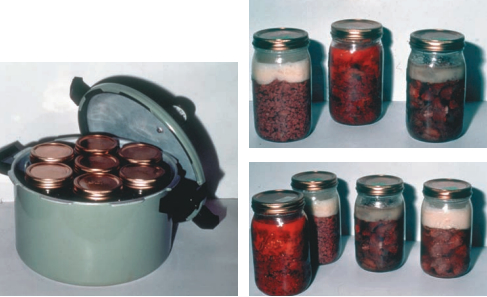
You need a large pressure canner. We use one that can hold seven quart jars. It is possible to can in pints by stacking a second layer of jars, staggered on the top of the bottom jars. Using quarts is more economical, giving four servings to the jar, whereas it is tight getting two servings from a pint jar. The glass canning jars used in home canning are commonly called Mason or Ball jars. They can be used over and over, and you can get replacement packages of additional rings and lids. Jar mouths come in two sizes: wide and regular.
Get wide-mouth jars for easier packing. Two brands of jars, lids, and rings in common use today are Kerr and Ball. They can be found in large grocery stores with the food storage bags and systems. You also need tongs and hot pads for handling the hot jars, a pitcher for pouring hot liquid, a number of clean cloths and towels, and any cooking utensils you will need for preparing the meat.
Basic canning steps
Thoroughly clean and rinse glass jars, rings, and lids. Check to make sure the rims of the jars are free of nicks and cracks. Discard inferior jars. Fill the jars with hot water to keep them warm until the meat is added. Remove the water just before adding the meat you will be canning.
Pack each jar with meat to within 1 inch of the top of the glass rim. Salt or other spices may be added. When using salt, it is better to use pure canning salt since table salt contains a filler that may cause cloudiness on the bottom of the jar.
Add enough water to bring the liquid level to within one inch of the top of the rim. Don’t overfill because the liquid will boil up in the canning process. If fat and little pieces of meat cling to the rim during the boiling process, the lid won’t be able to seal. This is the primary cause of lids not sealing.
Slide a rubber spatula down the sides inside the jar and throughout the meat to break up any air spaces and get them to fill with liquid. You may have to add more liquid as the air spaces fill up. This is a very important step because the expansion of air under heat is many times greater than liquids and this may cause overflow of the liquid, impeding the sealing process of the lid.
With a clean cloth or damp paper towel, wipe all grease and bits of meat from the top and both sides of the glass rim. This is another trick to ensure that the lids will seal during the vacuum process. Add the lids and tighten the rings. To get a good snug fit, moderately tighten the ring until it will go no more and then back off a half turn.
Place the canning/cooking rack that comes with the canner on the bottom of the canner. It is important to do this because jars standing directly on the bottom of the canner may break. Add 3 quarts of boiling water. Trick: if you add a couple of tablespoons of salt and white vinegar to the water, it will keep water stains from forming on the jars. Place the jars evenly in the canner without the sides touching, if possible.
Check sealing ring
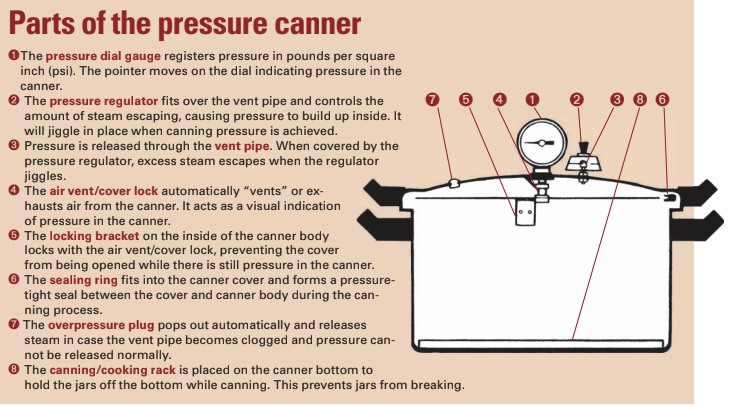
Before placing the lid on the pressure canner, check that its rubber sealing ring is snug and in place. Always look through the vent pipe to make sure it is absolutely clean and free from any food or debris from previous canning runs. A good secondary measure is to clean the vent pipe with a pipe cleaner. It is also a good idea to move the air vent/ cover lock up and down to make sure it moves freely. Place the lid on top of the canner and turn clockwise until it is in the sealed position. Most canners will have some kind of markers on the lid and canner, which need to be lined up to get the two parts into a locked position. Another good indication of the lid being in the locked position is that both the handles on the lid and canner line up directly over each other.
The next step is to evacuate all the air in the system. To do this, turn the stove heat on fairly high. Soon you will hear water boiling inside and see steam rushing out through the vent pipe. It is important to let this steam continue escaping for 10 minutes to make sure all the air from inside the canner is evacuated.
Place the small pressure regulator on the vent pipe. You will see the pressure quickly rise on the pressure dial gauge if your canner has one. Note that the pressure regulator doesn’t begin to rock or jiggle until it has reached canning pressure.
Canning pressure is achieved when the dial on the gauge reads 10 or 15 pounds, depending upon your altitude. It is only now that you begin timing your 90 minutes. The heat source on your stove may vary slightly over time, so it is important to keep checking the pressure gauge every 10 minutes or so and adjusting the heat accordingly to keep the pressure at 10 or 15 pounds or a little higher. Note that beyond the 15-pound pressure mark there is also a danger zone on the dial on some canners. If the pressure begins to register in this zone it is important to reduce the heat quickly, but not so much that the pressure falls below your goal of 10 or 15 pounds.
Let canner cool
After 90 minutes of pressure canning, turn off the heat. Allow the canner to cool on its own. Do not try to speed this part of the process up, as the jars could break. As the pressure drops in the canner, you may hear snapping or clicking sounds. These are the lids sealing as the vacuum forms.
Do not use the pressure gauge dial to determine when the pressure is reduced. Inside pressure is completely reduced only when both the air vent/cover lock and overpressure plug have dropped and no steam escapes when the pressure regulator is nudged. As a safety precaution always remove the pressure regulator first and let the canner continue cooling for another 10 minutes before removing the lid. Then open up the lid away from you to allow any residual steam or heat to escape.
You can now remove the canning jars with an oven mitt or special tongs. Put the hot jars on a clean towel on a counter. The liquid in the jars will continue to bubble, and the remainder of the lids will snap. When the jars are cool to the touch, check them to make sure all the lids have sealed.
There is a three-way test for this. The first is the click you hear as the lids snap into the vacuum. The second is that you can actually see a concave shape on a lid that has been slightly sucked in by the vacuum. But the most important test is to tap each lid with a fingernail. A sealed lid will give a clear metallic ring; an unsealed lid will give a dull thud. There is quite a distinction between the two sounds.
Jars with unsealed lids can be reprocessed. Simply remove the ring and defective lid, wipe down the glass neck and rim of the jar to remove any grease and meat, add more water up to the 1-inch mark, put on a new lid, (however, old rings can be reused) and pressure can these jars with the next batch.
If you cannot immediately re-can the meat, it should be refrigerated and eaten soon. Do not let it sit out at room temperature. It is also important to check each jar and throw away any cracked jars and all their contents. This is uncommon. Usually what happens with broken jars is that the bottoms fall out as you try to lift the jar out of the canner. Do not try to save any part of the meat as small pieces of glass may be embedded.
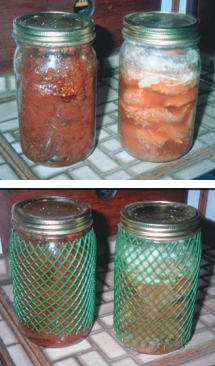
Before storing, rinse off the jars with hot soapy water and dry them. Jars can be stored with or without the rings left on since the lids are sealed. If you choose to leave the rings on, tighten them down. It is important to date and label each jar on the lid. Jars can be stored in the original divided cardboard boxes they came in. However, many sailors prefer not to have cardboard on their boats. We have used the open latticed plastic milk crates, which pack nine quarts nicely. If you use this storage method, you need some way to protect the glass jars. We have used the plastic mesh sleeves made for protecting wine bottles. We have also used rubber mesh shelf liners cut to size and held in place with rubber bands. The tops of heavy socks also work well, and bubble wrap (with small bubbles) can be used.
With good seals, we have used meat up to three years from the canning date.
Canning specific meats
There are two ways of preparing meat for pressure canning: raw pack and hot pack. Raw pack is just what the name implies: you pack moderate-sized pieces of uncooked meat directly into the canning jar. One advantage to this method is that, because the meat is soft and pliable, you can pack more into a jar. However, it is important to resist the temptation to pack it in too tightly as this can cause jar breakage. Another advantage of this method is that it leaves fewer air spaces between the pieces of meat. Examples of meats which lend themselves to raw packing are chicken, roast pork, and beef roasts.
For appearance (such as browning) and adding certain recipe ingredients, use the hot-pack method. Examples here are meatballs, pork chops, round steak, ground meats, and a mixture of ground beef and tomato. Adding seasonings, such as salt and pepper, is optional, however the flavors blend better when added in the canning process than when added during meal preparation. It doesn’t make much sense to use up valuable jar space with bone, fat, and parts of the meat you don’t eat. So regardless of which method you use, remove these space wasters.
Chicken and turkey: We have been successfully using the raw-pack method for years. It is possible to can most parts of the chicken, but since many contain bone and skin, it seems to work best to can skinless, de-boned chicken breasts which, when raw-packed, fit nicely into the jar. Add water to within one inch of the top and one teaspoon of canning salt. Remove hidden air spaces with a rubber spatula. In the same way, cooked leftover turkey can be hot-packed with water, broth, or gravy.
Roasts — beef or pork: Any grade of meat can be used since tougher cuts of meat are tenderized in the canning process. Remove all bone and excess fat. Cut the meat into serving pieces that will easily fit through the mouth of the jar. If the contents of the jar will be used for stew or beef stroganoff, cut the meat into smaller pieces, which will also pack more meat into the jar. You may prefer larger pieces for making other beef or pork recipes. Raw pack adding a couple of bay leaves, one teaspoon of canning salt, and water to within one inch of the top rim of the jar. Some canning manuals indicate that it is not necessary to add water, but we have always added water with good results. We like the tasty broth it produces in the canning process. The broth can be useful in preparing many recipes.
Meatballs: Make up your favorite meatball recipe. Browning meatballs beforehand adds to their appearance and helps them hold together in the canning process. If you are making a large number of meatballs, brown them on large cooking pans in a 350°F oven, turning them once. Keeping the meatballs small, no bigger than one inch in diameter, will allow many more to be packed into the canning jar. Hot pack, adding water to within one inch of the top rim.
Pork chops: Pork chops are hot-packed primarily for appearance. Although any grade of pork chop or pork steak can be used, we prefer those that are a half-inch thick and have as little bone as possible. Butterfly pork chops work especially well as they are just about the right round shape to fit nicely in layers in the jars and, when cut in half, can be used to fill up spaces. Remove all bone and excess fat, and brown them on both sides, adding salt and pepper to taste. Hot pack the chops into the canning jar. For extra flavor, add water to the browning residue in the pan and scrape up the bits and pieces to use when adding liquid to within one inch of the top of the jar rim. Use a rubber spatula to get rid of air pockets.
Round steak: This can be either raw-or hot-packed. Browning first really adds to the appearance of the meat, however. Cut it into strips or bite-sized pieces for pepper steak or stroganoff and brown with salt and pepper. Hot pack. Use water to retrieve the browning residue and flavor from the browning pan. Add this to your jars to within one inch of the rim.
Ground meats: These are browned and hot-packed mainly for appearance. Cooking beforehand also helps draw off any excess fat, which may be discarded before putting the meat into the canning jar. The meat can be seasoned if you like. This allows the seasonings to blend during the canning process. Hot pack the meat into jars, adding water to within one inch of the top of the rim. It adds a lot of flavor to first add the water to the browning pan to retrieve leftover bits and pieces of meat and the browning residue. Ground meats that work well are beef, turkey, and sausage. A canned mixture of ground beef and sausage bakes up nicely into breakfast egg casseroles. It takes about one and one half pounds of ground meat to fill a canning jar.
Basic ground beef and tomato mixture: This preparation is like the above except that after browning and seasoning with salt and pepper, approximately one 8-ounce can of concentrated tomato paste is added to the mixture for each canning jar. It is then hot-packed into canning jars to within one inch of the rim. No additional water is needed. Because minimal seasonings are used, this mixture can be used in many different recipes: hot dishes/casseroles, chili, and spaghetti sauce (see the sidebar on Page 39 for specific recipes).
Chicken, beef, or pork mixture: Be creative. If you have leftovers when canning, brown strips of chicken, beef, or pork. Hot-pack them with water and pressure can them. The mixture can be used with packaged seasonings for fajitas or rice dishes. Use the canning liquid instead of the water called for on the seasoning packet directions.
Using canned meat
When using canned meat, check the jar for any possibility of spoilage. The lid should snap off nicely, releasing a little pressure. If it doesn’t, if there is any indication of mold, or if there is a bad smell, discard it immediately. As a precaution if you are unsure, boil the liquid-meat mixture 10 to 15 minutes. This brings out odors not apparent in the cold meat. After boiling, if it does not smell or look right, don’t taste it to make sure it is bad; just throw it out.
In the canning process, any fat left with the meat will rise to the top, producing a barrier between the meat and the vacuum at the top of the jar. This fat can be discarded or used in making sauces and gravies.
With a little adjustment, most of your favorite recipes will lend themselves nicely to use with canned meat. The important thing to remember is to always boil the canned meat and liquid for 10 to 15 minutes somewhere in the recipe preparation.
When provisioning a boat for short-term or long-distance cruising, it becomes important to use all available resources. Adding home-canned meat to your ship’s stores increases the variety of possibilities in meal planning. For those with limited refrigeration or on long-distance cruises in remote areas, it also provides an important part of the diet that may not otherwise be available.
When we were on an extended cruise in the Eastern Caribbean and Venezuela, there were many times when meat was not available or, if freshly butchered in the open market, it was somewhat less than desirable. Because we were going to be gone for many years, we took along 70 quarts of home-canned meat, which gave us more than 140 meals.
In the final analysis, what we really like about having canned meat on board is that it brings us one step closer to achieving the independence we cherish in the cruising life.
Thank you to Sailrite Enterprises, Inc., for providing free access to back issues of Good Old Boat through intellectual property rights. Sailrite.com