The cost of wood made aluminum the way to go
Issue 113: March/April 2017
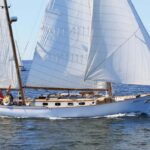
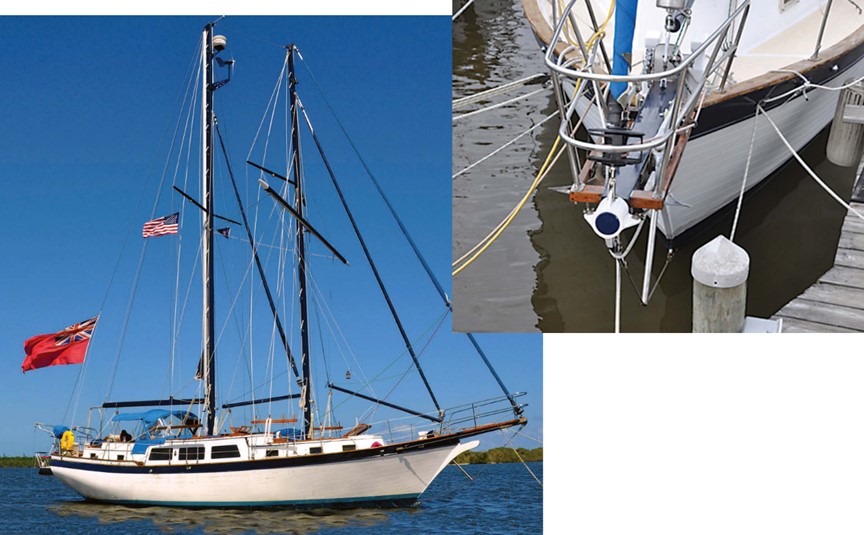
I was up the foremast of my 1977 Down East 45 schooner, Britannia, raised there by the electric windlass bolted to the bowsprit, when the windlass operator called up to me, “The windlass moves when the rope load hits the drum.”
It moves?
When I came down the mast, I could see the windlass was noticeably out of square on the bowsprit. Clearly something was amiss. From inside the chain locker, I checked the nuts on the four long rods that secured the windlass through the foredeck and they were all nicely tight.
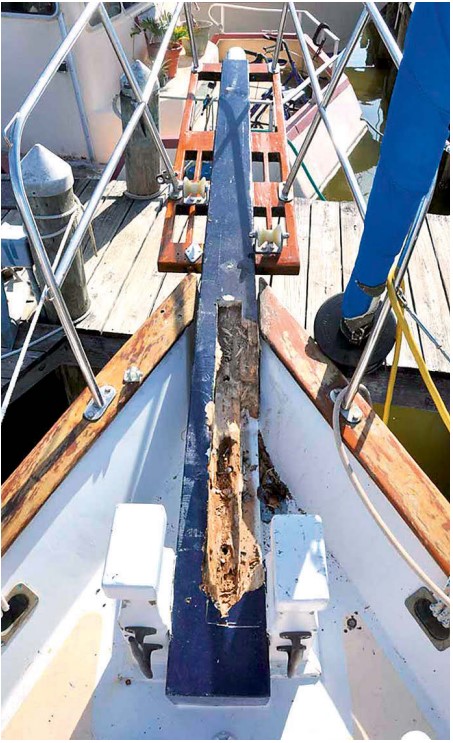
On deck again, I examined the bowsprit. It didn’t take five minutes probing with a screwdriver to realize there was some serious rot in the wood beneath the windlass. When I removed the windlass, more soft wood came out as I extracted the four rods. Further scouring with a chisel revealed that the rot in the bowsprit, which is nearly 10 feet long, was extensive.
At first I hoped it would be possible to repair the bowsprit in situ by scarfing in some new boards to replace the damaged ones. But that hope was dashed as I scoured more and more soft wood from the interior of the spar. I gave up after 3 feet! The boat needed a whole new bowsprit.
Britannia’s bowsprit was laminated from nine pieces of lumber glued together. It measured 9 feet 6 inches long and tapered from 8 inches square at the heel to 5 five inches square at the cranse iron on the forward end.
The previous owner’s log showed a new bowsprit was installed in February 2005, which didn’t persuade me much toward a third bowsprit in wood. But if I was to make a new one out of anything else, it had to be at least as strong as the one it would replace.
When considering bowsprit strength, the main factor to take into account is the tension in the headstay and the loads imparted by the headsail. These upward forces are resisted by the the bobstay, which in Britannia’s case is braced by a dolphin striker. When the bowsprit is properly rigged, the result of all these forces is a compression force on the bowsprit.
These interactions would be fairly easy to calculate in a simple static force diagram, and I found such a diagram in the copy of Skene’s Elements of Yacht Design a friend loaned me. However, a boat at sea hardly generates static forces, and a major unknown factor are the forces created when the bow plunges into a head sea, thrusting the complete pulpit into solid water. This imposes goodness knows what loads on the structure and nobody, including a sailboat architect, could tell me what those extra loads might be. Skene’s did include the sentence, “Since impact loads like head seas cannot be determined accurately, most designers apply a factor of three to five in their estimates.” I did not find that helpful.
Material questions
I talked to three local builders of wooden boats, all of whom said they could easily make a replacement bowsprit in Douglas-fir. So I made a drawing of the bowsprit and sent it to them. Upon seeing the drawing, one declined to quote and the others delivered shocking price quotes of $2,875 and $3,278! Apparently, the wood had to be shipped from the Pacific Northwest, about as far as it could be from where Britannia was moored in Florida. Also, even though I specifically asked for a time of completion, so I could plan the operation, neither builder gave me one. It was obvious to me that none of these people really wanted the job.
My next option was to see if I could buy the wood somewhere and build the bowsprit myself. I located a lumber supplier in Minnesota who quoted $830 for four 2-inch-thick finished boards of straight-grained Douglas-fir, each 10 feet long and 8 inches wide.
Building the bowsprit myself would be the cheapest way, but I was daunted by the task. First, I would have to glue and clamp the planks together, shape the massive balk of timber (weighing more than 200 pounds and about as big as a railroad tie) into a taper, then finish with a perfectly round 4-inch-diameter section on the end to carry the cranes iron. Because I had no covered facility, I would have to do all of this work with hand tools outside, on the dock, and subject to the weather. Over the years, I have undertaken some major projects on Britannia, including changing the rig from a ketch to a schooner, but this was just too much for me to take on at that time.
I decided to explore the possibility of having the spar fabricated in aluminum. At least it couldn’t rot and would likely be lighter. Luckily for me, my son-in-law, Jim, an engineer, offered advice on an aluminum design.
After researching different types of aluminum, I decided to specify 6061 aluminum alloy plate, 1/4 inch thick. This is a structural alloy and much stronger than regular aluminum. Drilling it is like drilling stainless steel.
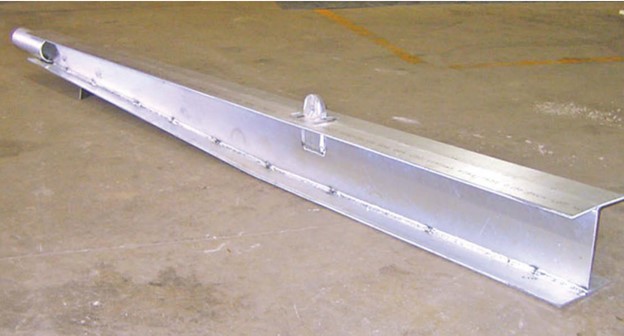
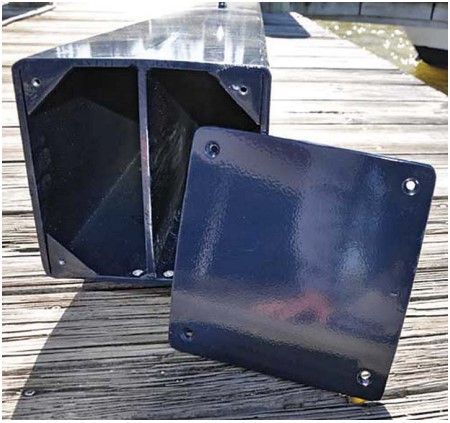
The new bowsprit needed to be the same shape and size as the existing spar so everything would bolt back in the same place. I therefore designed a box section with a vertical central spine the length of the interior. In short, this was an I-beam, a shape well-regarded for its resistance to both bending and compression.
I was interested in comparing the weight of an aluminum structure against a wooden one. I guessed the existing spar was made of something like Douglas-fir, which weighs roughly 35 pounds per cubic foot. I calculated the whole bowsprit was 3.24 cubic feet, which made its weight about 113 pounds.
The weight of 1/4-inch 6061 aluminum plate is 3.56 pounds per square foot. I worked out the square footage of each piece in the assembly and it all added up to 27.10 square feet. This, including a round tube at the tip to carry the cranes iron, gave a weight of about 100 pounds.
Aluminum it is
Two aluminum fabrication companies gave me estimates. One was $1,525, including powder coating both the bowsprit and cranse iron. The other was $2,200, delivered in raw form. It won’t be difficult for boat owners to guess which quote was from the “marine” fabricator and which was from a regular welding company near Orlando.
I decided to have the bowsprit made in aluminum, and gave the job to Twin City Welding & Erection of St. Cloud, Florida, near Orlando. They have done work for me before and I knew the excellent quality of their welding. Another advantage was that they could start the job almost immediately.
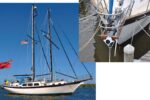
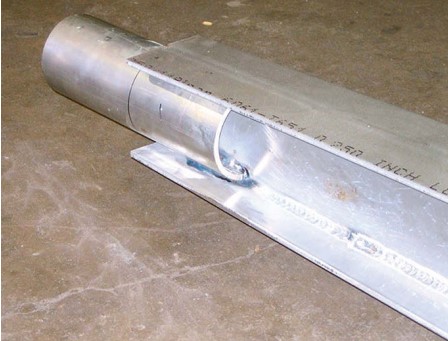
Twin City sheared all the pieces out of a 10 foot x 4 foot sheet. After bending the bottom piece slightly to form the underneath taper toward the bowsprit’s tip, they welded the top and bottom sections to the center spine. I also had a new staysail bracket welded through a slot in the top plate. The original bracket was bolted through the deck, so this detail eliminated two potential leaks. A 4-inch-diameter tube welded to the tip would carry the cranse iron.
Welding the two sides to the top and bottom completed the box. The result was a very stiff spar that looked magnificent in its dark blue livery that matches the rest of Britannia’s spars and the topside stripe.
I designed the heel plate to be screwed onto the end of the bowsprit so I could bolt the bowsprit to the two samson posts from inside. I also drilled two holes in the bottom, to drain any water that might find its way inside.
The bowsprit arrived exactly two weeks from the date I placed the order. It weighed 96 pounds — I was only 4 pounds off in my calculation!
Remove and install
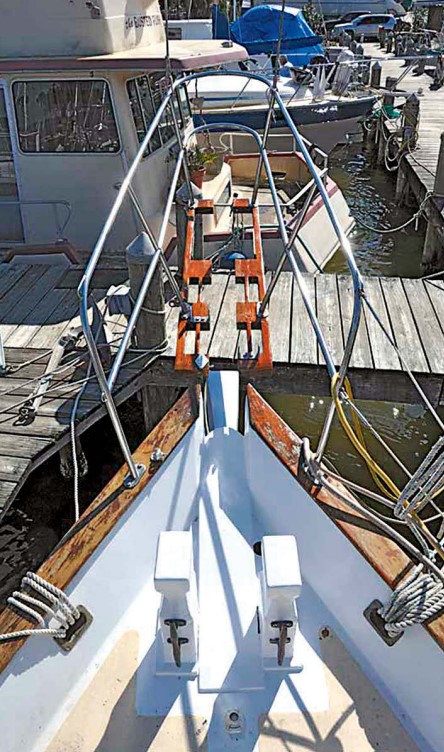
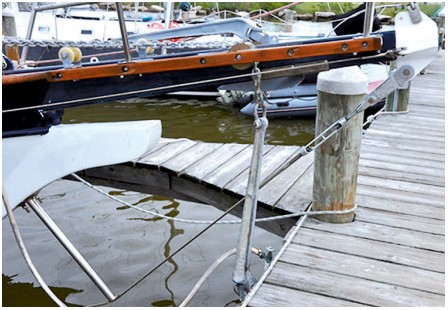
Before removing the damaged bowsprit, I used halyards on the foremast to support the weight of the pulpit and grating so I didn’t have to unbolt those cumbersome items from each other. I then unbolted all the fasteners that held the grating to the bowsprit and deck. Then, with the aid of a few willing helpers, I levered the damaged bowsprit clear from the bow. Britannia and her clipper bow looked very forlorn without her majestic bowsprit.
Allowing for wood that had rotted away, the bowsprit weighed 116 pounds. I was 3 pounds off with that calculation. I filled all the holes in the deck, then primed and repainted the area.
When everything was ready, I lowered the new bowsprit in place and carefully lined it up with the gratings and samson posts. I installed the Maxwell windlass with its bolts that pass all the way through the bowsprit and help secure it to the deck. I then drilled pilot holes though the samson posts and bolted the bowsprit to the posts from inside the tube.
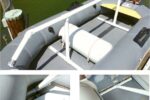
Before attaching the two gratings, I decided to sand and finish them — three coats of varnish restored them to like-new. I then drilled pilot holes through the bowsprit and bolted the gratings in place, using the original stainless-steel threaded rods. I plugged the holes in the gratings and samson posts with 14 1-inch and six 1 1/4-inch teak plugs, which I had to cut by hand because I didn’t have plug cutters for those sizes.
Everywhere the bowsprit and deck were in contact, I caulked the joints liberally with 3M 5200.
I pushed the cranse iron, which I’d had powder-coated white, onto its tube, then connected and tensioned the jib stay, forestay, bobstay, and whisker stays. To complete the job, I replaced both anchor rollers.
The reassembly operation took three days, during which time I removed and replaced the bowsprit for adjustments seven times. I did all this heaving and maneuvering with the boat in the water and the bow sticking over the dock. This was cheaper than hauling her and, because we didn’t need scaffolding or ladders as we would have on the hard, was easier. We could also continue to live on board.
Stress test
Finally, I wondered how we might test the strength and rigidity of the new structure. Of course, the ultimate test would happen at sea in heavy weather, but I decided to conduct a simple static test by bowsing down the bowsprit to see what happened.
I disconnected the jib and staysail stays and, with only the bobstay and whisker stays attached, I hooked the anchor under the dock, directly below the bowsprit. Then I tensioned the chain with the windlass, which I was pleased to see never budged. The force applied pulled the bow downward and the bobstay bracket disappeared under water. Another touch on the button and the winch pulled the bow down more, and drew the chain bar tight. Amazingly, the bobstay also remained taut — it would have gone slack had the the bowsprit deflected under the load. At this point we heard ominous creaking from the dock timbers, so I quickly slacked it off.
Hauling a heavy displacement boat down like this imposed some impressive loads on the bowsprit, but I saw absolutely no evidence of its shifting, or of the powder coat cracking anywhere along its length. On seeing the finished result, Jim wrote, “Based on the back-of-the-envelope calculations I did, and the way it’s been built, I think your new bowsprit is anywhere from five to ten times stiffer than a wooden job, and can probably withstand a load at least five times greater before yield or fracture.”
This was good to hear from an experienced engineer, I hope the sea doesn’t have other ideas.

Suppliers
Aluminum and fabrication
Twin City Welding & Erection
1855 Tileston Road
St. Cloud, FL 34771
407-892-5022
David Lucey, owner
Total cost $1,550 including nutsand bolts
Powder coating
Amera Trail
4840 East Irlo Bronson Highway
St. Cloud, FL 34771
407-892-1100
Roger Hughes has been sailing for nearly half a century as a professional captain, charterer, restorer, and happy imbiber on a lot of boats. His present project, the restoration of Britannia, a once run-down Down East 45, is nearing completion after five years (he thought it would take two at the most). Roger and his wife, Kati, look forward to cruising later in 2017 and using all the innovations he has incorporated in the boat, many of which have been featured in Good Old Boat. Roger’s website is www.schooner-britannia.com.
Thank you to Sailrite Enterprises, Inc., for providing free access to back issues of Good Old Boat through intellectual property rights. Sailrite.com