Years and years of antifouling succumb to chemical stripping
Issue 117: Nov/Dec 2017
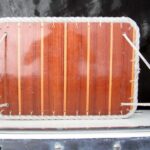
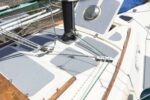
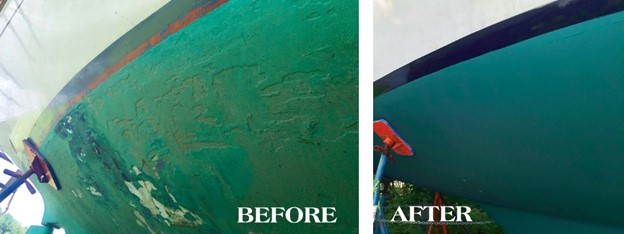
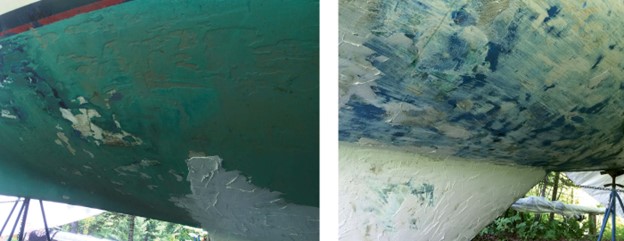
After a pressure washing at the boatyard, the hull of our new-to-us Morgan 382 did not present a pretty picture. While most of the paint remained firmly adhered, in many areas the force of the spray had peeled it away, leaving a very rough surface. It was obviously past the point where we could simply fix a few spots and apply a fresh coat. It needed to be completely stripped.
Removing bottom paint was something I could do myself, or I could pay to have it done. On the way to making that decision, I learned about the various ways of doing the job and their cost, and weighed the difficulty of doing it myself against the money that would save me.
There are several ways to strip layers and layers of bottom paint from a fiberglass hull. Sandblasting is one of the popular methods, although sand is not the best material to use on a fiberglass boat as it can damage the gelcoat. A more benign abrasive, such as soda (sodium bicarbonate), walnut shells, or dry ice is a better choice.
In our area (Maine), specialty firms will come to the boat, enclose it in a tent, and remove the paint. For the Morgan 382, I was told that would cost between $1,200 and $1,400. I found online a rule of thumb for estimating the cost of soda blasting that says to square the boat’s length (LOA in feet) and add a dollar sign before the result. That comes to $1,444 for a 38-foot boat. The price could vary by region, but it was more than I wanted to spend.
Stripping trials
I happened to have my boat at home over the winter, under a cover (see “A Winter Cover for All Seasons,” September 2016), so I could choose whatever method best suited me. Owners of boats that are kept in boatyards may have fewer options, as some yards restrict the type of work that can be done on a boat and by whom.
Not wanting to use a blaster in my yard, I started investigating alternatives to blasting.
First I tried scraping. I had once scraped the bottom paint off another boat with a carbide-blade scraper. The paint came off pretty easily and I removed it all in about two half-day sessions, but using the same scraper on the Morgan did not work out as well. In too many areas, the paint was too hard and too well adhered.
I next tried a random-orbit sander with a vacuum attachment. It didn’t take long for me to realize that this approach would take forever, I risked damaging the gelcoat by sanding too deeply, and holding the sander above my head for any length of time was a form of torture. I stopped.
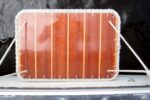
Attempting the job with the sander did reveal how many layers of paint I was up against. I counted at least ten distinct color changes and figured some of those color layers were made up of several coats.
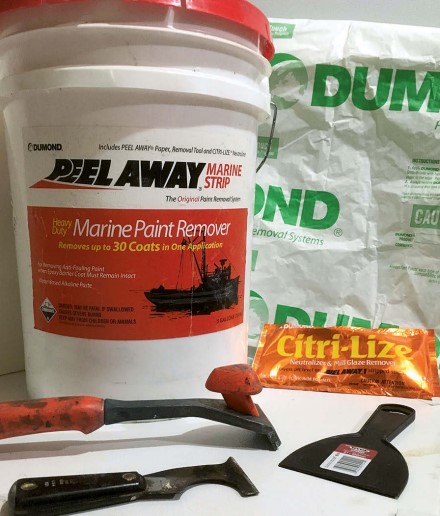
My next idea was chemical stripping. From the many brands and chemistries of bottom-paint strippers available I selected Dumond Chemicals’ Peel Away system, in which a very strong alkaline water-based paste is applied over the paint and then covered with plastic-coated paper. The paper prevents the stripper paste from drying out while it softens the paint, which it should do in 24 hours, after which the whole mass can be scraped off. Professionals use spray equipment to apply the paste. It can be done by hand but just takes longer.
The company’s literature says the system is formulated for bottom paint and will not harm epoxy barrier coats. It also claims that more than 30 coats of paint can be removed in one application. Of the chemical strippers I reviewed, the Peel Away product seemed to be less hazardous and more environmentally friendly than those that contained methylene chloride or flammable solvents.
Trial and selection
The manufacturer offers two formulations of Peel Away for use with bottom paint, Marine Safety Strip and Marine Strip. I bought 1-pint samples of both through the company website to try them and determine which would work best for me.
When the springtime temperatures warmed to the required 50°F, I applied both samples on the side of the keel in patches about 2 feet square. After 24 hours, I lifted a corner of the paper and scraped through the softened paint in both sample areas. Then I scraped off the whole mass of paper and paint onto a drop cloth. The Marine Safety Strip sample did not soften all the paint layers, and in my test area it seemed to be stopped by a particular layer of black paint. I may not have let it work long enough.
The Marine Strip sample removed all of the paint down to the gelcoat, so I decided to use that. I bought three 5-gallon kits based on the 20-square-feet-per-gallon coverage stated by the manufacturer and my calculation of roughly 300 square feet for the area of my hull. The numbers worked out well, as I had only a little paste left over when the job was done.
Each 5-gallon kit cost me $160 at Hamilton Marine, and by buying them locally I avoided the extra charges for shipping hazardous material. Each kit included the special covering paper, a neutralizing chemical, and test strips. The paper is laminated to a special plastic film. I found that 18-inch-wide Reynolds plastic-coated freezer paper worked well when I needed more.
Preparations
I would not have attempted this method if I had to drive a long way to and from the boat. The job is done in piecemeal fashion and the timing of each step is critical.
Having extra jack stands on hand was a big help throughout the stripping and repainting job, as I could use them to support the boat when I needed to move a stand to tackle the area under its pad.
I also had a tarp that covered the entire boat and extended out over the sides and allowed me to work rain or shine.
I found protective wear absolutely essential, as Peel Away is nasty stuff to get on skin. I wore a Tyvek suit with a hood — regular clothing or the cheap paper suits that painters use are not sufficient. I also wore rubber boots, heavy rubber chemical-resistant gloves such as fishermen wear, a face shield, and a hat with a brim I wore under the hood of the Tyvek suit. I sealed the gap between the sleeves of the suit and the gloves with Gorilla tape, and pulled my pant legs down over the tops of my boots to prevent paste from falling inside. Because I was working over my head a lot and often kneeled on the ground where paste had dropped, I made sure my suit had no tears in the knees, and kept tape nearby in case I found any.
I masked the prop and shaft with plastic and masking tape. I learned that, because of the consistency of the paste and the method of application, one strip of masking tape was not enough to protect the boot stripe. Fortunately, I was planning to repaint the boot stripe anyway.
Paste and peel
Some of the Peel Away products can be applied with an airless sprayer, but the Marine Strip is applied with a trowel. Using a 4-inch plastic putty knife, I applied the paste directly from the can in a rectangular area and then covered it with a sheet of the paper. The paste has a consistency and texture similar to that of drywall compound, and laying it on the hull was rather like doing a ceiling. I tried to work methodically, spreading it evenly and avoiding drips and drops as best I could.
Working alone, I was able to apply one 5-gallon can of paste on a Saturday morning and return 24 hours later at midday on Sunday to strip the softened paint. It took me three weekends doing it this way. Because of the need to move stands around to get at the patches under the pads, it would probably take three such sessions to strip a smaller boat.
When the stripper had done its job, I removed the paper, paste, and softened paint by pushing a broad putty knife under a corner and peeling the entire mass off into a plastic garbage can lined with a heavy contractor bag. I had to apply more paste and paper in a few places, mostly where I’d left a gap in the paper and the paste had dried out prematurely. These areas were small and I used the freezer paper.
The toxic part of the mass is actually the old paint. Because I was worried about harming the grass under the boat, I took great care to scrape off as much of the paint as I could before rinsing off the residue with a high-pressure water spray. I hoped to use the least amount of rinse water possible. I’d laid under the boat an old plastic tarp that was slightly perforated by weathering. The water strained through that as it ran off. After the job was done, I was happy to see no sign of damage to the grass.
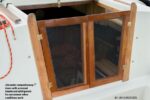
As the stripping progressed, I was pleased to see the shiny white gelcoat come into view. The process was so thorough that, had there been any defects that needed repair, I would have seen them clearly. I saw nothing to indicate that the stripper had damaged the gelcoat.
When I was sure the surface was thoroughly clean, I mixed the neutralizing chemical with water, per the instructions provided, then sprayed it over the entire bottom using an inexpensive pump-up bug sprayer. Once it had dried, the hull was ready for the new paint. I used the sander and 80-grit discs to scuff the surface and remove a few remaining spots of old paint, then applied one coat of epoxy as a primer, followed by two coats of bottom paint.
Analysis
For my 38-foot boat, I paid about $500 for the stripping supplies and another $250 or so for epoxy primer and bottom paint. Although there were many steps in the stripping and repainting process, none of them were really difficult. I’m glad I did the job myself, as it came out very well and I saved about $1,000.
Steve Ruell is a marine/structural engineer in Maine. He and his wife, Margi, have been sailing out of Belfast, Maine, for more than 20 years, exploring the Maine coast first in a Hunter 30 and now aboard Destiny, their Morgan 382. As retirement approaches, Steve and Margi are making plans for voyages to more distant destinations, starting with Nova Scotia and Newfoundland.
Thank you to Sailrite Enterprises, Inc., for providing free access to back issues of Good Old Boat through intellectual property rights. Sailrite.com