A gourmet cruiser’s tasty substitutes for fresh produce

Issue 48 : May/Jun 2006
It was the end of a perfect day. Earlier, we’d had a great spinnaker run along Lake Superior’s Ontario wilderness shoreline into a pristine anchorage. Now we were enjoying a meal of freshly caught lake trout grilled on the barbecue with wild rice and a tossed-lettuce salad. Ron was murmuring something about the great meal and the good life, to which I replied, “Well, enjoy it now because that’s the last of the lettuce.”
With 10 days to go to our next port, we both knew what that meant. It brought back memories of cruising in the eastern Caribbean: in many of those smaller ports, lettuce in any form was non-existent. We had learned to make do with salad substitutes, often just made from cans.
Even with special care, lettuce is one of the first things to deteriorate in the fresh-produce department of any ship’s stores. Drying it before storage and allowing it to breathe seems to help. Compact-head lettuce, such as iceberg or Boston lettuce, lasts longer than its leafy counterparts such as Romaine lettuce or even spinach. Yet, even with refrigeration, the shelf life of head lettuce is a little more than two weeks.
Lettuce substitutes
One of the easiest substitutes for lettuce in sandwiches is thinly sliced dill pickles layered on a piece of bread or bun before adding the main sandwich ingredients. The extra crunch and flavor make a nice addition to most sandwiches.
Cabbage is a great substitute for the fresh crunch of a lettuce salad, as it can last up to four weeks without refrigeration. It is grown in many of the remote areas of the Bahamas and Caribbean and is more readily available. In fact, coleslaw is almost a staple in many islands. It seems that everyone has a favorite coleslaw recipe.
Coleslaw consists mainly of shredded cabbage and thinly diced onion with any of the following options: shredded carrots, chopped green pepper, or celery. Some even add raisins for a little extra flavor or peanuts for an added crunch.
There are two basic types of coleslaw: one made with a creamy dressing, the other with a vinegar-and-oil dressing. The following dressing recipes are used with half a head of shredded cabbage and one small onion thinly diced, along with any of the above options thrown in.
Creamy coleslaw dressing
1⁄4 cup mayonnaise
2 Tbsp. milk, or mixed powdered buttermilk, or sour
cream*
2 Tbsp. white vinegar
1 Tbsp. sugar
1⁄2 tsp. celery seed
1⁄4 tsp. salt
1⁄8 tsp. pepper*Jury-rigged sour cream can be made by adding 2 tsp. lemon juice to 1 cup of milk and chilling while it clots, adding a little more lemon if necessary.
Mix the ingredients and add them to the shredded cabbage, onion, and any of the other veggie options. A handful of raisins or peanuts goes especially well with this one. If possible, chill for a couple of hours before serving.
Coleslaw vinaigrette
3 Tbsp. white vinegar
2 Tbsp. vegetable oil
1 Tbsp. sugar
1⁄2 tsp. celery seed
1⁄4 tsp. salt
1⁄8 tsp. pepperCombine the ingredients and beat well. Pour over cabbage, onion, and other veggies, mixing evenly. If possible, refrigerate a couple of hours before serving.
With either recipe, a tablespoon of spicy brown mustard will add a lot of zip to the salad.
Salads from cans
As good as coleslaw and other cabbage salads are, there comes a time when the cabbage is gone, too, or you’re looking for some variety. That’s when we turn to our can lockers, and creativity takes on new proportions as we put together salads made primarily from canned veggies. Like coleslaw, another favorite with sailors is three-bean salad and its variations.
Three-bean, four-bean, five-bean salad (take your pick)
1 can (16 oz.) green beans
1 can (16 oz.) yellow wax beans
1 can (16 oz.) red kidney beans
1 can (16 oz.) garbanzo beans (optional)
1 can (16 oz.) baby lima beans (optional)
1 medium onion, thinly slicedMarinade:
1⁄2 cup white, cider, or wine vinegar
1⁄2 cup vegetable oil
1⁄2 cup sugar
1⁄2 tsp. salt (optional)Drain beans and combine them with the onion in a large bowl. Mix the marinade ingredients in a separate bowl and add this to the bean mixture. Cover and chill at least two hours, the longer the better for flavors to blend. With refrigeration, this salad will keep a long time. If you are going to make the five-bean version, it’s a lot of salad, especially for two people. In that case, this is one recipe you might want to reserve for taking to potluck dinners.
There is another bean salad we have used throughout the years, especially when we were cruising in the eastern Caribbean. It is amazing in its simplicity and quite tasty with slivered water chestnuts adding a decided crunch.
Green bean and mushroom salad
1 can (14.5 oz.) French-style green beans
1 can (4 oz.) mushrooms stems and pieces
1 can (8 oz.) water chestnutsDrain all cans, cut water chestnuts into slivers, and mix. We particularly like to add a vinaigrette dressing, either from a bottle or made from seasoning packets. In a pinch we have used diluted soy sauce with this one.
Another salad that is incredibly simple is one made from canned beets and onion and then marinated in vinegar and oil.
Marinated beet and onion salad
1 can (15 oz.) sliced beets
1 small onion, cut in thin slicesMarinade:
1⁄4 cup white or wine vinegar
2 tsp. sugar
1 Tbsp. cooking oilDrain the beets, cut into thin slivers, and add the onion. In a separate bowl, dissolve sugar in vinegar and oil before adding to the beet and onion mixture. Note that this recipe doesn’t have to be chilled before serving, but it should be allowed to sit for about an hour for the flavors to blend.
In the earlier years of sailing exploration (1700s), sauerkraut was sometimes added to a sailor’s diet in an attempt to stave off scurvy, a disease caused by a vitamin C deficiency. Since cabbage was known to be a good source of vitamin C, it was thought that sauerkraut (fermented cabbage, which didn’t readily spoil) was the answer.
Modern-day sailors needn’t worry about scurvy, yet canned sauerkraut still finds a useful spot in the galley, particularly in making delicious salads. Although there are many variations of sauerkraut salad, this is one we have adapted from a number of recipes.
Sauerkraut salad
1 large can (27 oz.) sauerkraut
1 jar (2 oz.) pimentos, diced
1 medium onion, diced
1 cup diced green pepper or celery if you have itMarinade:
2⁄3 cup white or cider vinegar
1 cup sugar
1⁄3 cup cooking oil
1 tsp. celery seedDrain and rinse sauerkraut. Add diced pimento, onion, and optional veggies. In a separate pan, dissolve sugar in vinegar, heating a little if necessary. Mix in oil and celery seed and add to sauerkraut mixture, stirring to coat evenly. If kept chilled, this salad will last indefinitely.
There may come a point when you want a fancy salad to serve to guests but all you have are cans. The following concoction, from a number of recipes, may serve. With the added red color of the pimentos, it looks quite festive. This is another good recipe for a potluck dinner.
Marinated artichoke and hearts of palm
1 can (14 oz.) artichoke hearts
1 can (14 oz.) hearts of palm
1 can (4 oz.) mushroom stems and pieces
1 jar (2 oz.) canned pimentos, dicedMarinade:
3⁄4 cup vegetable oil
1⁄2 cup lemon juice
1 Tbsp. sugar
1 tsp. dry mustard
1⁄2 tsp. each: salt, garlic powder, basil
Dash of black pepperDrain all cans and pimento jar. In a large bowl, break artichoke hearts and hearts of palm into smaller pieces with a fork. Add mushrooms and diced pimento. Mix marinade in a separate bowl until well blended. Pour over veggies and mix thoroughly. Chill in marinade for at least 4 hours.
Note: If you don’t want to make the marinade, a nice substitute is Italian-seasoned vinaigrette dressing from a bottle.
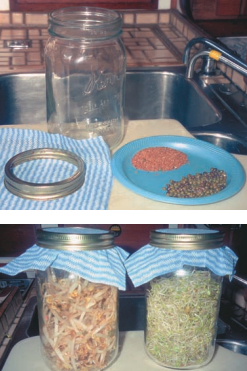
Growing sprouts
More variety? You’re looking for that extra crunch of something crisp? For many sailors, sprout gardens provide the answer. Sprouting is simply taking seeds and giving them enough water so they pop open and grow. Nutritionally, sprouts are higher in proteins, enzymes, minerals, and vitamins than the mature plant. They are an excellent source of vitamin C and many of the good B vitamins. Eaten raw, they are deliciously fresh and add texture and color to many recipes.
There are a number of reasons why growing sprouts is so adaptable on a boat. One is that the seeds take up little space. With sprouting, many seeds increase 20 times or more in volume. The cost of growing sprouts is relatively inexpensive when compared to buying the mature plants. A couple of tablespoons of seeds will fill a quart jar with sprouts. But the main reasons sprouting works so well on boats are that it is so easy, takes up little space, and can be done without sunlight.
Sprouts have three requirements for growth.
- Air. Sprouts need to breathe or they will mold and startto rot. They shouldn’t be put into sealed containers.
- Water. Initially, sprouts need a good soaking for at least eight hours or overnight. Then they need to have a good rinse with fresh water at least twice a day. If you miss a rinsing in the first few days, they will be permanently set back. If they dry too much, they will die. On the other hand they need good drainage. It is important that they don’t get too much water or they will drown.
- Temperature control. Although there is some leeway in the temperature range for germination and growth, the best temperature for sprouting seeds is between 70°F and 75°F. Cooler temperatures are good for storage once the sprouts are grown, but during the growing process cooler temperatures will slow the growth. In extremely hot temperatures the sprouts will wilt and die. These temperatures can be controlled somewhat with the temperature of the rinse water used. When sailing in cooler climates use warm water; in warmer climates use cool water.
There are some secondary conditions to consider. One is space. Because the seeds are so small, it is tempting to put a larger number than necessary in a sprouting jar. When tempted, remember they will increase to 20 times their volume. As they grow and fill the jar, their growth will actually be retarded if there is not enough space for expansion. Another consideration is that although sprouts don’t need light for initial growth, if you want them to “green up” they will need some light toward the end of their growth period. However, avoid direct sunlight. A few hours a day in indirect light toward the end of sprouting should do the trick.
Types of seeds to use.
Any kind of seed or bean can be sprouted, but some are better than others for eating. Some of the most common for eating raw are: alfalfa, cabbage, clover (red), lentils, mung bean, radish, and sunflower. A nice alternative to sprouting single seeds is to get a sprout mix. It is important to avoid using seeds from plants that may have poisonous parts. Do not eat potato or tomato sprouts; they are poisonous. Avoid seeds that are produced for planting. Make sure that any seeds you’ll be eating have not been previously treated with chemicals. To be on the safe side, it is prudent to purchase seeds packaged for sprouting. Certified organic seeds have been grown and processed to minimize all types of contamination. Health-food stores and cooperatives are a good source for sprouting seeds.
There have been a few news stories relating to salmonella contamination in sprouts. It appears that these seeds had been contaminated with animal waste and were intended to be used as a farm crop. To be on the safe side, use designated organic sprouting seeds. It also is important to refrigerate harvested sprouts until used.
Tools for sprouting.
To grow sprouts, you need a container to hold them as they grow and a means for draining off the liquid. Any container, such as plastic bottles and glass jars, can be used. Even a cottage cheese container will work. Some people will use a paper plate with a wet paper towel over the seeds and sprouts. Serious sprout growers often use large trays. Some even use hemp or linen drip bags. In the small confines of a boat, however, jars seem to work best. Sprouting jars should have a wide mouth for rinsing the sprouts and getting them out when grown. A glass jar allows you to watch the progress of the sprouts.
You also need to provide some means of draining water from the sprouts. A piece of cheesecloth or muslin held over the mouth of the jar with a rubber band is all that is needed. We have also used a fresh disposable washcloth. You can buy manufactured lids with holes of varying sizes. We particularly like using glass quart canning jars as the screw-on rings hold the drainage cloth in place. After rinsing, tilt the jar in a bowl to allow for complete drainage.
Steps in sprouting
There are three basic steps in sprouting seeds.
Soak organic seeds in water for eight hours or overnight in a warm dark place. For a quart jar, use 2 tablespoons alfalfa, cabbage, clover, radish, or 1⁄2 cup of mung beans or lentils. During this time the seeds will absorb 2 to 3 times their dry volume in water, so be sure to add enough water to keep them covered.
Rinse and drain twice a day. Fill the jar with water, swirl, and drain. Some sprouting advocates suggest rinsing 3 or 4 times a day. Particularly if you are cruising in salt water and rationing the ship’s fresh water, rinsing twice a day is sufficient. The important thing is to keep the sprouts moist without soaking. After a few days of growth, loosely separate the tangled mess, airing the sprouts in the center.
After draining, invert the jar at an angle in a bowl to allow for additional drainage. Seeds allowed to sit in residual water will rot. However, do not mistake the fuzzy white root hairs of radishes and some other sprouts for mold. Return the jar to the dark warm place. In the last few days of sprouting leave the jar out in indirect light for a few hours to promote “greening-up.”
Harvest your sprouts. When they are between 1 and 2 inches long, your sprouts are ready to eat. This varies according to the type of sprouts but usually in 3 to 5 days. Not all sprouts will mature at the same time. It may be necessary to remove just the ripe sprouts and let the less-developed ones continue growing. This promotes a continuing harvest. Sprouts left too long before harvesting will have a strong bitter taste. Although the hulls can be eaten, some sprouts taste better if they are removed. To do this, just swish a handful of sprouts in water to loosen and remove the hulls before storage. Drain any excess water and store in a closed container, such as a plastic bag, in the icebox or fridge. Sprouts should keep up to a week, but they must be rinsed and drained every three days.
Using sprouts. One of the biggest advantages in growing sprouts is their versatility in the galley. They are a welcome addition in any kind of salad, especially those made from cans, as they contribute color and a fresh crunch. Sprouts can also be used as the main component of a salad, as seen in the following recipe.
Marinated sprout salad
2 cups of mixed sprouts (alfalfa and mung work well, or a commercially prepared mix)
1 can (8 oz.) water chestnuts cut into sliversMarinade:
3 Tbsp. white vinegar
1 Tbsp. lemon juice
2 Tbsp. sugar
1⁄8 tsp. each salt, pepper, basil, and thymeMix sprouts and slivered water chestnuts in a bowl. In a separate bowl mix thoroughly all ingredients for the marinade. Pour over sprouts and water chestnuts, coating evenly. A bottled vinaigrette is just as good, if you don’t want to make your own marinade. A half-cup of peanuts can be substituted for the water chestnuts.
Sprouts also substitute well for lettuce. Use sprouts instead of lettuce in sandwiches. They are especially good with tuna or ham salad sandwiches. Sprouts work well in pocket bread and sub sandwiches. Even grilled cheese sandwiches get an extra kick with sprouts. For a main course, chilled chicken salad over a bed of sprouts is delicious. We have used sprouts in place of lettuce in tacos and California hamburgers as well.
Most sprouts that can be eaten raw are equally good cooked. They are a natural component in stir-fry meals. They are good when added to soups. Adding a handful of alfalfa sprouts to omelets just before folding adds an interesting flavor and crunch. Some people even add sprouts to yeast breads, as they seem to help the yeast in producing a higher-rising loaf.
One of the challenges of long-term cruising is making do without. The concept of “jury-rig” is one that definitely has its origins in shipboard existence. Yet this doesn’t necessarily imply hardship. Often our substitutions are as good as, or better than, the original because they add variety.
Thank you to Sailrite Enterprises, Inc., for providing free access to back issues of Good Old Boat through intellectual property rights. Sailrite.com