It’s one thing to find it, quite another to apply it
Issue 53 : Mar/Apr 2007
As far as we were concerned, our new boat was a great success. All her systems were working well. She sailed like a dream and looked lovely on the water. The only thing we didn’t like was her name. Each time we hailed someone on the radio we had to think about what she was called. We spent a lot of time explaining to our fellow boaters that the moniker on her stern was not our choice but the previous owners’ choice. It just never quite fit. It may have suited her former owners but it just did not work for us. We decided to change it . . . but to what? This would prove to be one of the biggest challenges we faced in the restoration of our 1984 Endeavour 35.
The name on our craft had to speak to us on a personal level. We wanted our vessel’s name to fit with her character and ours. The name had to be feminine in keeping with maritime tradition. We wanted to register our boat in Canada. This required us to find a name that was not yet on the List of Ships registered with Transport Canada. We debated for six months on the issue.
The deadline for launch was looming and we had to settle on something. The solution to this problem was on the Internet. We searched through the lists of baby names offered on a number of sites. We paid careful attention to female names and read through lists from numerous languages. Most of the name sites offer meanings for the names. Some sounded good but had negative definitions. Others had great connotations but sounded bad.
Accumulated a few
As we came across hopefuls, we wrote them down. Once we had accumulated a few options, we checked their availability for registry in Canada. The ones that weren’t got the ax. Next we gave them the “hailing test.” Any vessel name has to be spoken three times in quick succession when hailing. If a name gave our tongues difficulty, it ended up in the reject pile.
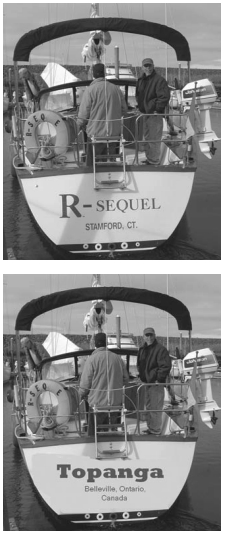
After a few hours we ended up with a handful of prospects: our short list. The final test was how they looked on the boat. Again the computer came in handy. Using Windows Picture and Fax Viewer, I brought up a photo of the stern that I had on file and opened it for editing. I selected the gelcoat color on our boat from the color chart and electronically painted over the old name. Once painted, the stern looked blank. I then clicked on the text button, created a field the size of the new name and typed it into the box. Once typed, I could manipulate the size, font, and color of the new name using the options on the toolbar. This gave us a great visual on our choices. Some of the name choices ended up as our screen saver for a few days to see how they held up.
By repeating this process with all of the names on our list, we were able to come to a decision. Our boat had a name. From now on she would be known as Topanga, a Native American word for “where the mountain meets the sea.” The definition was what caught our eye initially and it was available for registration. We could repeat it three times quickly without stumbling, and, most importantly, it looked great on our virtual transom (see images at left).
Renaming your boat makes it your own. Once the new name was on her, we felt a closer bond to our vessel because now she was really ours. The name on her stern was more than just a means of identification. Her name spoke of her strength, her beauty, and what she meant to us as owners. We enjoy hearing her name called out on the radio, “Topanga, Topanga, Topanga . . .”
“This is Topanga. Go zero seven.”
Out with the old
Removing old vinyl lettering from gel-coat is simple. With the help of a little heat from a hair dryer or a heat gun, the letters can be lifted off with a dull, flat scraper. Avoid using razor blades as they tend to dig in and will leave ugly scratches for you to deal with later. Once the letters are removed, the glue residue will wipe away with a bit of acetone and a clean cloth.
You may find that the gelcoat has remained high under the old vinyl. The letters protected the surface from abrasives and UV rays so the extra thickness leaves an obvious ghost of the old name. If you are replacing the vinyl with the same name and intend to use the same font, you can leave it as it is. If, however, you wish to change the name or font, this ghost will have to be removed.
We took an orbital sander with 220-grit paper and gently sanded the areas where the old letters had been. (Note: The recommended way to do this is to wet-sand by hand. Start with a less aggressive 600-grit paper. –Eds.) Take your time and occasionally run your hand over the surface to see if the raised area is noticeable. Gelcoat that has been sanded with extra fine paper can be brought back up to gloss with rubbing compound. Leave the waxing until after your letters have been applied. Some discoloration may remain in the gelcoat from years of protection from the sun. This will fade to the color of the rest of the stern over time.
Names painted on a gelcoated transom will come off with acetone and a dull scraper. Start in one corner and dampen the painted area with acetone. Allow the paint to soften and take it off with the scraper. Once most of the paint is removed, you may have to sand the area lightly, wiping with an acetone-dampened cloth occasionally to pick up any stray paint dust. (Note: As an alternative, oven cleaner can remove painted letters if you’re careful. Brush-on paint stripper can also work. Do not use either strong chemical while your boat’s in the water, since the runoff can hurt nearby boats and marine life. Similarly, avoid spraying oven cleaner on windy days for fear of nasty side effects to you and nearby boats. –Eds.)
Painted boats are different
Painted boats pose another problem. Products like Awlgrip and Brightside do not like to be sanded. Excessive heat will bubble the paint and acetone will remove it. In most cases, if the letters do not come away easily, you will have to repaint the transom. Even if you manage to remove the letters, if a ghost of the old name remains, it is not repairable without repainting.
Once we decided what to call her and what font we would use, we had to get it on the stern. We decided early on to use vinyl letters. They are durable and bright, resist UV, and are inexpensive to have made. Using the photo I had manipulated on the computer, I estimated the actual size of the new name on the stern. One of our local printers took our information. We selected a color from his vinyl stock that matched the accents on the boat, and in a couple of days we had our letters.
Applying vinyl letters can be a nightmare if it’s done incorrectly. You cannot rush the process. Once you have committed, you cannot back out. Careful preparation will assure you a final product that you will be proud to display at the marina.
First, make sure your transom is clean and free of wax. Using an acetone-dampened cloth, clean the surface where the letters will be fixed. If the air is cool or damp, vinyl letters may not adhere properly. It was cool the day we did our boat. Once the acetone had dissipated, we took a heat gun and carefully warmed the gelcoat. If your boat has been painted, you may wish to use a hair dryer, since too much heat will cause your paint to bubble.
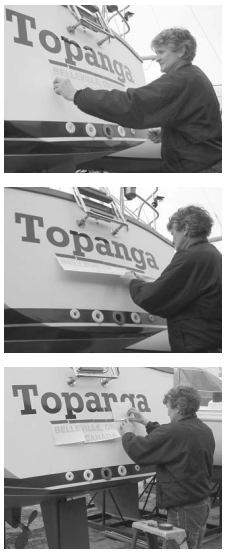
Our new name was delivered in one large piece. The vinyl cutouts were sandwiched between two pieces of waxed paper. We laid out our tools in preparation for the job. First we held up the new name and made sure it was measured properly. We trimmed off the excess waxed paper above the name 1⁄2 inch from the letters. Using a few small pieces of masking tape, we put the name on the transom roughly in the location it would be fixed.
Reference point
We centered it on the stern by eye, using the backstay as a reference point. If your boat has a split backstay, you can mark the center on the stern with a piece of tape. Now that we had things close to where they would be, we measured to make sure it was all level. After a few adjustments, we had things where we liked them. We then taped along the entire top of the waxed paper and rubbed the tape well to make sure we had a good bond. When using large letters, it is easier to apply one or two letters at a time, since smaller groupings of letters are easier to install in blocks. We cut from the bottom of the waxed paper to the tape running along the top.
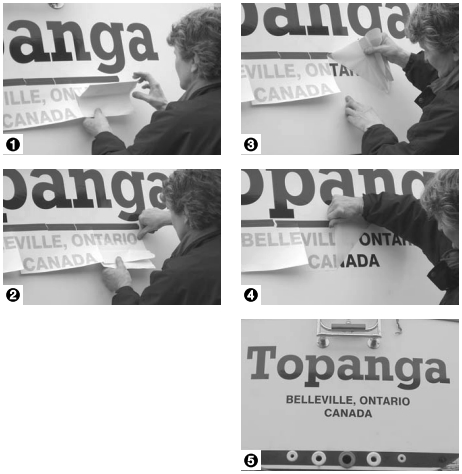
Beginning with the first letter, we lifted it up to reveal the back and peeled off the waxed paper backing. Once the vinyl touches the transom it will stick, so you must make sure to apply it from the top down, taking up any slack in the waxed paper. This will assure that you have placed the letter exactly where you registered it when you took your measurements.
Using your thumb, gently rub the letter from the top down. Once the entire letter has been adhered, go over it again, making sure the bond is good with no wrinkles or bubbles. Now the top layer of waxed paper can be gently removed, taking care that the letter does not come off with it. Repeat this process, one or two letters at a time, until complete.
Once the hull has been prepared and the graphic positioning has been marked, another way recommended by vinyl lettering professionals is to spray the hull and the sticky back of the graphic (after carefully removing the paper backing) with Windex or a mixture of water and a capful of baby shampoo or dish detergent, such as Joy. The diluted soap coating on the lettering and hull allows you to slide the decal around on the hull to some degree. When you are pleased with the positioning, squeegee the water out from under the letters. Work the squeegee from the center outward. Let the letters maintain contact with the hull for 15 minutes (or longer on a cold day) before carefully peeling the top covering away. Some further squeegee work may be necessary if any letter corners let go. When the covering has been removed entirely, squeegee each letter once more.
The whole job took only a couple of hours to accomplish but was, by far, one of the most satisfying projects I have done so far on our boat. With a name we chose on her stern, Topanga is now truly ours.
Thank you to Sailrite Enterprises, Inc., for providing free access to back issues of Good Old Boat through intellectual property rights. Sailrite.com