It supports a whole lot more than an over-the-cockpit solar array
Issue 119: March/April 2018
“Don’t do it . . . just don’t.” That’s the advice we got from nearly everyone we talked to after deciding to build — ourselves — an over-the-cockpit arch on our 1979 Dufour 35, MonArk. We’d already considered several mounting options for the 400-watt solar panel array we wanted to install, and determined that a structural arch made the most sense. But after receiving a couple of quotes over $5,000 for a “simple arch,” and being young and foolish, we decided to try it anyway. What did we really have to lose?
Well, building it proved more difficult than I anticipated, but we ended up with an attractive, skookum arch that ably holds our solar panels — and offers much more — and cost us only a little more than $250.
A little about arches
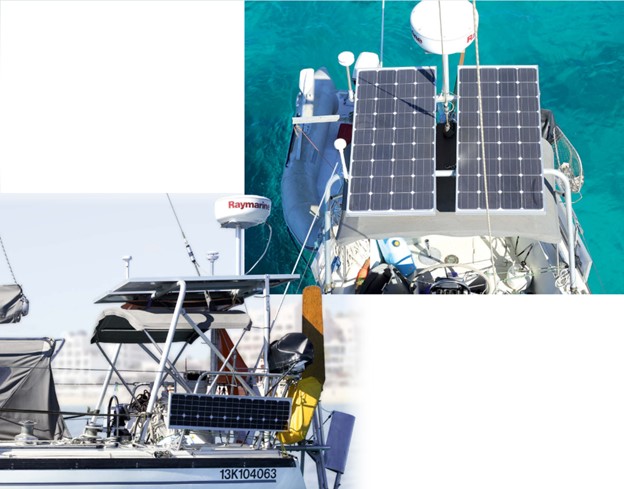
Structural arches, also commonly referred to as radar, solar, or stern arches, are a common feature of coastal-cruising and offshore-outfitted sailboats. They are used for a variety of purposes, but most commonly to support a solar array and/or wind generator, mount a radar radome and various communications antennae, and carry a dinghy. There are as many shapes and sizes of structural arches as there are sailboats. Three primary factors helped us determine the design of our arch: aesthetics, cost, and function. A custom arch provides many advantages, but can be prohibitively expensive (commonly from $5,000 to $12,000). But with a little sweat equity, limited metalworking skill, and some careful measuring, there’s no reason why a boat owner can’t build a sturdy arch for a fraction of the going rate.
This article details my experience designing, fabricating, and installing a simple aluminum arch to carry solar panels, radar, an AIS antenna, and a weather station, not to mention a hundred other small things. I provide very little engineering guidance, but the design and fabrication principles I followed are common to a wide variety of arches, and I hope other boat owners can use them as a basis for designing an arch to suit individual needs and boat shapes. I recommend that anyone choosing to do so first pass their design by someone knowledgeable in structural engineering.
While the size of the solar panels we planned to install was a major determinant of the dimensions of our arch, we had to look at some other factors. The boom was well clear of our proposed setup but we had to allow for the height and swing radius of the windvane. We also didn’t want to create any obstruction to getting on and off the boat, especially at head height.
Materials
Three materials commonly used to construct an arch are stainless steel, aluminum, and fiberglass. When selecting a material, the factors to take into account are aesthetics, price,
strength, and ease of construction. I made a subjective traffic-light comparison of the different materials to assist our decision-making process. Stainless steel and aluminum compared closely for our needs, but as our chief concerns were price and ease of construction, we decided on aluminum.
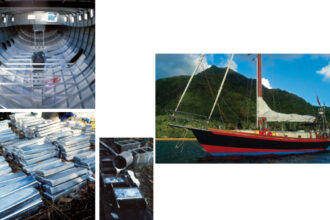
There are many different grades of aluminum, but not a great many that will stand up to the marine environment. We selected 5052 aluminum, a medium-strength alloy with good ductility and excellent corrosion resistance. For the latter property it is often preferred for marine environments.
High-grade aluminum is not easily found in retail building-supply stores. Purchasing metal from a wholesaler, such as Metalsupermarkets.com or Metalsdepot.com, is much cheaper than buying from a local welder or manufacturer. An internet search might turn up metal wholesalers nearby. We purchased our raw materials for the arch for around $70.
In addition to the aluminum tubing, we needed the same type of aluminum in flat stock, as well as stainless steel bolts and locknuts for fastening the frame together and to secure it to the deck of the boat. I made all the required cuts with a hacksaw and a jigsaw, though a metal-cutting blade on a radial arm saw or circular saw would have worked as well. I cleaned up the cut edges and any sharp spots with a 5-inch angle grinder with a grinding disc intended for use on aluminum. I used a titanium-coated drill bit to make the bolt holes.
Design
Once we’d selected the material, we had to decide on a shape. We wanted as simple and robust a shape as possible. Many arches have a form that cantilevers over the transom of the boat. While the aesthetic is nice, the primary function of this shape is to support dinghy davits. As a cantilever, it imparts a constant rotational force on the attachment points. We have a windvane on the stern of our boat, so hoisting the dinghy was out of the question. We opted for a simpler shape that transfers load straight down, thereby reducing stress on the attachment points.
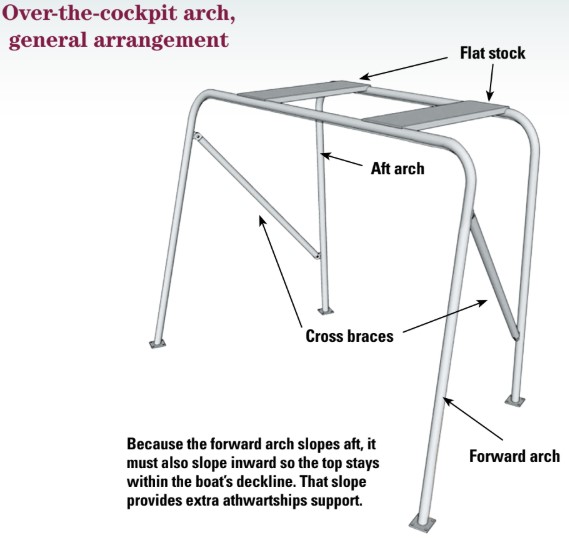
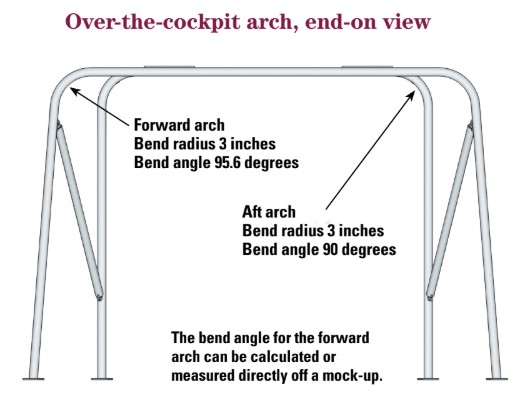
Our design makes use of a forward tube and an aft tube with two bends in each tube. Tubes connecting the aft and forward tubes at an angle form cross braces, resisting lateral forces fore and aft and distributing dead load. Two pieces of aluminum flat stock bolted on top of the forward and aft tubes also provide lateral resistance and further rigidity to the frame. The 3-inch-radius bends in the tubes resist lateral forces from the sides. I cut four 1⁄4-inch-thick, 3-inch-square plates from flat stock to serve as feet for the forward and aft tubes and four matching backing plates to go on the underside of the deck.
Calculating tube bends
After measuring everything to ensure there were no obstructions, I determined the slope angle of the forward tube. Sloping the tube aft would give the arch a sleeker look and impede access on and off the boat less than a vertical tube, and for aesthetic reasons I matched the slope to that of the forward tubes of the pushpit.
Because the hull narrows toward the stern, the forward tube must also slope inboard to keep the top corners inside the deckline of the boat. The angle of this inboard slope is dependent on the shape of the deckline and both the height and the angle of aft slope of the forward tube.
To calculate the angle of bend in the forward tube, I went with some fairly complex trigonometry, for which I have created a calculator in Excel using the dimensions of the arch as inputs. Another option for the computer-adept is to draw the desired arch using measurements taken from the boat and a free CAD (computer-aided design) program such as SketchUp and use the protractor tool to measure the angle of the bend.
The more hands-on might prefer to build a mock-up of the arch in situ using, say, 1 x 2 lumber and clamps, and measure the angle directly. This option also provides the opportunity to see how the arch interacts with other components of the boat and to make any necessary adjustments before bending metal.
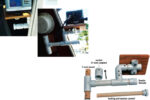
Tube bending
It’s worthwhile contacting a metal shop or tube-bending company to ensure that a design can be fabricated without special equipment or techniques. Usually these questions can be answered quickly and over the phone and do not incur a consulting fee. A tube-bending company we contacted advised us to use tubing with a 11⁄2-inch outer diameter and a 0.145-inch wall as it doesn’t require annealing (heating and slowly cooling) to bend to a 3-inch radius, whereas 2-inch tubing would have required annealing. It’s possible to rent a tube bender from a building-supply store for about $50 per day, or purchase a hydraulic tube bender for $100 to $150. We rented a tube bender and found the process quite easy.
Installation
My recommendation is to dry-fit everything prior to welding. It takes a little extra time to assemble and dry-install an arch, only to disassemble it again, but if doing so avoids having to cut welds or modify a finished product it’s well worthwhile. We designed and installed our arch while dry-docked in a boatyard. We tried to keep the solar panels parallel to the waterline, but due to weight redistribution, when the boat went back in the water, the panels ended up angled slightly forward. It’s better to fit the arch on a calm day at the dock, rather than guess at how the boat will sit in the water.
Measure and cut the tubes
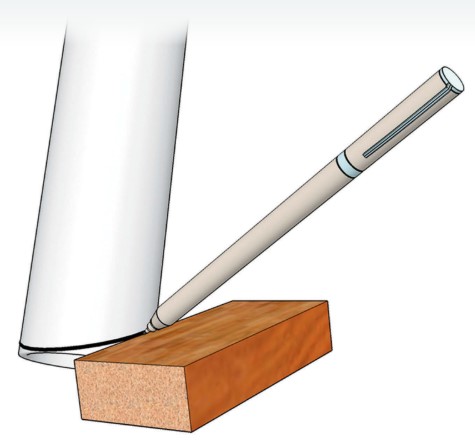
The most difficult process of the whole job was transferring the angle of the deck to the bottoms of the tubes to ensure that the baseplates would be flush when mounted. Because the deck slopes in two directions, it would be impossible to assume an angle at which to cut. The solution we devised was to trace around the tube with an indelible marker resting on a 3⁄8-inch-thick wooden block.
We first made the tubes as secure as we could in the locations they would be when bolted to the deck. This required installing the flat stock atop the arches, connecting the arches, and then immobilizing them by lashing them to as many points on the deck as we could find. Where the bottom of each tube rested on the deck, we placed the block of wood flat on the deck next to it and, with the marker resting on it, pushed the block around the tube, drawing a line parallel to the deck. I made the cuts with a hacksaw and cleaned them up with an angle grinder.
Welding
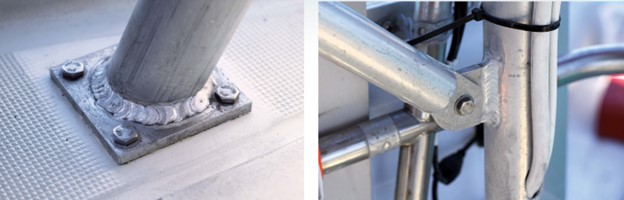
The 3 x 3 x 1⁄4-inch baseplates I had cut earlier were to be welded to the bottoms of the arches. We hired an aluminum welder to do this work, and before handing the materials over to the welder, I traced the shapes of the tubes onto the baseplates to ensure their orientation would be correct.
I also had the welder weld tabs to the forward and aft arches and corresponding tabs to the ends of the cross-brace tubes. Because the cross-brace tubes must be the exact length to connect to the attachment tabs on the arches, I measured carefully.
Installing the arches
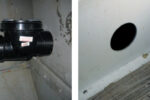
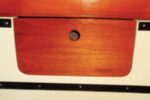
We bolted the forward and aft arches to the deck prior to bolting together the rest of the frame. We had planned to run the electrical cables for antennae and the radome through the tubes, so we drilled 1-inch-diameter holes in the baseplates and through the deck where the baseplates would be attached. (A 1-inch-diameter hole will accommodate most electrical connectors.) Running a messenger line through the frame is a great help for pulling cables through after the arch is installed.
We applied Sikaflex 291 to the entire underside of the baseplate immediately prior to installation to ensure a watertight connection between the baseplates and the deck. Next, I secured the baseplates with 11⁄2 x 5⁄16-inch stainless steel bolts that connected to corresponding plates on the underside of the deck. If there is not enough room for a plate on the underside, doubling up oversize stainless steel washers will meet the pullout resistance requirements. Aluminum in contact with stainless steel will corrode. A simple way to avoid this is to apply lanolin (we used LanoCote) to the bolts to help insulate them from the aluminum.
Bracing the frame
Next, we attached the cross-brace tubes with stainless steel bolts. A little flex in the frame gave us some assistance in fitting them. After that, we installed the 1⁄4-inch flat stock to the tops of the tubes. We had previously cut the flat stock into two 8-inch-wide strips. If rigidity is a concern, bending a 90-degree angle into the length of the flat stock will stiffen it, though over our 3-foot length, we saw minimal deflection in the unbent flat stock.
Finishing
Once the welding has been done, the components of the arch can be anodized or painted to improve resistance to corrosion and enhance the aesthetic appearance of the finished arch. For anodizing, which requires submersion in an electrolyte, the arch must be in its disassembled form. We received a quote for $150 to anodize the arch in any color we wanted.
Another option was to have the arch powder-coated. We received a quote of $100 to paint it white or black. In the end, we opted to do nothing, as we don’t mind the dull silver look of the aluminum and we were still penny-pinching. In retrospect, we should have had the arch anodized bright orange, but we were in a rush and focused on keeping costs to a minimum.

A welcome addition
The arch has been extremely useful for its intended purpose, but has become invaluable for the various add-ons that we could never have foreseen. In addition to the items we’d planned for it, the arch has taken on the tasks of supporting the outboard’s fuel tank, fishing-rod holders, and a fish-cleaning station. It’s a place to hang the stern anchor, furling line, and boom-brake attachment points, and it’s where we hang spare line, the outboard-lifting tackle, a boogie board, and spare windvanes. It also adds to the sense of security in the cockpit and is a great handhold in rolling conditions. It was a lot of work, but in the end only cost us $250 and we cannot imagine our little boat without it.
Materials, tools, and costs
Materials
Aluminum alloy 5052 tubing to length:
.5-inch diameter x .145-inch wall
1-inch diameter x .125-inch wall
Aluminum alloy 5052 flat stock:
2 x 4 feet x 1/4 inch
Stainless steel hardware:
12 x 1-1/2 x 5/16-inch bolts
4 x 1 x 5/16-inch bolts
8 x 2 x 5/16-inch bolts
24 x 5/16-inch nyloc nuts
Tools
Hacksaw or other metal-cutting saw
Angle grinder
Drill
Cost
Materials (aluminum and stainless steel) $ 79
Tube bender rental $ 50
Welding $113
Sikaflex 291 (1 tube) $ 12
Total: $254
Robin Urquhart is a Good Old Boat contributing editor. His master’s degree in building engineering has been severely tested since he and his partner, Fiona McGlynn, now his wife, headed south from Vancouver, and then west from Mexico, on MonArk, their 1979 Dufour 35. Check out their blog at www.youngandsalty.com, where they reach out to younger sailors who share a passion for good old boats.
Thank you to Sailrite Enterprises, Inc., for providing free access to back issues of Good Old Boat through intellectual property rights. Sailrite.com