A new life for an abandoned good old boat turns a lubber into a sailor.
Issue 130: Jan/Feb 2020
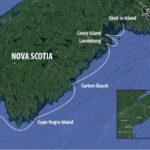
It all began on a sunny mid-August Saturday seven years ago, my two boys and I walking along the harbor shoreline of Hamilton, Ontario. When we reached the boat graveyard at MacDonald Marine, we ducked in to have a look. All around us were familiar boats that seemed to have reached the end of the line: a Beneteau to the left, a Grampion over there, a Tanzer just beyond, a McGregor to the right, and more.
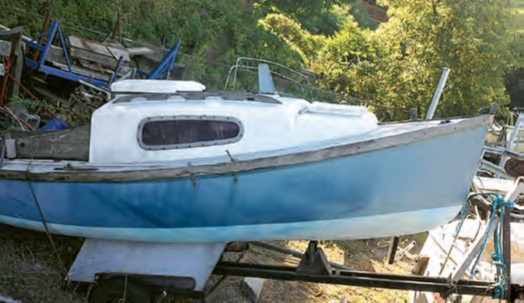
But at the back of the lot, I spotted a boat that drew me closer. She was a twin-keel sailboat on a rusty trailer hiding in 6-foot-tall grass, surely sinking into the ground, its atoms seemingly being absorbed back into the earth.
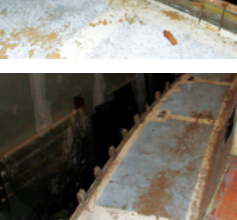
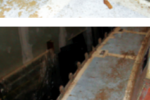
I don’t know why my gaze lingered over this particular “treasure,” but I couldn’t ignore it. An early fiberglass hull, solid as a rock. Double-galvanized keels with lead torpedo-shaped ballast on each fin. A small cabin with windows. Forward hatch with cover. Wooden toerails, transom plate, and cockpit coamings, all mostly rotted away. Lazarette and cockpit filled with gallons of rainwater, mud, leaves, and weeds.
In the cabin, I found more of the same, plus some dormant bees’ nests. The original wooden mast with shrouds and stays attached lay on the ground, covered in overgrown grasses. A wooden rudder and tiller, in poor condition, rested in the cabin. The hull had no identification to indicate manufacturer or model. A measuring tape confirmed it was 17 feet LOA with a beam of 6.6 feet.
She looked abandoned; I had to find out.

In the marina office, the manager answered my query with words that sparked a dream: “That sow’s ear has been here at least 20 years. No one knows who owns it. If you want it, come and take it.”
He barely finished the sentence before I was back at the boat, bailing rainwater, pulling cockpit weeds, and clearing the tatters of an ancient tarp. Not too many days passed before I’d replaced the trailer tires and driven her home to begin the real work.
This was my first sailboat ever, and on that first day, the possibilities seemed endless. I couldn’t wait to get started on my epic restoration project. Like a dog on a bone, I would not stop until I completed it. First, I unleashed my own hurricane with a power washer and wet/dry vac. I blasted off and vacuumed out years of mud, leaves, and all sorts of nastiness. I washed every inch of fiberglass and wood, inside and out, and then applied bleach to all the surfaces.
During the first two weeks I spent cleaning and prepping the boat, her make or model remained a mystery. Boats built since the late 1970s bear identification plates, usually made of aluminum and stamped with a hull identification number (HIN). But my Jane Doe bore no clues. I scoured the internet, comparing hull shape, specifications, window shape, and keel configuration. For several days I thought I’d identified her correctly as a Siren 17; I even joined the Siren 17 owner’s group on Yahoo. But the slight variations soon became apparent. The hunt was back on.
A key visual indicator was the cabin windows. My boat’s windows had an oblong, rounded shape that narrowed toward the bow. Continuing to scour the internet for photos, one day I came across a single picture that confirmed I had been endowed with a very rare Newbridge Topaz.
I learned that Newbridge Boats LTD of the United Kingdom built 12 lines of sailboats during the ’60s, ’70s, and ’80s. Of the Topaz, they built two designs. The earlier design, launched around 1965, includes a small forward hatch, plus three-stay rigging. The later design includes a larger forward hatch, a top-load lazarette, and six-stay rigging.
My boat was clearly one of the later designs, and I estimated she was built about 1970. These boats, with their twin keels, were made for coastal waters, as they could be moored close to shore at high tide and remain standing upright on their keels at low tide. Eventually, Newbridge sold the Topaz molds to a Canadian company that produced a short run of hulls. I presume my boat is one of these, but there is no way to know for certain.
Over a few years’ time, I was only able to find pictures of four or five different Topaz hulls. There is no owner’s group, but I was able to find one U.K.-based Topaz owner who shared some design ideas and historical data. My Topaz was indeed a very rare good old boat.

I started with the boat and trailer parked in my carport. With some MacGyver ingenuity, I crafted a plywood stand for the stern, and a double 2-by-8-foot jig, 10 feet long, to go in front of the keels. Using car jacks, shims, bricks, and cement blocks, I slowly but surely separated the 800-pound boat from its trailer.
After grinding the rust off the trailer, I applied two coats of Tremclad Gloss Black—at the same time coating the galvanized metal and lead keels. I allowed this paint to cure for a month before I lowered the boat back on the trailer and began working on the hull—I wanted the paint rock hard to prevent sticking and making a mess of my job. (Ultimately, with new fenders, winch cable, taillights, and fresh wiring, the trailer looked like new.)
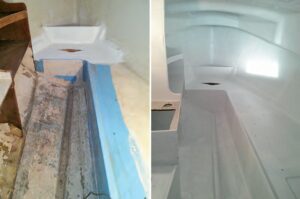
While the trailer paint cured, I turned my attention to the cabin. There was a single berth to starboard, some storage areas aft and below the cockpit, and to port a plywood shelf unit, small countertop, and small stainless steel sink. There was even a crude water tank built into the bottom of the shelf unit, complete with a filling hose connected to a deck fitting.
I had sanitary concerns and so removed the sink and water tank and installed a solid countertop made of teak-surfaced marine plywood. I used the same material for a new shelf unit face plate. Even after cleaning, the rest of the interior remained a weathered gray. I coated the entire cabin—floor, walls, and overhead—with Dulux Exterior Latex Primer before I applied a topcoat of Interlux BilgeKote. It took two coats of each to create a sparkling white space down below.
Then, it was back to the hull. I found evidence that there may have once been a small skeg attached on the centerline, just forward of the transom. I didn’t find such an appendage in the weeds where I had found the boat. Only minor fiberglass repair was needed to fill the holes and patch up this damaged area.
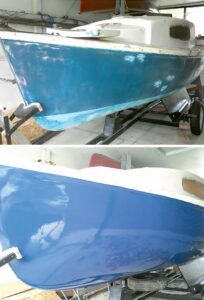
I sanded (and sanded) in preparation for hull paint. I knew this would have a huge impact on the appearance of the boat, so I did it right. Because this was a trailered boat, never to be left in the water for more than a few days, I didn’t bother with anti-fouling below the waterline.
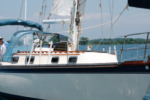
With the hull surface fair and smooth, I applied two coats of Interlux grey primer. The recommended roll-and-tip application method was bril¬liant! (Anyone contemplating painting with Interlux need only follow their instructions carefully and fully, including the use of 333 Brushing Liquid.) With the primer looking good, I rolled and tipped two coats of Interlux Brightside Sapphire Blue. I added a sweet finishing touch: a 1-inch boot stripe that I painted with Interlux Brightside White. All of this I accomplished while octopus-ing my 5-foot-10-inch frame in and around the keels, trailer frame, and axle.
With the hull looking Bristol, I turned my attention to the deck. These early boats were constructed with thicker and stronger (and heavier) fiberglass than their modern counterparts, and I found very little crazing. After prep, a couple coats of paint were all that were required. I used a white Interlux primer and the same Brightside white that I used on the boot stripe.
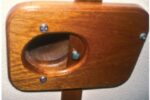
Here I discovered further evidence for an early date of manufacture. Hidden under gray weathering, I uncovered beautiful brass fittings! I sanded and varnished the samson post, several shackles, the bow roller, some brackets, and compan¬ionway slides. Bright again, these fittings dazzled like amber diamonds, creating a stunning bejeweled effect.
As winter approached, I hauled the boat and trailer to a friend’s property in the country and backed it into a full-sized shipping container with power, lights, and a wood stove inside. I was free to putter away on the woodwork during the snowy months.
Before painting, I had removed nearly all wood from the boat. This included toerails, handles, cockpit coamings, and transom plate, all of it rotten and shredding. I learned a valuable lesson as I labored to remove these pieces: Never use plain steel screws or bolts aboard a boat. I had to drill out or cut off almost every fastener, all of them rusted beyond use.
I also learned that teak, although expensive, is the friend of a sailor. Even with the passage of time and obvious neglect, all of the solid teak fixtures (except the toerails) could be restored and reinstalled.
Mercifully, I was able to find a 20-foot piece of ash, which I ripped in half lengthwise, to fashion two new toerails. I rounded the edges with a router and coated them with spar varnish. To attach them, I started at the stern using the original holes and new stain¬less steel fasteners, bolting the rails through to the inside of the cabin where the deck meets the hull. The first 12 feet on each side went on fairly easily, but once amidships, I had to come up with a way to bend the rails to accommodate the sharper curve.
I found the solution using pressure, heat, and moisture. First, I tied the rails’ free bow ends and pulled them tightly together to induce more bend. After a week, I was halfway there. For the final bending, I soaked a 4-foot section of rail at a time with wet towels, then slid a 6-foot piece of 5-inch ABS pipe over the section and blasted a heated steamer into the pipe to warm the wood. As soon as I pulled off the pipe and towels, I quickly worked to bolt that section down while the wood was still supple. During this final bolting process, I used 5-foot pipe clamps to hold the toerails tightly in place.
The next major project was the wooden spars. Thanks to the marvel of stainless, the shrouds and fittings were in fine shape, but the spars were untrustworthy, not to mention that the top 4 feet of the mast was significantly warped.
Turning again to the internet, I found a boat recycler in a whistle-stop called Sunderland, Ontario. Similar to the landlubber-equivalent businesses that offer a final resting place for wheeled vehicles, this one catered to watercraft. I tromped around the yard for a couple of hours, screwdrivers and wrenches in hand, and found a new-to-me aluminum mast/boom combo, a bow pulpit, an anchor, a few newer blocks, and some odds and ends.
Back home, I carefully measured the location of the fitting attachment points on the old mast, and then transferred all the bits and pieces to its younger, metal cousin. But a new mast also meant I needed a new tabernacle. Dwyer Mast and Rigging proved to be a great online resource. The only modification I made was to simplify the shroud arrange¬ment. Rather than two shrouds on each side, which I thought was overkill given the boat’s full, split backstay, I opted to go with one on each side.
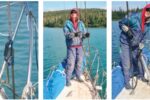
I may have chewed every fingernail off of each hand on the day we stepped the new mast. Having never seen it raised, and having taken all my measurements with the mast off the boat, I was worried I’d incorrectly measured the stays and shrouds. Compounding that anxiety, I had never stepped a mast before. Nevertheless, with my wife and two strongest kids each holding a shroud or stay, we successfully raised and stepped the spar. The same day, I also took many measurements in preparation for the next purchase.
My little “sow’s ear” came without sails. This, I found out, was an expensive drawback. I chose Precision Sails of Victoria, British Columbia. Even though I worked with them from the other side of the continent, they were very helpful guiding me through the process of obtaining dimensions for my order—and it required more measurements than I knew existed. I got a crash course in the meaning of letters such as I, J, P, E, and LP. One boat buck and a couple of months later, a big bundle arrived on my doorstep. I couldn’t wait to bend them on.
And they fit perfectly! (Two bigger boats later, and I have yet to again experience the joy of sailing with crisp, new, white Dacron.)
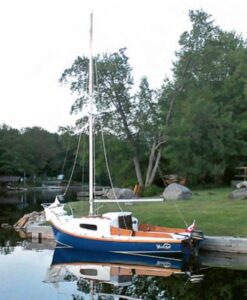
All told, it cost me 10 months of determined labor, plus a few thousand dollars, before the day came that we christened this former mystery boat Wind of God and splashed her for the first time in at least a couple of decades. I had successfully mined a diamond in the rough and was absolutely hooked.
After spending two seasons learning to sail aboard Wind of God, I sold the little beauty to an appreciative new owner in Maine, where she will be able to float on the ocean for which her twin keels were designed. And I resumed paying attention on my harbor walks, looking for my next boat.
Lee Brubacher is an avid sailor of the Great Lakes and considers it a hobby to restore forgotten boats to their former glory. He is the Worship Arts Director at West Highland Church, Hamilton, Ontario, (since 2001), and is adjunct faculty in the area of music and worship at Heritage College & Seminary, Cambridge, Ontario.
Thank you to Sailrite Enterprises, Inc., for providing free access to back issues of Good Old Boat through intellectual property rights. Sailrite.com