 There’s more than one way to fasten the two biggest boat parts
Issue 128: Sept/Oct 2019
It is the nature of boats that they be built as two primary pieces — hull and deck. Over the decades, boatbuilders have devised various means of making the all-important attachment of these independent structures. Done correctly, they form one structure, absent leaks and able to withstand enormous and varied forces, for the boat’s lifespan.
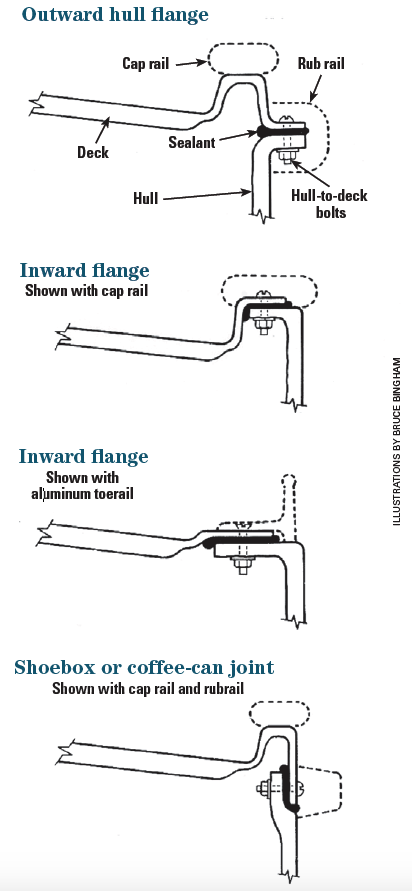
Before fiberglass boat construction, traditional plank-on- frame wooden boat construction married the hull and deck using a sheer clamp and a beam shelf to support the deck beams, all reinforced by hanging and lodging knees. Building boats from fiberglass means there are fewer pieces — just the hull and deck. And there are three ways in which they are attached to each other: outward hull flange, inward hull flange, and the so-called shoebox or coffee can. And there are variations of these three primary techniques, such as when the deck includes a raised portion that serves as a toerail or bulwark, and the design determines the actual location of the joint.
Key aspects
When evaluating the critical hull-to-deck joint, consider these three key aspects:
- How the joint is sealed.
- How the joint is fastened.
- How the joint is covered.
Sealing the joint
Making the joint watertight is accomplished by inserting a material between the two surfaces, such as how a gasket or O-ring functions in other applications. Polysulfide caulk has been commonly used, as has butyl tape. These presuppose the possible eventuality of having to open the joint for some reason. With the advent of structural adhesives, such as methacrylate (Plexus) and polyurethane (3M 5200 and Sikaflex 292i), conventional sealants fell out of favor. (In addition to waterproofing the joint, structural adhesives add integrity. My friend Bill Seifert tells a story that took place at Tartan Yachts, when an external lead keel was sealed to the hull with 3M 5200. The crew wanted to change the keel, so they removed the bolts and lifted the hull with a crane, expecting the keel would stay in place on the ground. Nope.) In his book Ted Brewer Explains Yacht Design, Ted says quality builders glass-over the inside of a hull-to-deck joint for a strong, guaranteed waterproof seal. Glassing the inside of the joint with several layers of fiberglass tape serves two key aspects: to back-up mechanical fasteners and to assure a watertight joint.
Of course, an old joint can leak. But unlike portlights and hatches, a hull-to-deck joint can be significantly more difficult to repair. The best way to fix a leaky seal is to open it, remove old sealing material, and apply fresh material. But this remedy is very rarely going to be an option on an old boat. Instead, a boatowner is likely going to be left to apply some sort of sealant to the exterior edges of the joint, and smearing paste over a thin crack is not a very effective solution.
Fastening the joint
For fastening, methacrylate adhesive obviates the need for rivets, screws, or through-bolts. Applied to clean fiberglass surfaces, methacrylate creates a bond of which it’s been said: What methacrylate has joined, let no man tear asunder. Not that it’s likely you’ll ever need to take a methacrylate- or polyurethane-fastened joint apart. Longtime Marblehead, Massachusetts, surveyor Jonathan Klopman, who has examined hundreds of hurricane-damaged boats during his career, says “You’re not going to take [methacrylate-fastened joints] apart. Consider these permanent joints.” And if a boat with extensive rail damage is going to be repaired, “you’ll just glass it all together.” Of the mechanical fastening methods, through-bolts are preferred over rivets and screws.
Covering the joint
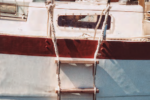
How a hull-to-deck joint is covered is a function of cost, aesthetics, and function. Materials range from elastomeric extrusions to aluminum, stainless steel, and wood. In the case of the latter, it was traditionally teak, though older boats (especially European) often employed oak or mahogany. The location of the joint determines whether it will be a cap rail or rubrail. Rubrails are important in protecting the topsides of the hull when docking or rafting with other boats, so they need to be resilient and strong. Sourcing replacements can be difficult, especially if the builder is out of business.
Three joint types
Outward flanges: An advantage to the builder is lower cost; if the builder opts to fasten the joint with nuts and bolts, a single employee can install through-bolts and nuts working on the outside of the boat. A disadvantage of this joint is vulnerability to damage, such as from striking a dock or piling.
Inward flanges: These are more expensive to assemble by through-bolting, which is a two-person job, unless the builder has developed a clever method for one person. This is why lower-quality boats are screwed or riveted together. This type of joint is common on sailboats.
Shoebox or coffee can: The simplest, cheapest, and prob- ably least-reliable joint is the shoebox, because forces applied to either the hull or deck are almost entirely transferred to the fastener. This joint type is more common on powerboats than sailboats. Upon examining damaged boats with this joint type, Klopman says that it’s easy to see the difficulty builders have in trying to tightly mate the two surfaces. “It’s often a wide gap, impossible for the builder to pull together with screws.” He adds that in a serious collision, this type of hull- to-deck joint can easily “zip open.” Screws out of alignment are often an indicator that a shoebox joint is working.
Finally, all hull-to-deck joints are trimmed for appearance sake. This makes a prominent feature of a sailboat (the joint) even more prominent. For this reason, trim can help or hurt appearance. A varnished, teak cap rail can accentuate a lovely sweeping sheer, and a wavy or scuffed plastic rubrail can detract from an otherwise pleasing impression of a boat.
There are many features and design aspects to consider when choosing a boat, primarily type, size, and cost. Then construction quality, coring issues, and tank materials and installation are common areas of inspection. But if you find yourself looking at your next boat, or even getting to know your current boat better, don’t forget the all-important hull- to-deck joint. If you begin your boat experience with a quality joint, you’re way ahead of the old-boat game.
Daniel Spurr is a Good Old Boat contributing editor and editor-at-large with Professional Boatbuilder. He is the author of seven books on boats and sailing including Heart of Glass, about the fiberglass boatbuilding industry, and was formerly senior editor at Cruising World and the editor of Practical Sailor.
Thank you to Sailrite Enterprises, Inc., for providing free access to back issues of Good Old Boat through intellectual property rights. Sailrite.com