Rescue that rusting tank
Tucked away under the cabin sole floorboards, the average fuel tank doesn’t get much attention from those of us who like to sail. In fact, it may be totally neglected until something major goes wrong. Even if you’re good about preventive maintenance, your time and energy probably stop short of a detailed inspection of that fuel tank and of yanking it out, if necessary. The good news for many of us is that it is possible to refinish a problem tank without too much effort and expense. The key is to do it before it’s too late. New tanks are expensive. But it is possible to maintain your existing tank in a condition that will be worthy of your confidence and reward you with years of trouble-free service. In the bilge, the typical black iron tank – painted and installed at the factory – undergoes all kinds of insults. More than likely, its exterior will be assaulted by salt water, bilge cleaning chemicals, and a little diesel fuel now and then. The paint breaks down, and before you realize it, rust begins to do its thing on the undersides, even though what you can see from above may look fine. On the inside, if the tank is normally kept full and the owner is careful about filtering fuel before adding it to the tank, severe problems are not likely to develop. Several years ago we were in the market to buy a used pocket cruiser. On board the Baba 30 cutter we eventually purchased, my first look at the fuel tank in the bilge compartment raised questions and concerns. A flashlight beam down the exterior sides of the black iron tank revealed puffs of rust blossoming midway down to near the bottom. The fiberglass walls of the bilge space were very close to the sides of the tank, so it was impossible to thoroughly assess the tank’s condition without pulling it out. As built, the tank compartment was isolated from the rest of the bilge to contain diesel spills and to isolate it from the normal slosh of bilge water. Nevertheless, water had entered this compartment somehow, probably working its way down from above, and the tank was immersed long enough over the years to deteriorate its gray enamel paint and initiate the rusting process. The flashlight beam also revealed that the tank was sitting in a small puddle of liquid in the very bottom of the compartment. We sampled the liquid with a hand pump. It was mostly water with a little diesel fuel in it. The trace of diesel in the liquid sample raised the concern that the tank might have a leak. However, since the compartment remained dry after being pumped out and left alone for several days, fuel leakage through the tank walls or welded seams was apparently not a problem. We topped the tank off with fuel for this observation. Some people wouldn’t stop here, but would conduct a pressure test to detect leaks. Pressure testing requires sealing all openings and pressurizing the tank by using a gauge, valve, and hand pump to achieve pressure. If the pressure is sustained at the original level overnight, the tank is deemed salvageable. I didn’t have what was needed to conduct this test, but it would have provided valuable and more definitive information for us when making our decision about whether to buy the boat. Instead, we considered the worst case, which was the possible need to install a new tank, and got a quote for a new custom-fabricated aluminum-alloy tank. We factored this cost, $400 to $500, into our offering price. Next, we pumped about 2 gallons of diesel from the bottom of the tank to see if there were any obvious problems brewing, such as microbial sludge and accumulated water. I was looking for the telltale greenish black or brown slime caused by bacteria and fungi that commonly infect diesel fuel, clog filters, and cause poor engine performance. Fortunately, the sample was clean, and no water was present. Water introduced into the tank, such as by condensation, can provide a medium where organisms can thrive. Once we owned the boat, I made a mental note regarding the need to refinish the tank exterior but left the tank in place for a future appointment with the tank doctor. Every time I thought of pulling the tank and refinishing it, I delayed because the time the task might take would interfere with the much more exciting prospect of sailing. It turned out that the job, once started, took less than two weekends. The 30-gallon wedge-shaped, flat-bottomed tank, measuring 36 inches long and 18 inches high at its highest point, with a maximum width of 16 inches, appeared to be quite heavy and was secured in the bilge by three floor joists across the top. It had the usual hoses plus ground wires connected to it to complicate the task of removal.
 Finally, after several years, while I was replacing some fuel system parts on our Volvo Penta diesel, I decided it was time to tackle that tank. We had just returned from a 1,300-mile trip, and the tank ended up on a MUST DO list before we headed offshore again. The floor joists were easy to remove. We detached the hoses and wires, and my 15-year-old son and I lifted the tank out fairly easily. Once removed, it was painfully obvious that the tank should have been pulled and refinished years ago. The factory enamel finish was rusted through over most of the lower half of the tank. Pitting had begun on the black iron surface. My first reaction was to attach a wire wheel brush to my hand drill to remove the rust and old paint. After a few minutes with the drill and brush, it became clear that sandblasting was necessary. I called around to find a metal coating shop able to sandblast and powder coat the tank with epoxy. Epoxy powder coating offers exceptional qualities: high impact resistance, virtually eliminating chipping and scratching; outstanding moisture, chemical, and corrosion resistance; and good control of film thickness, from less than one to more than six mils. Powders can be applied to all electrically conductive metal surfaces, such as iron, steel, and aluminum. Metals that don’t rust but may corrode in the marine environment can also benefit from the coating. The only limitation is that the object must be able to withstand temperatures of up to 400 degrees Fahrenheit without damage. In this case, I was not concerned about the temperature, save for a large rubber gasket seal at the inspection plate. We removed this before beginning the coating process. Before we delivered the tank to the shop, we opened the inspection port and thoroughly cleaned the tank interior to remove the residual diesel fuel and some rusty sediment. This sediment hadn’t shown up when fuel was hand-pumped from the tank bottom. Reducing the potential for water condensation inside the tank is not the only reason why it’s a good idea to keep your tank full. A full tank minimizes oxidation of the inside tank walls, reducing the chance for oxidation to eat away at your tank and welded seams. Electrostatic powder coating is a fairly new high-tech metal coating process which uses dry powdered paint. The powders are applied using a special high voltage gun (100 KV or more) which charges the particles and causes them to cling in a uniform manner to the part being coated. The coated part is then placed in an oven at 300 to 400 degrees Fahrenheit to fuse the powder to the metal surface. It is heated for periods of 10 minutes to an hour, depending upon the size of the object. When cool, the part is ready for use. The shop estimated the job cost at less than $100. Garnet sand, which is hard and sharp, was used for the blasting. It’s effective in removing rust, even in the pitted areas. The next step was to blast it with minute glass beads which polished the tank to a silver color, and removed any remaining rust, as well as “flash rust” that may have developed overnight between the time it had been sandblasted and then readied for the powder coat. The powder coating, approximately six mils thick, consisted of 100 percent epoxy and had the appearance of gloss white enamel. The epoxy powder was applied directly to the metal. No primer is used in the process, because the electrically charged powder requires bare metal to adhere. Light paint colors enhance your ability in the future to see any rust formation and, by using some touch-up epoxy paint over the years, you may be able to avoid another major refinishing job. While the job involved some hard work, it was easier than we had anticipated and cost much less than replacing the entire tank. The result is a tank that is as durable as the rest of the boat, along with some peace of mind that the next time we go sailing we can depend on the tank to hold its contents.
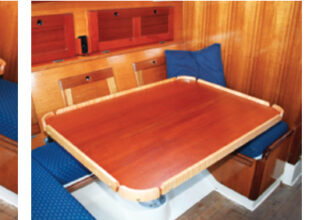
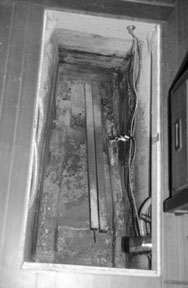
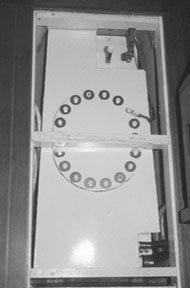
Once the tank was removed, we took advantage of the opportunity to give this otherwise inaccessible space a thorough cleaning, light sanding, and some new paint. The two removable lengthwise runners on the bottom at left are what the tank rests on. These are of painted hardwood and reduce chafe that would otherwise occur between the metal tank and fiberglass keel housing.
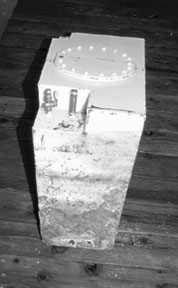
Rust covered the lower half of the tank. Once the rust was removed by sandblasting, pits were revealed that apparently had been forming for several years. Fortunately, these pitted areas weren’t deep enough to affect the integrity of the tank. The tank could be reused, provided the rusting process could be halted. The only foolproof option available was to thoroughly sandblast the tank to remove all traces of oxidized iron down to bare metal.
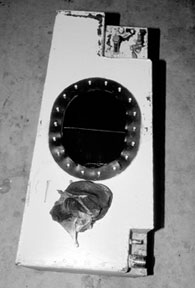
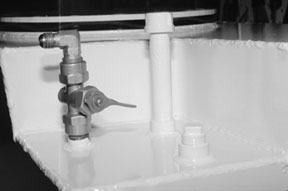
This was the perfect time to clean the tank interior. See photo above. We used rags to mop up the remaining diesel and the few teaspoons of sludge that had gathered in the corners at the tank’s lowest point.
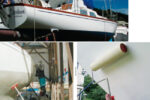
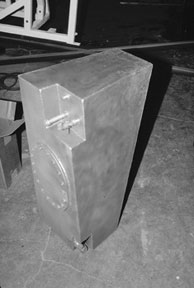
Powder coating colors are rich and bright. The glossy white epoxy we chose, above, was applied to achieve a maximum thickness for long-term protection.
The garnet sand and bead blasting process was a crucial step to eliminate any trace of oxidized iron. Without this step, in photo above, it probably would have been better to replace the tank rather than expend the effort and money to refinish it. The tank should now last another decade or two before it shows signs of exterior rust.
We achieved professional results, along with a great deal of satisfaction that the job was done right and will last.
Article from Good Old Boat magazine, January/February 1999.