Bent stanchions and delaminated decks
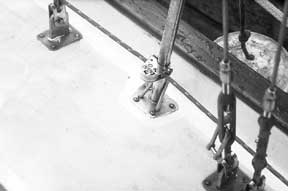
When we were unloading our boat following a recent week-long cruise, I noticed the midship stanchion on the port side was slightly bent toward the stern. It was about an inch out of plumb at the top. While docking in gusty conditions, the stanchion had taken the weight of the boat, and something had to give. When I examined it closely, I discovered that the stanchion was bent and the deck under the stanchion was flexing. Clearly there was also structural damage to the deck. Repairs were in order.
A bent stanchion requires replacement or straightening. In this case, it was possible to have it straightened. Removing the stanchion required access to the backing plate, nuts, and lockwashers holding it. I had to remove an overhead panel below the sidedeck. Another approach would have been to cut a hole in the panel slightly larger than the stanchion base and patch it after the repair was finished. The structural repair to the deck area under the stanchion was much more involved.
As a general rule, boats built before the days of modern composites and high-tech layup techniques are overbuilt. An exception to this rule, however, is in the area of deck reinforcement in high-stress areas. Where holes were drilled to mount hardware and stanchions in a balsa-cored deck, it’s quite possible that moisture has invaded the core. Even if adequate bedding compound was applied, the hardware will have worked under stress, and moisture may have invaded the core, resulting in delamination.
Dry below the stanchion?
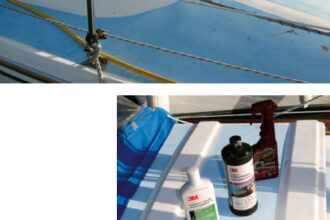
Once I had removed our bent stanchion, I examined the damage to the deck area. I was faced with two possible approaches to the repair, depending on the condition of the balsa core under the stanchion. If the core was dry and sound, the area around the mounting holes could be repaired. This involves putting a bent nail in an electric hand drill and enlarging the area in the balsa core around the holes. Do not enlarge the holes in the top or bottom laminates.
Once the debris is cleaned out, you can begin strengthening the area. Cover the holes below deck with duct tape. Mix up a small quantity of epoxy resin/ hardener and add some high-density filler. Mix this to a mayonnaise consistency. Using a plastic syringe (available where epoxy materials are sold), inject this mixture into the holes from above, filling the voids completely. This mixture will bond to the surrounding core area and add structural strength while it seals the core from any moisture. When the mixture has hardened, the surface can be sanded smooth. Remove the tape from the bottom holes. Now you can drill new holes and remount the stanchion. Don’t forget to use bedding compound.
Wet under there?
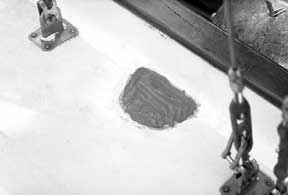
However, if the impact caused the deck under the stanchion to delaminate from the balsa core, or if the core has absorbed moisture, more extensive repairs are necessary. The most satisfactory way to repair the deck under a stanchion when the balsa core is wet is to replace the core under the stanchion.
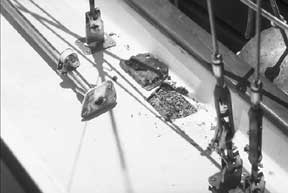
Placing the stanchion over the existing holes, outline the stanchion base with a felt tip pen. Next, using a Dremel tool, remove the top laminate by cutting around the outline. When the laminate has been removed, dig out the wet balsa core material, digging back under the edge of the laminate around the hole. Try to dig back to dry balsa. Clean out the area of the debris and allow the area to dry thoroughly. There are several ways to hasten the drying:
- Use a hair dryer to blow in the cleaned-out area, being careful not to use too much heat.
- Cover the area with plastic, held in place with duct tape, and cover the holes under the area with duct tape. Cut a hole in the plastic and insert and tape the nozzle of a shop vacuum cleaner to the plastic. Now turn the vacuum on and allow it to draw out the moisture from the core material. Be careful not to overheat the vacuum cleaner motor.
- Flood the area with denatured alcohol. The alcohol will absorb the moisture and when the alcohol evaporates, the moisture will evaporate with it.
You can use any or all of these, but be careful that the alcohol has thoroughly evaporated before using either the hair dryer or the vacuum cleaner to avoid any risk of the alcohol igniting from the heat of the dryer or the sparks of the vacuum cleaner motor.
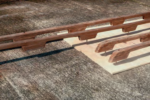
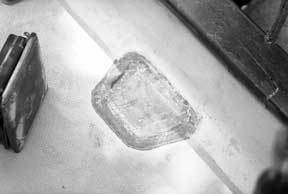
When the area is dry, cut a piece of marine-grade plywood the same size as the cut-out hole in the laminate. The plywood should be slightly thinner than the core material removed. You can use exterior grade plywood, but be sure there are no voids in it. Cover the holes in the bottom laminate from below with duct tape. Mix a small amount of epoxy/ hardener. The amount to mix will depend on the air temperature and pot life of the mixture. Using an acid brush, thoroughly wet out the repair area, making sure the edges of the balsa core material are saturated with the mixture. Wet out the piece of plywood to seal it from moisture.
Pourit in
Mix some more epoxy and add some high-density filler to make a mayonnaise consistency. Pour some of this into the repair area and spread it evenly to about a quarter of the depth of the area. Force the piece of plywood into the area, displacing the epoxy putty into the area beyond the edge of the hole under the top laminate. The top of the plywood should be below the bottom level of the top laminate. Using a plastic syringe, inject the epoxy/putty mixture into the area around the edge of the plywood to fill any voids under the top laminate. Cover the top of the plywood with the mixture but only to the bottom level of the top laminate.
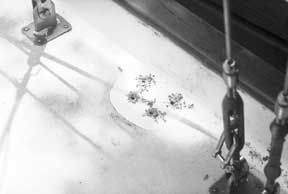
When the epoxy mixture has hardened, grind the edge of the hole with a pad sander and 80-grit sandpaper. Grind the edge on a bevel back about 1 1/2 inches from the edge of the hole. This will give an approximate 1:12 ratio (1/8-inch thickness of the laminate to 1 1/2-inch bevel). Now cut a piece of fiberglass cloth the size of the outside of the beveled area around the hole. Next, cut more pieces in decreasing sizes down to the size of the hole in the deck. The combined thickness should total the thickness of the top laminate or slightly less. On a piece of plastic, such as a heavy garbage bag, wet out the pieces of fiberglass cloth with an epoxy/hardener mixture.

Starting with the largest piece, first wet the cloth using an acid brush and a spreader. Place the next smaller piece on top of the previous one until all the pieces are stacked and saturated, with any excess squeegeed out with the spreader. Now wet the bevel and hole area with the epoxy mixture and lay the saturated cloth over the hole, largest piece down. This is important because if the cloth is damaged during the final finishing and sanding, the largest piece, which ties the whole patch together, will not be compromised. The layers of cloth should bring the surface of the patch slightly lower than the level of the surrounding deck. When the epoxy has hardened, the area can be lightly sanded and leveled with a mixture of epoxy/hardener and a fairing filler such as micro-balloons. After that has cured, the area can be sanded smooth. I painted my repair with one-part polyurethane to match the color of the deck.
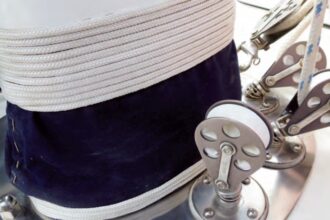
Replacing the stanchion
I was now ready to reattach the stanchion. I placed it in its proper location and marked the location of the four mounting holes on the deck. I then placed the stanchion aside and drilled the holes in the deck. The bolt size was 1/4 inch, and I drilled the holes 3/8 inch in diameter. I then covered the below-deck holes with duct tape and, using the syringe, filled the holes from above with a mixture of epoxy/hardener and high-density filler. This added strength to the area and sealed the plywood core from any moisture should the bedding compound later fail. When the epoxy mixture had cured, I drilled the holes again to 1/4-inch diameter and installed the stanchion with a bedding compound and the backing plate below. The resulting repair left the deck under the stanchion much stronger than when the boat was new.
A few closing notes and instructions
Use latex gloves when using epoxy. Over a period of time you can develop an allergy to it. Also, be careful not to breathe epoxy dust when sanding. Use a mask and goggles. The same techniques can be used to repair or strengthen the cored laminate under other deck hardware such as winches, halyard clutches, and cleats. It is not only possible to repair your boat, but to make it stronger than new.
Article from Good Old Boat magazine, November/December 1999.