You’ve found your dreamboat, had it surveyed, and signed up for a long and happy relationship. The broker said it holds 20 gallons of fuel and 40 gallons of water. He didn’t say where the tanks are located. The boat surveyor’s report didn’t mention tank condition. He did look at the tanks, didn’t he? Well, not necessarily.
I just had my boat surveyed for insurance purposes, and the surveyor asked me how much fuel and water I carry. He made a note of the quantities for his report, but never looked at the tanks at all. He never asked me about their location, or whether they were full or empty, tight, full of holes, or anything else for that matter.
Most books on small-boat design gloss over and dismiss tanks with a paragraph or two. The designer assumes the builder will create suitable tankage at the location designated, yet tanks determine, in large part, the capability of our boats in terms of range under power and the duration of fresh water availability.
Note: Tanks in the Fog
The following three articles offer three solutions to tank problems: replacement, recoating the exterior, and repairing leaks with epoxy. All are solid techniques for dealing with your tanks. Less clear-cut is the choice of materials, if replacement is required. Two naval architects we respect endorse the use of aluminum tanks, provided attention is paid to the alloy (5000 series). At least one reader is having a lot of trouble with her stock aluminum tanks (alloy unknown). Stainless gets mixed reviews as well. One naval architect said categorically that stainless should not be used for tanks. Other authorities accept stainless, if the alloy is carefully selected (Bill Sandifer says 316L or 317L). We all know “black iron,” which is really low-carbon mild steel, rusts. But it has a good record in cases where the tank was properly built, coated, installed, and of course maintained. High density polyethylene does not rust, but we have seen it fail mechanically where it did not have proper support. A friend’s waste tank failed at the inlet twice because of stress on the entry hole from the fill hose. So there is no one perfect material. As in fog, proceed carefully. The way is not clear.
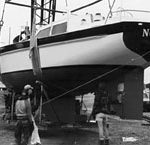
I once owned a Cape Carib 33 ketch in Singapore. It was a Brewer-designed fiberglass sailboat, ketch-rigged, with a Volvo diesel. The boat performed well under sail or power, however we kept getting diesel fuel in the bilge after a rail-down sail. I checked the fuel lines, the filter, the vent line, the fill line, and all were tight. It was only when, under sail, I climbed into the leeward cockpit locker that I could see diesel fuel running down the outside of the tank on the leeward side.
When I illuminated the area between the tank top and the underside of the cockpit floor (a very small area), I could see corrosion and holes in the tank top. It only leaked when we heeled over. Apparently the tank top was dished down and water accumulation had eaten holes in the black iron surface. The only remedy was to replace the tank, which meant removing the engine, a very large job.
This same boat had its water tank built into the wineglass section of the full keel. It was simply the inside fiberglass cavity of the keel above the ballast, dammed off and covered. The water that came from the tank was putrid.
In an effort to make the tank usable, I cut a large clean-out hole in the top and thoroughly cleaned the tank and filled it with a mixture of G cup of bleach for every gallon in an attempt to “purify” it. (Editor’s note: Don’t exceed a teaspoon per gallon to purify.) My efforts proved to be a big mistake. The tank was clean, and the water ran clear thereafter, but it never lost the taste and smell of chlorine no matter how many times I flushed the tank with fresh water. The fiberglass had absorbed the chlorine and would not let go of the scent. Subsequently, I learned that a solution of one quart of white vinegar added to every five gallons of water in the tank and allowed to agitate for several days, then drained and flushed will remove the chlorine taste and smell.
Here, on one boat, are two examples of tank problems that are more common to good old boats than you might think. When fiberglass boats were first built, the tanks were the same as those which had been traditionally installed in wood construction: copper or Monel fuel tanks, and Monel, tinned copper, or stainless steel water tanks.
If a wood boat was big enough to be fitted with a diesel engine (prior to today’s small diesels), the diesel tanks were “black iron” (mild steel) painted on the outside and pickled (by diesel fuel) on the inside. These tanks served well and were suitable for their intended purposes.
My 30-year-old Pearson is fortunate to have Monel fuel and water tanks. Monel is a fine, long-lasting material for tanks, but it has become hard to get and expensive in recent years.
I priced the cost of a basic 4-foot x 10-foot, 16-gauge sheet of 316L stainless steel with 400 series Monel. The stainless cost $218 per sheet, while Monel was $1,008 for a sheet the same size. The distributor told me this was the best price he had seen for Monel in 30 years. Now we know why it is not used for tank construction anymore.
With the advent of “economies” in the fiberglass boat business, fiberglass boatbuilders began to look at the high cost of the metal tanks and decided they could build tanks, particularly water tanks, cheaper with fiberglass.
No one knew of the porosity of fiberglass or the weakness of the bond between molded tank bottom and top. Many, many tanks were built. As time passed, the fiberglass “taste” in the water became a problem as did the separation of tank top from tank sides due to boat motion and the sloshing of the water in the tanks.
Most fuel tanks continue to be built of metal, but often of corrosion-prone aluminum and stainless steel. Black iron is a good choice for diesel tanks, while 316L/ 317L stainless steel is superior for gasoline and water tanks. Rotomolded polyethylene is another choice which has appeared on the market in the last 10 years.
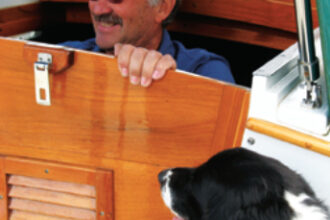
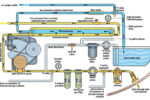
When we look at our boat tanks or the tanks in a boat we are interested in buying, what should we look for? The first step is to find the tanks. Most fuel tanks are located under the cockpit floor aft of the engine or nearby.
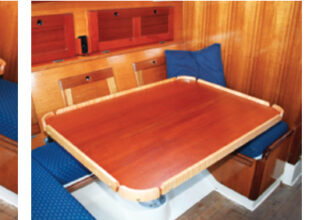
The water tanks can be anywhere, but because designers are intent on keeping weight low in a sailboat, the tanks will usually be under the V-berth, under the settee or berths in the main cabin, or in the keel cavity. If you follow the water supply line from the faucet in the galley or the head, it will lead you to the tanks. All these locations are hard to inspect and because the tanks are “out of sight,” they are usually “out of mind” for most boat owners.
The only way to visually inspect the tanks is to hire a very small person with a strong light and good eyesight or to be a contortionist. (I, myself, fall into the latter category!) When inspecting the tanks, wear thin gloves and feel as much of the tank perimeter as you can. Check the method used to secure the tank in place: metal or nylon straps, fiberglass tape, wood chocking, or mechanical fasteners. Check the structural integrity of the tank hold-down and supports carefully.
Remember that water and fuel weigh approximately 8 pounds per gallon, so a 40-gallon tank weighs 320 pounds when full, not counting the weight of the tank itself. The same tank, if half full, contains 160 pounds of liquid. That 160 pounds is slamming up and down every time the boat moves. If, in severe conditions, the boat were to fall off a wave and slam down, an inferior tank mount could come loose or fail altogether.
Water Finder Paste Day Co. Water Finder 1 Prestige Place P. O. Box 1004 Dayton, Ohio 45401-1004
Other companies, such as Color Cut, also make water finder paste. It is usually available from companies that provide service station equipment. Look under Service Station Equipment or Service Station Supplies in the Yellow Pages of your local telephone book.
If all looks good with no apparent leaks, you can do an air pressure test on the tank. This can be performed professionally for a couple hundred dollars, or you can do it yourself for an investment in time, energy, and a little money. If you do it yourself, you will learn a lot about your boat in the process.
Close the tank shut-off valve at the tank. (Oops, discovery number 1: It doesn’t have one.) Remove the fill plate from the tank and check the O-ring seal. (Oops, discovery number 2: The O-ring may be long gone.) Fit a shut-off valve at the tank, and replace the lost O-ring.
Now make up a short section of pipe the size of the tank vent line consisting of the following: 1. A method of connecting pipes to vent line (example: hose and hose clamps, screwed fitting, etc.). 2. A short section of copper tube or pipe with a tee fitting to fit a large diameter, low pressure gauge (0 to 5 psi maximum). A ball valve to fit the tube or pipe, a bicycle pump (hand style), and a method of attaching it to the end of the pipe.
If the boat is your own and has been out of service for some time, do yourself a favor and completely drain the fuel and water tanks. Be sure to properly dispose of the old fuel. When I do this, I let the fuel settle out in a bucket so I can observe the water that will inevitably settle out of the fuel. I then decant the fuel into a plastic gas can using a Baja filter. Then I pour the gas into one of my automobiles. The cars seem to have no problem with the older fuel, and it is properly disposed of. The remaining water that has been separated from the fuel is allowed to evaporate into the atmosphere. The bucket is wiped clean until next time.
If the boat is not yours, you should still test for water in the fuel. However this time you will have to use water finder paste. (See sidebar for contact information.) You can hope that the fill pipe for the tank will be a direct drop into the tank. Place the water finder paste on the bottom four inches of a wood dowel, and slowly lower it into the tank. The paste will turn a specific color up to the exact depth of the water in the bottom of the tank. When I was a kid, I worked the fuel dock at a local marina where one of my duties was to stick the large gas tanks every morning with a rod and the paste to check for water. The water paste is very dependable.
While you’re at it, try to feel the bottom of the tank with the dowel. Is it smooth or gummy? Does it feel like there are soft rocks down there? If it is anything but smooth and clean, the least you will need is a thorough tank steam cleaning by a professional firm that does these things. Check your Yellow Pages under Tank Cleaning. If they do not do small tanks, they can probably send you to someone who does.
Next, with the fill plate closed, the discharge valve closed, and the ball valve open, pump the bicycle pump to raise the tank pressure to 3 psi. Do not increase pressure to more than 3 psi!
ABYC American Boat and Yacht Council, Incorporated 3069 Solomon’s Island Road Edgewater, MD 21037-1416 Attn: Renee Lazer, Assistant Membership Coordinator 410-956-1050 410-956-2737 fax
You must join ABYC to receive a copy of their Standards and Recommended Practices for Small Craft manual. Membership is $125. There is an additional charge of $135 plus $10 shipping and handling for the manual.
The ABYC standards would be particularly helpful if a person were going to build or rebuild a boat. The organization is a good source of information and will help with obtaining insurance if the rebuilt boat complies with ABYC standards.
Holding the pressure steady at 3 psi, close the ball valve. Note the time. Check the gauge for several hours or overnight. If it does not move from the 3 psi mark, the tank does not leak. If the pressure drops, the tank will have to be completely emptied for the next part of the test. Prepare a mixture of 90 percent water and 10 percent liquid soap in a small container. Repressurize the tank to 3 psi. Using a clean 2-inch paintbrush, paint the soap and water mixture over the fill plate, discharge valve, and test assembly. Bubbles will indicate the location of a leak. If no leak is evident in these areas, soap the seams of the tank and the fill pipe/tank interface as well as the vent pipe and discharge pipe interface. If you have good ears, listen for an air leak and try to localize the sound. (My ears are bad, so I use the soap).
Pass your hand around the tank to feel for an air leak. Soap the supports (both sides) where the tank rests on them. If you still cannot find the leak, soap all tank surfaces, slowly – one surface at a time – and check for bubbles. The leak may be a worn or corroded spot in the tank plating rather than at a fitting or seam.
If it is a water tank, you can increase the pressure to 4 psi to make the leak more apparent. If you are testing a fuel tank, do not increase the pressure. Plan to remove the tank for repair or replacement.
Check underneath the tank with soap and a flashlight, if possible. If you still cannot find the leak, repressurize the tank to 3 psi and wait several hours. If the gauge again drops, the tank leaks and will have to be repaired or replaced.
With a water tank, it may be feasible to open the tank, drain, clean, and insert a bladder tank using the original tank as a container for the bladder. Tank location and economics will dictate this decision.
Many good old boats had tanks that were literally built into the boat before the deck was placed on the hull. This situation makes removal of the tank a large job that will include major demolition and rebuilding of the interior. Even when it is possible to remove the tank with little problem, the tank may not fit through the companionway hatch for removal from the boat. Measure carefully, and sit and think for a while. Do not rush your decision.
US Coast Guard Code of Federal Regulations Printed copies of the applicable CFRs are available, at no charge, from: U.S. Coast Guard 2100 Second Street S.W. Washington, DC 20593-0001 Attn: Richard Gipe Recreational Boating Product Assurance Division 202-267-0985 202-267-4285 fax
If it is a water tank, it may be easier to disconnect the old tank and locate a new bladder tank under the main cabin berths. Clean and dry the old tank and leave as it is or use it for dry stores.
If the leaking tank is a fuel tank, there is no choice. It must come out. This is a job for a professional mechanic, boatyard, or talented amateur. If you’re up to it, here’s how. First, remove whatever is in the way of getting at the tank. If this is the engine, be sure you know how to remove and reinstall it. Carefully remove all fuel from the tank. Disconnect the fuel discharge line from the tank, but leave the shut-off valve in place. If the shut-off valve is not at the tank, leave it and the line running to it alone. Disconnect it from the engine as close to the tank as possible.
Open the tank fill pipe and fill the tank with water and a good emulsifying soap. Pump out and dispose of the contents properly, as the liquid will contain fuel particles. Fill the tank with water again. Disconnect the vent line at the tank to be sure there is no space in the tank for a pocket of fuel vapors.
Set up temporary blocking to hold the tank in place when you cut the permanent strapping. Disconnect the fill line, vent, and discharge line, as well as the fuel return line if it is a diesel tank. Disconnect the grounding strap. Using non-electric hand, pneumatic, or hydraulic tools, remove the restraints holding the tank in place. Once the tank is free of its permanent restraints, check to be sure the tank is completely disconnected. If all is OK, drain the tank again, collecting the drained water to avoid releasing any pollutants overboard. Extract the tank from its bed and remove it from the boat.
If the tank was satisfactory in capacity, you may take it to a tank shop to have a duplicate made. However, before giving the shop approval to build a new tank, give some thought to the best material with which to build the new tank.
Many companies make rotomolded tanks for fuel out of cross-linked polyethylene. These tanks are immune to corrosion and are mass-produced, which makes them very price competitive. They are tough and durable and come in many shapes and sizes. It may be easier and cheaper to modify the tank bed to accommodate a stock polyethylene tank than to buy a custom-made tank.
Fuel tanks must be made from cross-linked polyethylene. Linear polyethylene is the one to select for potable water tanks. Be sure what type of tank you need to buy. They are not interchangeable.
The downside of the polyethylene tanks is that they are subject to chafe, cutting, and abrasion. The tank must be fully supported on the bottom and carefully restrained. Nylon strapping is recommended, as it will accommodate the tanks initial expansion upon first filling. If a poly tank will not work, consider a 316L/317L stainless steel, a 6 percent molybdenum alloy stainless steel, or a thick-walled black iron tank for diesel fuel. The size of the tank makes a difference. ABYC limits stainless steel fuel tanks to a maximum of 20 gallons.
Another alternative may be a flexible bladder tank. Today, many firms make flexible bladder tanks that will hold fuel, water, waste, and many other liquids. They are sometimes used to hold wine, vegetable juices, or chemicals for industry. More than 20 different types of materials are used to hold specific liquids. A tank made to hold water will not be good for gasoline and so forth. These tanks are convenient to install, as they will conform to spaces more readily. They will fit through a small access hole, when empty, and require less effort to install. The volume of an empty flexible tank is less than 5 percent of the filled tank. The low weight and great compactness make installation and use very easy.
The technology of flexible tanks is well-developed. There are many tank manufacturers supplying aviation and industry. The marine market for tanks is a very small portion of the overall market. Flexible tanks can even be ordered in custom sizes to fit your exact needs. They will be more expensive and take longer to get, but they are a viable alternative to a custom hard tank and are definitely cheaper. Keep in mind that the life expectancy of a flexible tank may be substantially shorter than that of a hard tank, depending on the conditions in which it is employed, but as replacement cost is lower and installation simpler. It is a trade-off worth thinking through.
About a year or so ago I tried to fit two additional 10-gallon water tanks under the V-berth of my Pearson. All the standard flexible tanks were too wide to fit the space available. One manufacturer quoted a price of $130 each for the two custom tanks. This was double the cost of a standard flex tank but much less than the cost of hard stainless steel tanks which were quoted at $400 each. Flexible tanks have the same disadvantages as rotomolded polyethylene tanks except more so. They are subject to cutting, chafe, and abrasion. These problems can be overcome by careful installation. The tanks must be installed on a smooth surface. If the inside of the compartment where the tank is to be installed is not smooth, it may be covered with a glued-down sheet of thick neoprene. The tank is then mounted on top of the sheet.
Flexible tanks are usually secured through reinforced grommets at the four corners of the tank. The grommets need to be fixed to a strong point on the hull, such as a bulkhead or beam to make sure the tank does not shift. Even a 10-gallon tank will weigh 80 pounds when full. When installing these tanks, be sure to follow the manufacturer’s directions on allowing for the movement of the fill, vent, and discharge lines when the tank is full or empty.
Many cruisers use flexible tanks to carry additional fuel and water for a long passage. This is a good use of the tanks, as they can be stored away in a small space when not needed and yet provide great volume for the long haul. Careful installation is the key to a long leak-proof life for a flexible tank. Manufacturers include Nauta, Vetus, and Plastimo to name a few. (See below for contact information.)
Back to our inspection of the existing tanks in our good old boat. If, after inspection and the air test, the tanks in your boat or prospective boat pass muster, you should consider how to keep them in good shape. Check the exterior surface of each tank. Are there areas of abrasion, worn out coating, rust, pits, or corrosion?
If the tank can be easily removed from the boat for coating, remove it, clean it, resurface it, and reinstall it. If it cannot be removed easily, service it in place. Wash it with soap and water, sand any pits and corrosion down to good metal, wipe the surface with mineral spirits, repaint it with a high-grade metal primer, and give it a finish coat. Removable black iron tanks can be sandblasted clean and bright and electrostatically coated with powdered epoxy for a long-lasting coating, or cold galvanizing can be used to protect steel tanks after suitable surface preparation.
When replacing or servicing a tank, check the tank supports. Do they need reinforcement? How about the tank hold-down? Consider new strapping with neoprene cushioning between the tank and the straps. Finally, check fill and discharge lines. Marine engines vibrate and can cause hard fuel lines to fatigue or crack over time. Even flexible fuel lines with solid fittings can have problems.
Case in point: I was powering home one windless winter day when the engine stopped for no apparent reason. I ran through the usual checklist and could find nothing wrong. I tried the starter, and the engine ran for 30 seconds then quit. By this time it was getting cold and dark.
We were in the river near our home with no other boats about. My son had his new girlfriend out with us, and she was a nonsailor and cold. I tried the engine again, and it ran for 30 seconds and quit as before. Our strategy was that my son would steer while I started the engine. It ran, and we glided along for 30 seconds under power and another minute on momentum. We repeated this exercise for more than an hour and finally made the mooring. Fortunately I had ample battery capacity. Still, it was a long night.
Two days later I still could not find the engine problem until, in handling the fuel supply line from the filter to the fuel pump, I noticed a crack in the bayonet fitting of the fuel line. This tiny crack in the fitting had been allowing enough air into the fuel system to starve the engine under power but still allow enough fuel flow to start it momentarily.
Always check your fuel lines as part of your fuel system. Rubber lines crack from age and environmental effects. Wipe flexible hoses dry and check for an odor of fuel. If there is any sign of deterioration, replace with U.S. Coast Guard (USCG) approved Type A-1 (SAE F1527) hose for gasoline or Type A-2 for diesel fuel. Metallic hoses must be USCG Type A-1 hose for diesel return lines, USCG CFR 183.538, 183.540, 183.558 & 183.562. (See sidebar.)
Always keep in mind that any fuel or oil discharge from a boat that causes a visible sheen on the water surface is in violation of federal pollution regulations and subject to stiff fines. The Oil Pollution Act (OPA1990) requires that spills or even situations where fuel or oil has the potential of being spilled must be reported to the National Pollution Response Center (800-424-8802) as well as to the USCG. Reports must be followed up with immediate action to prevent or clean up any spill.
The USCG requires positive steps to contain a spill. People who do not maintain their boats, perform preventive maintenance, or cooperate with them could be heavily fined. If a person does not report a spill, he or she could face criminal penalties and may be liable for fines up to $250,000. Spills caused by any gross negligence or willful misconduct may result in fines of not less than $100,000. Preventive maintenance of tanks, fuel, and oil systems are cheap insurance compared to the possible consequences.
There are many products in the marine market to help you comply with the laws. The 1998 BOAT/U.S. catalog has an entire page (Page 415) devoted to accidental spill prevention. Boat insurance policies will not pay your fine if you get one, but they usually will provide emergency assistance in dealing with a spill. Asking for help could mean the difference between a $500 fine and a $50,000 one.
Oh, enough doom and gloom, already! Let’s recap. Take the time to inspect the tanks. Test if you have any doubts about the tanks’ integrity, particularly the fuel tanks, on your existing or prospective boat. If you need new tanks, buy quality. Buy flexible, polyethylene, 316L/317L, 6 percent stainless, or black iron, depending on the tank’s intended use. When I was building commercial diesel-powered workboats, we always used heavy-walled mild steel tanks, cold galvanized on the outside and pickled with diesel fuel on the inside. I was aboard one of my boats the other day, and it still had the original tanks in fine condition 30 years after they were built.
Make sure your tanks are well-supported and secured for heavy weather. You may never see a 25-foot wave, but years of four-foot waves can have the same destructive effect. Think of your tanks as a system that includes fill pipes, vent, supply lines, filters, and grounding straps. All are part of the essential propulsion system on your boat. If you have metal tanks, keep them clean and protect from bilge water, salt water, and chemicals.
There are many tank builders and manufacturers. The sidebar at right lists a representative group. Check with boatyards in your area for recommendations on local sources. Make sure your tanks comply with USCG requirements, CFR 183.510 through 183.590, and ABYC recommendations. Remember, a fuel tank must be tested and certified as conforming to USCG requirements. Before you commit to having a fuel tank built, ask the builder to show you his USCG test program and the label he will provide to certify the tank, CFR 183.514.
All fuels are dangerous and polluting to the environment. Be safe and sure in their storage, use, and disposal.
Tank builders and distributors
Builders
Rayco Manufacturing Company 6060 28th St. East, # 1, Bradenton, FL 34203 941-751-3177 Custom tanks: stainless steel, aluminum, and iron (fuel, water, waste).
Holland Marine Products 3008 Dunbar St. West Toronto, Ontario Canada M6P 123 416-762-3821 416-762-4458 fax Custom tanks: stainless steel, aluminum, and iron (fuel, water, waste).
Atlantic Coastal Welding, Inc. 16 Butler Blvd. Bayville, NJ 08721-3002 800-434-8265 732-269-7992 fax Custom tanks: stainless steel, aluminum, and iron (fuel, water, waste).
Florida Marine Tanks 16480 Northwest 48th Ave. Hialeah, FL 33014 305-620-9030 305-621-8524 fax Custom tanks: stainless steel, aluminum, and iron (fuel, water, waste).
Todd Enterprises 530 Wellington Ave. Cranston, RI 02910 401-467-2750 401-467-2650 fax Tank manufacturer: polyethylene, stock sizes (fuel, water, waste).
Tempo Products Company P.O. Box 39126 Cleveland, OH 44139-3389 440-248-1450. Tank manufacturer: polyethylene, stock sizes (fuel).
Ronco Plastics, Incorporated 15022 Parkway Loop, Tustin, CA 92780; 714-259-1385; 714-259-9759 fax; http://www.ronco-plastics.com Tank manufacturer: polyethylene, stock sizes (water, waste).
Distributors
BoatU.S. 884 S. Pickett St. Alexandria, VA 22304 800-937-2628 http://www.boatus.com Tempo (fuel), Todd (fuel, water, waste), Sealand (waste), and Vetus (water, waste).
West Marine P.O. Box 50050 Watsonville, CA 95077; 800-262-8464; 408-761-4421 fax http://www.westmarine.com Tempo (fuel), Todd (fuel, water), Skyline (aluminum fuel), Sealand (waste), Kracor (waste), Jabsco (waste), Plastimo (water), and Nauta (water).
Defender Industries 42 Great Neck Rd. Waterford, CT 06385 800-628-8225 800-654-1616 fax mail@defenderus.com http://www.defenderus.com
Vetus DenOuden P.O. Box 8713 Hanover, MD 21076 800-398-3887 410-712-0985 fax vetus@aol.com http://www.vetus.com Flexible tanks (fuel, water, waste).
Fisheries Supply Co. 1900 N. Northlake Way #10 Seattle, WA 98103 800-426-6930 206-634-4600 fax mail@fisheriessupply.com http://www.fisheriessupply.com Tempo (fuel), Todd (fuel, water, waste), Jabsco (waste), Whale (gray water), Vetus (water, waste), and Nauta (water).
Steve Christensen, a research chemist, moved from Utah to Michigan and took up sailing to replace skiing. Steve and Beth sail Rag Doll, an Ericson 38, on Lake Huron. They spend each August cruising the waters of The North Channel and dream of retirement as liveaboards someplace warm.
Article taken from Good Old Boat magazine: Volume 2, Number 1, January/February 1999.