Turning the interior of a bargain trailer-sailer into a comfortable pocket cruiser
Issue 155: March/April 2024
When hunting for an old fiberglass sailboat to adopt in the spring of 2022, I found many sitting forlorn in backyards on rusted-through trailers, full of rainwater and leaves. Prices started at “Please haul it away!” I passed on the free boats and looked for one that was mostly ready to sail.
The heyday of the trailerable sailboat began in the 1960s, with fiberglass boats popped out of molds and featuring incredible curves and gleaming gelcoat finishes. Gone was the need for slips or moorages, and annual hauling for maintenance that past generations of boaters had put up with. These boats were simply towed home behind your car, parked in the yard, and maintained with little more than soap, water, and wax. The idea was a boat that a family could own without the boat owning the family. It was a novel concept that sold well.
Manufacturers made tens of thousands of these boats, and thanks to the longevity of fiberglass and resin, used ones are still available. Some designs were inspired; others, not so much. Some are great performers under sail, while others are better for playing house in.
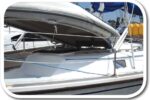
Eventually I found a 1978 San Juan 21 that had spent decades in an old chicken barn. The rigging and sails were basically good, the cored deck sound, and the hull still gleamed under the dust and grime. The same could not be said for the interior. Moldy carpet covered the floors and old cloth was glued to the walls. The cushions were damp and stank of mildew. The forward hatch was broken. There were brittle plastic light fixtures, a cassette player, and a knotmeter of late 1970s vintage. The electrical panel was corroded, with a long-mummified battery, and the chainplates leaked, dry-rotting the bulkheads.
This boat was for sailing, not playing house. The headroom down below was only 4 feet at best, but the raised, flush-deck cabin allowed us to sit on the quarter berths without knocking our heads against the side decks. The V-berth had 3 feet of headroom at the head and not much less at the foot. Two people could sit comfortably on it, reclining against the cabin walls and facing each other.
As we sat in the mildewed cabin amid a jumble of old gear, we could see the potential to make her into a cozy little den. We fell in love with the boat, which is the most important part. Towing her home was exciting yet uneventful, an odd combination. At 1,500 pounds, she towed easily behind our 16-year-old Jeep. This was a boat we could own, that could take us on many adventures, yet would not own us.
We parked her on the lawn and spent days scrubbing her out. Cushions, carpet, cloth from the walls, bulkheads, electrical system, and wiring were torn out. We scrubbed the walls with 80-grit sandpaper and painted them with mold-killing primer, including under the cockpit. Then we sat inside, sketch pad on lap, deciding what was to become of the interior. Working on an old, cheap boat is liberating because the investment is minimal and we couldn’t make it worse than it already was.
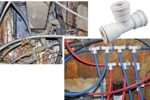
We drew up lists of things we wanted; storage, a two-burner propane stove, some counter space, a place to stow the porta-potty, a small folding table, and a good mirror for shaving and putting in contact lenses. Things we didn’t want were plumbing, a sink, or a complicated electrical system. A sink takes up room, is often too small to be useful, and isn’t needed on a boat low enough for us to touch the water from the cockpit. Modern rechargeable lights and handheld electronics make an electrical system on a small boat a needless complication.
The remodel started in the bow, where I cut out a fiberglass bin above the V-berth that had been used to hold the anchor and rode. No way I was going to stow a muddy anchor and dripping rode above my bed. I replaced it with simple plywood shelves for clothes, glued in place with thickened epoxy. Then I started on the main cabin.
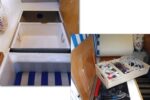
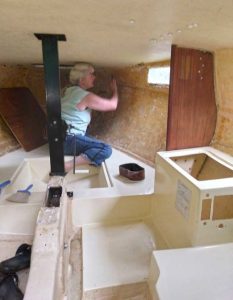
The original layout was pretty standard for boats this size, with a V-berth forward and quarter berths aft, separated by small molded storage bins, one of which had held the battery and electrical panel. The centerboard trunk bisects the cabin. The quarter berths were wider than needed for sitting and the voids inside them were unused space, so using a 4-inch angle grinder, I sliced 6 inches off the starboard quarter berth, going back under the cockpit 2 feet. This gave us more foot room and space to hang a folding table on the centerboard trunk, and enabled us to slide the porta-potty under the cockpit.
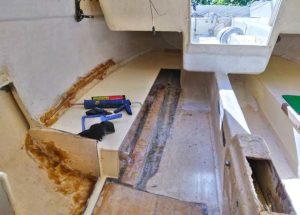
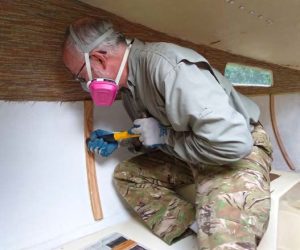
While I was at it, I cut away the battery bin forward of the quarter berth and the flat spot molded into the floor intended to hold the potty at the head of the V-berth. In the port quarter berth, I cut a big hole to make a hatch to access the unused space within for storage. (Of course, I wore a hooded Tyvek suit, gloves, and respirator for all this cutting.)
During the demolition, I discovered the hull liner had separated from the hull in several places. This isn’t unusual, as fiberglass boats are typically made from three big molded pieces — the hull, liner, and deck — and stress can crack the joints between them. Thankfully, another virtue of fiberglass boats is that they are easy to repair. I slathered thickened epoxy into the cracks between the hull and liner and covered them with fiberglass tape set in more epoxy. Cutting open the starboard quarter berth exposed a cardboard tube glassed to the hull to stiffen it, which I ground away because that area was now part of the floor. The quarter berths are a structural element, and I needed to reinforce the area where I’d removed these pieces.
I laid fiberglass mat down in epoxy on the exposed areas of the bare hull, extending well inside the quarter berth. Then I epoxied ¼-inch birch plywood on top of that, using a 55-pound anvil to force the plywood into the curve of the hull. I put another layer of fiberglass mat on top of the plywood, and finally, laid down fiberglass cloth for a new, smooth floor. I made a new front for the starboard quarter berth out of 1/4-inch birch plywood with ¾-inch square framing on the inside, glued and screwed it in place, and added epoxy fillets outside.
Then I turned my attention to the port quarter berth. I made a plywood hatch to fit the opening, with stiffening ribs on the inside. Next came the hard part. The quarter berth extends back under the cockpit some distance. To keep from losing things inside, I installed a bulkhead about 2 feet aft of the hatch. I did this by reaching in and fitting cardboard templates by trial and error, transferring the shapes to plywood, and sticking them in place with sloppy fillets of thickened epoxy. Finally, I sanded the storage space reasonably smooth and painted it.
For peace of mind, I drilled holes in the rear of both quarter berths and the front of the V-berth to access the remaining voids within, and poured in two-part expanding foam. It would take about 22 cubic feet of foam to float the boat when swamped. There isn’t sufficient volume for that, but the foam does help stiffen the hull, and it turns the V-berth into a collision bulkhead. The foam under the V-berth would prevent water intrusion in the event of a hull breach forward, at least for a time. After the foam cured, I patched the pour holes with epoxy. Call it cheap insurance.
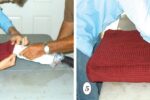
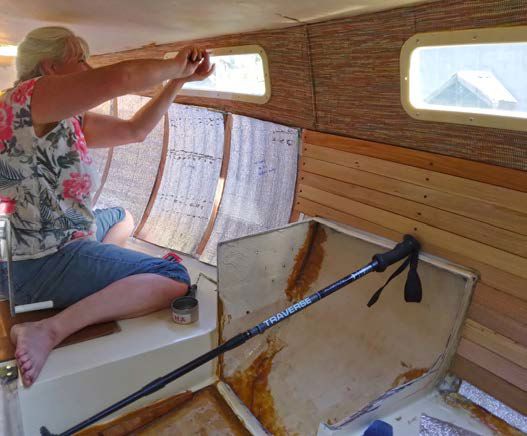
A neighbor gave us a roll of insulation left over from lining his garage — it was ¼-inch closed-cell with foil on both sides, perfect for the boat! My wife measured, cut, and fit the insulation to go on the walls above the turn of the hull. When she was happy with the fit, she wrapped the insulation with upholstery fabric and quilted it together on her sewing machine, then glued it in place with contact cement.
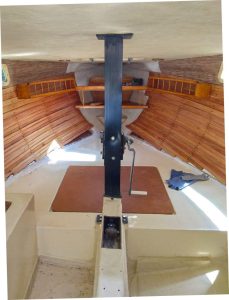
Now for the woodwork. I was inspired to line the cabin with cedar by a friend who has done this to dozens of boats, installing vertical ribs and fixing long, horizontal cedar strips to them. I made ribs by slicing Douglas fir 2 x 4 scraps into 1/8-inch strips with my table saw, and laminated three layers of them together with contact cement. I chose contact cement because we had a gallon and I thought its instant grab would make things easier. This did work, but in the future, I’d stick with epoxy. Next, I took cedar fence boards that had sat in my father-in-law’s basement for years and milled them into 2-inch by 5/16-inch shiplap using his fancy tools. When the ribs were done, we fitted insulation between them and attached the cedar strips with polyurethane glue and short brads. Trekking poles made handy adjustable cross braces while the glue set.
The shiplap worked well in the main cabin and in higher areas, but close to the V-berth I had to use strips about 3/4-inch by 3/16-inch to fit the tight curves. I painted the insulation behind them brown so any gaps wouldn’t be noticeable. We finished the strips with a single coat of amber shellac, a natural material made from a resin secreted by female lac bugs on trees in the forests of southeastern Asia. Once a popular wood finish, it has been largely replaced by cheaper and tougher stuff. It worked well and its scent complements that of the cedar.
Next came new plywood bulkheads, fitted by taking the shape from the old. I extended the port bulkhead to the centerboard trunk to provide backing for a galley counter. This turned the V-berth into a distinct space, a separate room.
When the bulkheads were in, I made a tall storage cabinet topped with a 4-inch rail where the starboard battery bin had been. This was quite a chore because nothing was level and all the surfaces the cabinet touches are curved. Thankfully, I’m no perfectionist, and I simply did the best I could by guess and by golly and with cardboard templates, transferring the shapes to plywood that I framed with small sticks ripped to size on the table saw. It’s one of the best features of the cabin, holding water jugs in the bottom and a week’s supply of food on the shelves. The top holds bread, fruit, and vegetables.
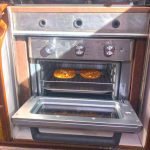
The storage space inside the port fiberglass bin was difficult to access. To make it easier to get at, I cut the top opening much bigger and stiffened the edge with a wood rim fitted inside. Then I installed a hinged, ¾-inch plywood galley counter over it, extending it to the centerline, where the other end rests on the centerboard trunk. A 3-gallon propane tank sits on the floor below the counter, lashed to the bulkhead, and feeds the stove bolted on top and the propane heater. I fitted a small drawer repurposed from an old desk under the counter to hold utensils, adding an elk horn toggle to keep it closed.
We needed a rack for dishes, and the wasted space along the curved hull side of the galley counter seemed ideal. This was another case of inventing something to fit the space. I made cardboard templates, then transferred the shapes to ¼-inch plywood and framed them with small pieces of oak ripped on my table saw. It works great, holding cups, bowls, plates, frying pan, and more.
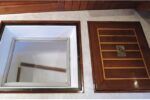
Above the galley is a small spice rack and medicine cabinet I made of oak pieces — again, ripped to the right size and thickness on my table saw, then glued and nailed together. You’re probably noticing a pattern here; my table saw is essential for this kind of cabinetwork, but there are no dovetails or anything fancy anywhere, just simple lap and butt joints. The medicine cabinet door is thin plywood fitted with a mirror my wife found at a yard sale. It’s perfect for shaving and dealing with contact lenses.
To finish the interior, I made shelves to go above the V-berth and racks to stow paddles and whisker poles under the cockpit while my wife sewed cushions, pouches to hang above the V-berth for clothes, and pockets to hang along the sides of the hull under the cockpit to hold charts, companionway drop boards, umbrellas, kites, and more.
There was still plenty of work to do on the boat’s exterior, but that is a story for another day. We easily got all of the initial work done in one summer. That’s probably the biggest advantage of trailerable sailboats. The boat can sit out on the lawn or in the driveway, accessible to work on when the opportunity presents itself or inspiration strikes — and heck, all my tools and supplies are at home too! The cost of the project was surprisingly little. The wood was free from old furniture, fence boards, and the like. Any special tools I didn’t have, I borrowed. All I had to pay for was some hardware, glue, and fiberglass materials.
The improvement to the boat is nothing short of astonishing. Living out of a duffle bag in a cramped plastic turtle shell dripping with condensation amid confused jumbles of paraphernalia can be laughed off for a time, but a real cruising boat needs a cozy and snug cabin wherein one can truly be at home. It should be finished in warm, natural wood and cloth surfaces that don’t attract condensation, and the available space adapted to the functions of living; one must be able to cook, eat, and rest comfortably. There must be adequate storage, including a spot for your toothbrush. Customizing the boat makes it more serviceable and functional, and can actually make it feel larger.
The smaller the boat, the more challenging this may be, but nothing offers the carefree freedom, adventure, and solitude like an affordable and easily handled pocket cruiser.
Robert grew up on Long Island Sound, where he and a buddy sailed a Super Snark to destruction. Eventually he moved to the Pacific Northwest, where he canoed happily for decades. One day on Ross Lake in Washington state, he and his wife were hammering the water as if killing snakes, trying to round a point in a canoe in high wind and waves, when it occurred to him that it might be nice to once again have a boat that could harness the wind.
Thank you to Sailrite Enterprises, Inc., for providing free access to back issues of Good Old Boat through intellectual property rights. Sailrite.com