role easier in the rudder-extraction exploit.
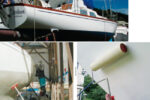
With careful planning, a rudder can be unshipped and refitted in the water
Issue 123: Nov/Dec 2018
The lengths that sailors go to avoid hauling out range from the ingenious to the ridiculous. Friends of ours recently plugged a leaking through-hull with a carrot inserted from the outside, then careened the boat with an anchor to a 35-degree angle to bring the through-hull above the waterline so they could replace it. While much can be done to effect repairs in the water, sometimes a haulout is unavoidable.
We reconciled ourselves to this prospect after noticing that, when a wave raised the waterline of our Dufour 35 above the top of the rudder port, water trickled steadily from around the bearing. It wasn’t clear what the failure mechanism was, and after packing J-B WaterWeld epoxy around the seam to no avail, my wife, Fiona, and I agreed we faced a $500 haulout and another week or two in the yard. We weren’t happy.
As luck would have it, that’s when Bonavalette, another 1979 Dufour 35, pulled up and grabbed the mooring beside our MonArk. Our boats were only two numbers apart off the assembly line in La Rochelle, France. We had never even seen another Dufour 35 before, let alone our twin sister. Even luckier, Bonavalette was captained by two extraordinary young Swiss fellows who had recently completed the Northwest Passage. After hearing our dilemma, they reassured us that we could drop the rudder and fix the problem in the water . . . after all, they had just done it themselves.
The next day, we had the rudder lying on the deck of the boat.
Rudder design
Almost every boat has a different rudder design. While there are many similarities between rudders of the same type (spade, skeg-hung, transom-mount), almost no two are the same on boats of different design. I’ve tried to provide general guidance and principles to help the reader develop a method for dropping a rudder, no matter what the specific rudder design parameters are.
It may be difficult to determine exactly how a rudder has been designed and built. The bearings are often in locations to which access is difficult or cramped. The best place to start figuring out how a rudder is constructed is online, where you might find drawings of the rudder assembly on the designer’s website, or the designer might be able to send them to you. Forums are another good place to check for advice.
After doing some research, it’s important to take a look for yourself. On boats with wheel steering, the quadrant often obscures the view of anything going on below it, so you will likely have to remove the quadrant to get a better look.
The rudder port should extend well above the waterline, but this is not always the case. On many boats, the rudder port is at or below the waterline and is fitted with a stuffing box to keep water from seeping around the rudder stock. It’s more difficult, but not impossible, to remove the rudder if the rudder port does not extend above the waterline. Raising the stern by moving weight to the bow might help, but at the very least you will have to be very quick with a plug, as an 1 1⁄2- to 2-inch hole fills a boat with water surprisingly quickly.
Rudders are secured to boats in a variety of ways, ranging from clamps to plates to lock rings to eyebolts. It may take some investigation to understand how your rudder is secured, but removing the mechanism shouldn’t be too difficult.
Our rudder
The rudder on a Dufour 35 has a skeg, but the skeg doesn’t bear any weight. A pintle at the bottom of the skeg provides lateral support at the bottom of the rudder. A Delrin sleeve at the underside of the cockpit seat provides lateral resistance at the top of the rudder stock. The main axial bearing (the bearing that takes loads parallel to the axis of the rudder stock) is a Delrin bushing. It sits on top of a lip seal, which keeps seawater from encountering the bushing. The rudder stock runs inside a 6-inch-long Delrin tube fiberglassed into the hull, which provides lateral resistance to the forces acting on the rudder as the boat moves through the water. The axial bushing sits on a rudder port that extends about 8 inches above the waterline. A tapered through-bolt prevents the rudder from falling out of the boat. This is common on older, smaller boats.
Removing the rudder
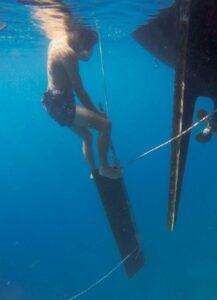
To facilitate removing the through-bolt, we had to take the weight of the rudder off it by lifting the rudder slightly. We tied safety lines to the rudder to make sure that, when we removed the bolt, the rudder wouldn’t sink out of sight. After we’d removed the bolt, the lines supported the weight of the rudder so we could lower it and maneuver it to the side of the boat.
Taking the weight
We began by removing the shoe that attaches the pintle to the bottom of the skeg and over which the foot of the rudder stock sits.
We then tied a line around the rudder and made it very tight using loops of rope, the same way a two-block system works. The shape of the rudder and the slot at the bottom ensured the line was not able to slide off the rudder in either direction.
We tied two other lines to this line, ran one up each side of the boat, and secured them. (Some rudders might have to be tied up like a Christmas present to ensure the line can’t slip off.)
With the safety lines attached, we ran a lifting line from one side of the boat to the other under the bottom of the rudder.
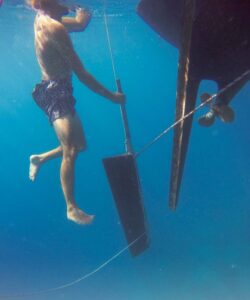
We took the pressure off the through-bolt by tightening each side of the lifting line with the cockpit winches to lift the rudder about 3⁄4 inch until the blade itself contacted the hull. We at first tried tightening only one side of the lifting line, but all that did was flex the rudder stock to that side and it bound against the inside of the rudder port. We had to tighten both sides at close to the same speed to create an upward force, and a swimmer had to push on the sides of the rudder to prevent the stock from binding in the tube.
Lowering the rudder
Using a hammer and a block of wood, we removed the through-bolt, leaving the rudder supported only by the lifting line and the safety lines.
By easing the lifting line and letting out the safety lines, we lowered the rudder until the top of the stock exited the hull. Managing four lines (lifting line ends and safety lines) in the cockpit required a couple of people, and it helped to have one person in the water watching the rudder and pushing on it when needed.
When the top of the stock exited the hull, we released and removed the lifting line, leaving the rudder supported only by the safety lines.
Maneuvering the rudder
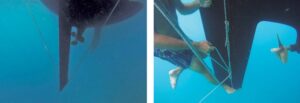
We slowly released one of the safety lines while bringing in the other one. This moved the rudder from directly under the boat over to one side. A swimmer made sure that the rudder didn’t bump into the hull on its way.
We released the safety line on the side opposite the rudder and fed it under the boat to come up on the same side as the safety line under tension.
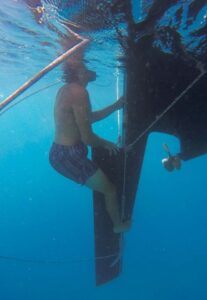
Bringing the rudder on board
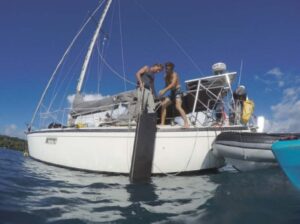
To lift the 100-pound rudder, we attached the loose safety line to a halyard — simply lifting it from the water by hand was not an option.
One person winched up the halyard to raise the rudder, while another fended the rudder off the hull.
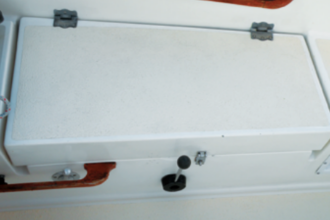
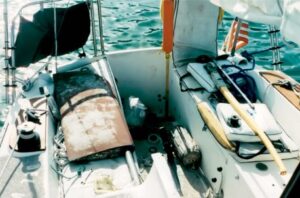
When the rudder was in place on deck, we eased the halyard to lay it down flat. In our excitement, we didn’t think to put cardboard, a tarp, or an old piece of sailcloth on the deck to protect it, so when we were done, we had to scrub the deck to remove black bottom paint left by the rudder.
We were surprised at how quickly and easily we were able to remove the rudder. All in all, it took three of us less than an hour and a half to get the rudder on deck. The upshot was that we saved a haulout fee and the cost of renting space in the yard, and we didn’t waste time preparing the boat to come out of the water.
The cause of the leak proved to be a poorly fiberglassed rudder port that had voids in it and had caused a sealant failure between the port and the bearing. I ground down the weak port and built a stronger one with epoxy. A week later, we put the rudder back in place by simply reversing the steps for removing it.

A Shared Experience — Michael Robertson
When I had to perform an in-the-water rudder removal, it was because my prop shaft broke at the coupling. Removing the rudder was step one in my in-the-water shaft-removal project.
The rudder on my 1980 Newport 27 was a balanced spade, so there was no skeg. In the cockpit, a collar sat on top of a bearing, just below where the tiller fitted on the stock. This was the clamp that kept the rudder attached to the boat. Before removing the clamp, I strapped several bulky life vests to the rudder and tied a safety line to it, all to keep it from sinking out of sight the moment I loosened the clamp. This turned out to be unnecessary.
After I removed the tiller and then the clamp, nothing happened. I found that, by pushing very hard on the top of the stock poking out of the cockpit sole, I could push the rudder downward an inch or so, but as soon as I released the pressure, the stock would quickly pop back up. One by one, I removed the life vests until there were none. Pushing on the top of the rudder stock yielded the same result.
Next, I cinched my dive-weight belt around the rudder. That made it a bit easier to push the stock down and it didn’t spring up as quickly. I added weight until the rudder was only slightly buoyant. Finally, I pulled it down and out of the boat from underwater. I pushed it aside, and after I removed the weight belt, it shot to the surface. Using a line, it wasn’t difficult to wrangle it into the cockpit myself. As Robin indicated, reinstalling it was as easy as reversing those steps.
Robin Urquhart and his wife, Fiona, recently crossed the Pacific in their good old Dufour 35, MonArk. After that voyage, and their earlier passage from British Columbia to Mexico, they can attest to the verity of the old adage that cruising is really about fixing boats in exotic places. Robin is an editor at Waterbornemag.com, a website aimed at inspiring and supporting a new generation of water people.
Thank you to Sailrite Enterprises, Inc., for providing free access to back issues of Good Old Boat through intellectual property rights. Sailrite.com