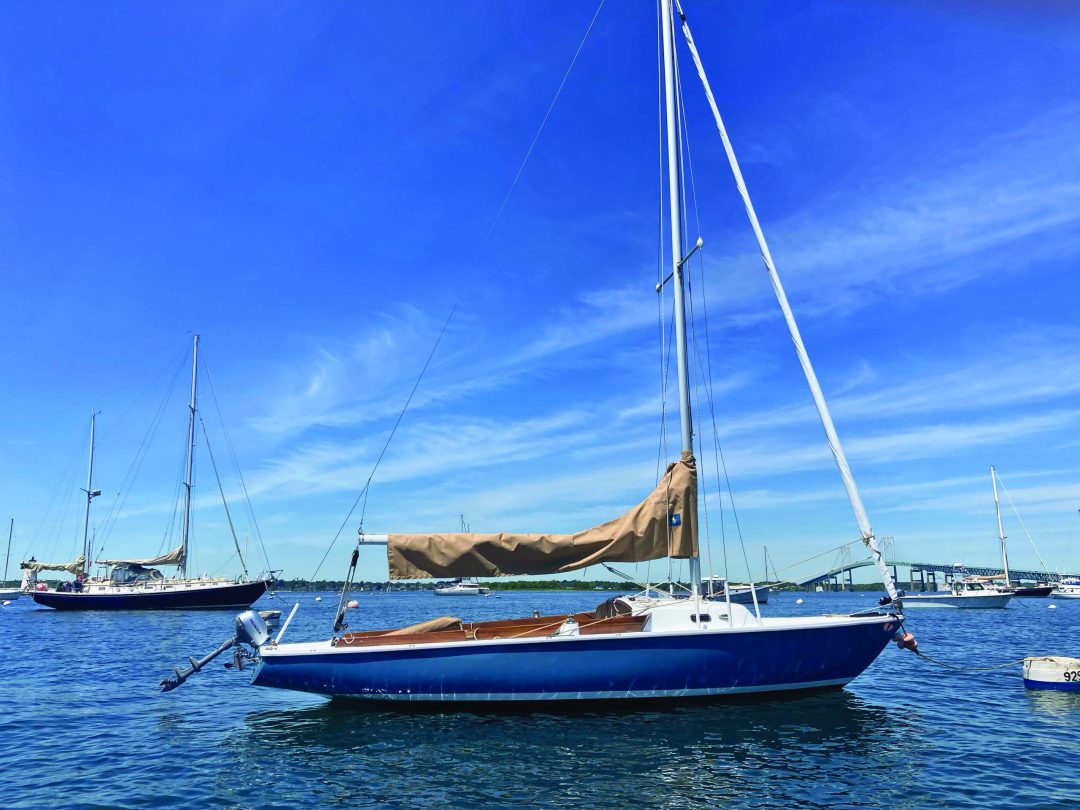
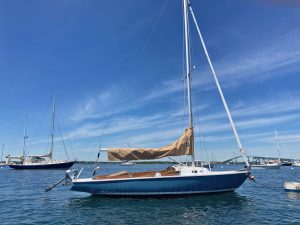
After a winterlong refit, a 51-year-old daysailer looks sharp and sails like a dream.
Issue 146: Sept/Oct 2022

My partner, Nancy, and I are in our mid-70s and have enjoyed ocruising in New England aboard Pegasus, our 1969 Tartan 34C, for many years. Eventually, though, we were doing more motoring than sailing, and we realized that if we were to continue enjoying cruising, we needed a boat more accommodating to our less-agile joints and with a few more creature comforts. So, we finally sold Pegasus and bought a 2001, 30-foot Cape Classic trawler.
Swapping the Tartan for the trawler solved the question of how to keep us cruising longer into our senior years, but we— especially I—knew all along that we couldn’t do without a sailboat of some kind. And so the search began for a boat we could daysail.
Knowing that we wanted a boat with classic lines, I was at first tempted by some real bargains on small cruisers like a Pearson Triton, a Compac 23, Quicksteps, and Seawards. Fortunately, sanity prevailed; we already had a cruising boat, so our second boat did not need all the systems and gadgets that would make her capable of overnighting.
We refocused the search to daysailers, though we didn’t limit it to trailerable boats. We planned to keep the sailboat on my mooring in Newport, Rhode Island, letting our marina handle the hauling, launching, and mast-stepping.
After a brief flirtation with a 19-foot catboat, we found a Pearson Ensign, hull #1424, called Blue Dragon, for sale. I have appreciated this Carl Alberg design over the years, and I knew its reputation for sailing performance.
Built by Pearson in Bristol, Rhode Island, Blue Dragon had been owned by Tom Crane and his brother, Charles, since she was new in 1971. She stayed on a mooring in Woods Hole, Massachusetts, where Tom and the nearby Quissett Boat Yard kept her well-maintained. Tom obviously loved sailing her; he had a big grin during our sea trial in a brisk breeze off Quissett Harbor.
I saw some potential cosmetic improvements I would enjoy making, but the boat was basically sound. It was early spring during the beginning of the COVID-19 pandemic, when any boat that could float was selling quickly. The thought of my mooring sitting empty all summer encouraged us to meet Tom’s asking price pretty much on the spot.
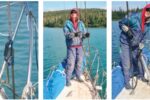
We renamed her Leota, after my grandmother, and Nancy and I sailed her as we found her for that first summer. We loved the boat. She performed wonderfully, and she reminded me how much fun it is to sail a smaller, responsive boat that occasionally douses you with sea water.

With a huge cockpit for her size, she was perfect for daysailing with friends on Narragansett Bay or lounging with a book on the mooring after going for a swim. We could have Leota sailing off her mooring in a matter of minutes, and about the only thing aboard that might need attention over the years were the bilge pump and its battery.
Having decided that Leota was for us, I wanted to give her a refresh. So, during that first winter, we splurged and stored her in a heated shed, where working on her made for a perfect winter project for me. (I have restored boats outside under a cover in the New England winter, so being inside was a real treat.)
Leota was in good shape structurally—her wooden floors and bulkheads were solid, and Tom had stripped and epoxy- coated the bottom a few years earlier. The cockpit coamings and rigging were also in good shape, and she had a fairly new boom built by Ensign Spars.
So, restoring the 51-year-old boat mainly involved refreshing her paint and varnish finishes and replacing worn moving parts, including cam cleats and turning blocks. I also decided to replace the entire electrical system, which was very basic but starting to show signs of corrosion and aging insulation. Some of Leota’s upgrades were far from essential, but as the boat came together, I got a little carried away.
Refreshing the Finishes
To prepare for painting, I removed all the deck hardware and wood trim except the cockpit coamings. Over the winter in our basement, I stripped all the wood trim with a heat gun and revarnished it.

While I had all the deck gear off, I wanted to make sure that the fasteners went through solid epoxy and not exposed core. I drilled out all the fastener holes, making them slightly larger and filling them with epoxy. I was relieved to find no significant rot in the plywood-cored cabintop and fore and aft decks, and most of the rest of the boat is solid fiberglass.
The molded toerail had many gelcoat cracks, likely from gelcoat being applied too thickly in this area (though I found no structural fractures). I ground out all the cracks, filled them with epoxy, then faired them. This took at least two coats of filler before I applied two coats of Pettit primer, sanding between each coat.
Where non-skid wasn’t needed, I finished the deck with two coats of Pettit EZ-Poxy in Mediterranean White. I painted non-skid areas with Interlux Interdeck White. Using Interdeck saved me having to mix non-skid and deglosser into a base paint, and it resulted in a very pleasing, uniform finish with non-skid that isn’t too aggressive for this small boat. I wanted the gloss and non-skid areas of the deck to be about the same color, so masking between the two types of paint didn’t have to be quite so precise.
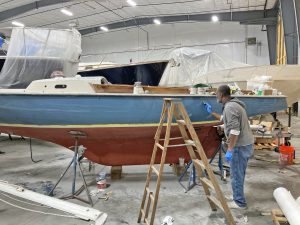
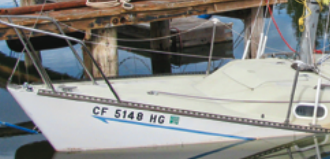
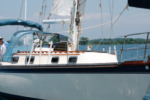
Leota’s topsides had been painted at least once in her lifetime but needed new paint again. I started the process myself, but after watching a fellow who goes by CB varnishing a big, all-mahogany Hacker Craft near me in the shed, I decided to splurge again by hiring him to work on Leota. CB and his professional crew rolled and tipped Leota’s topsides and boot stripe with two-part Awlgrip. The topsides are Stars and Stripes Blue with a Chevy White boot stripe. It took a lot of fairing and filling and several coats of primer and topcoat, but Leota’s hull now looks new.
As a finishing touch, I ordered Leota’s name and hailing port in vinyl lettering from BoatU.S. and applied them to the transom.
Sprucing up the Interior
It took a lot of power sanding to strip layers of old peeling paint from the interior of the cuddy cabin while being careful not to damage the fiberglass layup. My back informed me that working for long periods in the cramped cuddy was not a good idea, so I hired one of the marina’s technicians, Mike, to finish the work.
Mike did a great job, and though the cuddy isn’t like new, it is bright, clean, and refreshed, which was my goal. We repainted the interior with three coats of a good-quality, self-priming exterior urethane gloss house deck paint that I have had good luck with using on another boat.
I removed, stripped, and revarnished the wooden fiddles on the bunks and painted the cabin sole with gray Interlux Bilgekote.
I added a portable toilet just forward of the mast where the original plans show an overboard-discharging head was intended to be mounted. One will have to be a bit of a contortionist to use this head, but it’s there for emergencies.
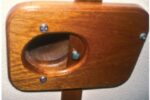
I replaced the two small, foggy portlights with new acrylic and I had their aluminum frames powder- coated in a bronze color at Granite State Powder Coating in New Hampshire. One of the frames broke at a mounting screw hole (my fault). Ensign Spars sells replacement frames, but to keep the project moving, a friend of mine fashioned a new frame out of G-10 that is as good as the original after being spray-painted bronze.
Since we didn’t plan to sleep aboard, I just covered the bunks with 3/4-inch-thick, closed-cell, blue foam yoga mats. They were inexpensive, easy to cut to fit, and go well with the light blue interior.
Upgrading the Electrics

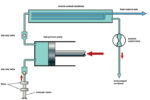
Leota’s wiring is minimal; in addition to the battery cable and solar charger, there is a cable for each of the three running lights, a triplex for the bilge pump, and maybe a wire for a compass light if you get fancy. What was probably the original wiring was a rat’s nest of splices and in-line fuses crammed into a small wooden switch box. I made a new watertight electrical breaker box that includes two 12-volt charger ports, modern blade fuses, a rocker switch for the bilge pump’s automatic and manual operation, and an external voltmeter.
Because the boat is not self-bailing, I sized a new battery around her bilge pump requirements. I calculated the area of the Ensign’s cockpit and how much rainwater it would collect on the worst-case one-day rainfall (3.23 inches on June 7, 2013, in Newport), and how much energy it would take to pump out that much water with the boat’s pump.
These calculations indicated I could replace the existing 34-pound battery with a compact, sealed AGM unit that only weighed 9.5 pounds and could be tucked in a corner inside a small battery box. While I was at it, I also replaced the weathered solar battery charger.
Final Touches
When the time came to reinstall the deck hardware, I was glad to find that Harken still made nearly identical replacements for the cam cleats and turning blocks. I decided not to replace the spinnaker hardware, since we don’t plan to sail with a chute.
But I did decide, after a beat up Narragansett Bay into a strong nor ’wester last fall, that we could use a new jib. The boat came with a roller furler, so we ordered a new jib from Randy Shore at Sailor and Seam in Newport. As an Ensign sailor himself, Randy knows these boats, and he talked me through all the options for a jib. Each time I order a new sail they seem to get smaller, and this time I got a blade jib with vertical battens. Randy also made us new covers for the mainsail and the cockpit.
I hired Anchors and Thread at Safe Harbor Sakonnet Marina to make a custom-fitted zipper door for the companionway and a tiller cover. The canvas maker’s co-owner, Mike, accommodated all my unique requests, including adding built-in restraining straps on the tiller cover to keep the rudder centered on the mooring. Mike’s innovative designs were professionally executed on time and on budget. All of Leota’s new canvas is in toast-colored Sunbrella.
I replaced the delaminating tiller (while sailing last summer, the last foot of it broke off). And while the extruded rubrail could have served for a few more years, it looked a little shabby next to CB’s beautiful topside paint job, so I replaced it with a new light-gray one. Ensign Spars stocks many unique parts for Ensigns, so I was able to order the replacement tiller, rubrail, stainless rubrail bow fittings, and a new outboard bracket to match Ensign originals.
With Leota all freshened up, we don’t anticipate her requiring much annual maintenance other than bottom paint and varnish, and her fun-to-work ratio should be high. We’re happy with how the Ensign perfectly complements our modest trawler, and we believe both boats will keep us on the water for quite a while longer.
David Sharp is a retired ocean engineer living in Newport, Rhode Island. He started boating as a child and has owned over 20 boats so far. Along with sailing their Pearson Ensign, Leota, he and his partner, Nancy, cruise New England aboard Carry On, a 2001 Cape Classic 30 trawler.
Thank you to Sailrite Enterprises, Inc., for providing free access to back issues of Good Old Boat through intellectual property rights. Sailrite.com