Building a Jordan Series Drogue is an exercise in patience, but well worth the effort.
Issue 147: Nov/Dec 2022
As my partner, Tim, and I prepared to sail from Montreal, Canada, down the St. Lawrence River, into the Atlantic and ultimately south to the Caribbean, we decided that one piece of emergency gear we definitely wanted aboard our 1969 Alberg 30, Ariose, was a Jordan Series Drogue (JSD).
We made this choice after deep-diving storm tactics. The JSD, often referred to as the sailor’s airbag, was invented in the early 1980s by Don Jordan. This series of small parachutes affixed to a long line, weighted at the end, is deployed off the stern. While the boat runs with the wind, the drogue remains anchored in at least a following wave or two, thus slowing the boat, improving motion, and keeping a good position stern-to the seas. Compared to the conventional single parachute drogue, the JSD has been proven to be easier to deploy, more stable, and less vulnerable. It’s akin to having many eggs in the basket versus the one-egged single drogue.
Our friend, George, in 1991 narrowly survived Hurricane Grace sailing drogueless in the tempest that inspired Sebastian Junger’s book The Perfect Storm. Since then, he will only put to sea with a JSD. We also read about more celebrated seafarers, like Jeanne Socrates, who credits the JSD for keeping her safe on her record-breaking solo circumnavigation. Even the U.S. Coast Guard has strongly endorsed it.
So, we were sold, but when we obtained a quote of $2,300 (Canadian) to buy one, our instinctive DIY natures kicked in. Tim and I pride ourselves on living frugally, and we derive a great deal of satisfaction from the learning and sense of accomplishment in doing our own work on Ariose. Making a JSD was added to my project list. Oh, and Tim helpfully offered to add the metal polishing to his.
Planning and Design
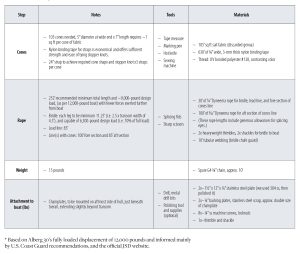
I started by filling several long winter evenings with reading and viewing all I could on the JSD. The Alberg 30’s specifications put Ariose at 9,000 pounds. We have had her craned out when fully loaded and were startled to discover we had an additional 2,500 pounds aboard. So for the purpose of this drogue, I rounded up and assumed a 12,000-pound displacement.
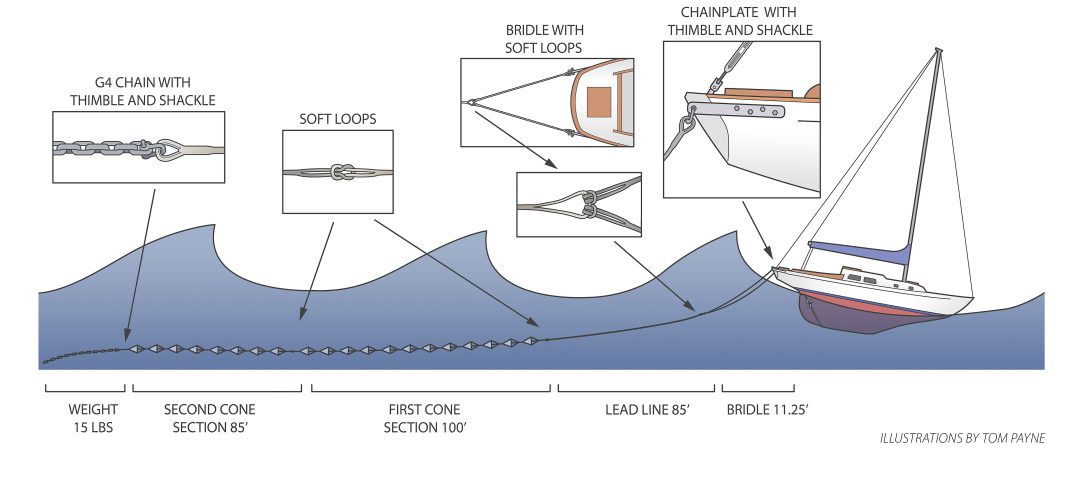
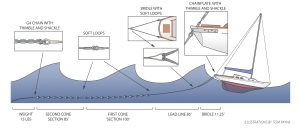
All JSDs have four components: the bridle, a long lead line, followed by a length of small cones, and a weighted bitter end. I decided on a separate lead line, and also to divide the coned line into two. This saved some money by letting me use smaller-diameter rope on the aftmost line, which would be under lower forces.
It also offers added functionality to this hopefully never-to-be-used gear. A shorter coned section, deployed off the bow, could serve as a sea anchor to stall for a daylight approach to land, or for a needed rest at sea. If we lost Ariose’s rudder, half the cones off the stern would provide a means of emergency steerage. The lead line could be easily detached should we ever require it elsewhere, like jury-rigging a replacement stay.
For me, these advantages outweighed the disadvantage that each added attachment point introduces a potential weak link. I hope this is not a mistake. I made a mental note to choose chafe-resistant rope and to be darn sure my splicing was up to par.
A total length of 230 feet, 105 cones, and a 15-pound weight met recommendations for our displacement.
Assembling the Parts
Confident that I had a design that would work, I sourced what I needed to make the drogue.
Many types of fabric can be used to make the cones. I had acquired a discarded sail for a pittance from a boat salvager and it had been calling out to be upcycled. Sailcloth offers a more robust option than the often-used ripstop nylon, which if deployed repeatedly or for longer periods of time is prone to fraying.
The JSD’s cones are attached with sewn-on straps spliced through the line and secured with stopper knots. I chose nylon binding tape, which is like light webbing but easier to form the required figure eights. For thread, I had bonded polyester, size #138, left over from other canvas work. It is far stronger than necessary, but I have never heard anyone complain about a drogue being too durable. The thread color does not match, and that may be a good thing as it will allow easier inspection of the integrity of the stitches over time.
I debated using nylon or polyester versus ultra-high-molecular-weight polyethylene (UHMWPE) rope. After much back-and-forth, I settled on Dyneema, a popular brand of UHMWPE. It is significantly stronger than traditional rope, so a smaller diameter provides the needed strength and is less bulky for stowing. It is easy to splice, its splices reduce strength far less than with traditional fibers, and it resists chafe and tangles. These are all positive features for a JSD.
Dyneema also has less stretch than polyester, and much less than nylon, which is good, as I did not want to add a bungee effect to what would likely be an already wild ride. It is also significantly more expensive, about double or triple the cost, but an unexpected employment contract and the temporary illusion of having surplus cash caused me to set aside our typical frugality.
Trying to figure out what size of rope I needed felt like a journey down a rabbit hole. There is a lot of information out there, and much of it is incomplete, like dictating size of rope without specifying type. I decided on 1/4-inch Dyneema for the bridle, lead line, and first section of cones, and because the final section would be under less stress, 5/32-inch Dyneema for that.
Finally, I purchased a small amount of tubular nylon webbing as chafe protection for the bridle. Ariose’s transom-mounted swim ladder and steering windvane could possibly interfere, so this seemed prudent.
(When the drogue’s construction was nearly complete, I found additional resources that have left me with some doubts about our JSD’s strength. I am confident that the lines will be more than sufficient for a typical severe storm. If we were ever to be so unfortunate as to encounter a breaking wave strike or other worst-case scenario, however, our drogue may be undersized. Considering that we are not heading for the roaring 40s and are highly motivated to avoid storms, our JSD will likely never be deployed, and if needed, should be adequate. But, if I were to start again, I would put out a little more money and size up the lines.)
For the weight, almost anything that will weigh down the end of the drogue keeping the cones submerged will work. I thought we could just secure some tools from the excessive collection we keep aboard. Tim was not in favor of this option. Fortunately, I found a spare length of slightly corroding G4 that, when combined with our dinghy anchor chain, provides the recommended 15-pound weight.
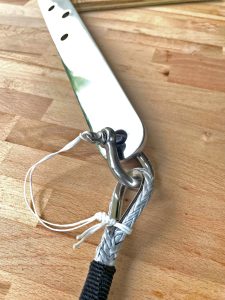
The JSD needs to be well secured at the stern. After querying an Alberg 30 owners’ forum and checking other resources, I narrowed the possibilities. I decided, as most do, on chainplates, purchasing two 11/5 x 12-inch rectangular plates of 304 stainless steel. Tim rounded the corners and polished them to a lovely shine. They would be installed on the aftmost hull, just below the toerail and extending slightly off the transom. Our 50-plus-year-old boat, like most of that era, sports beefy fiberglass, especially thick at the hull-to-transom joint. A backing plate and 1/4-inch bolts would ensure the attachment is sound.
And what about the connections within the drogue itself? Although hard attachments may intuitively seem stronger, the open end of thimbles, if not perfectly spliced or if the rope stretches, can actually abrade the line. Closed thimbles are better, but I was not able to find any used ones, and with my design having 11 attachment points, new would be prohibitively expensive.
The greatest forces would be at the chainplate-bridle attachment, and this is also the only area that once deployed can be easily monitored, so I decided on thimbled eyes there to shackle to the chainplate. A thimble-shackle attachment for the chain at the drogue’s bitter end also makes sense. All I needed were three strong thimbles and shackles, which I bought used, and in between, spliced soft eyes, joined with a cow hitch, which would connect each section of line.
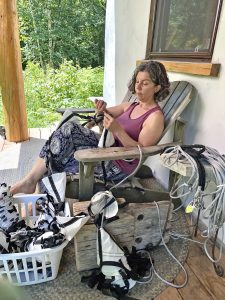
With materials sourced and ready, I assembled the tools. My industrial sewing machine came out of its case but making a JSD does not require heavy-duty sewing. Any machine will do. Hot knife, tape measure, splicing fids, and rug hook were laid out and ready. Although optional, I highly recommend keeping your favorite device with engaging playlists or podcasts at hand. I found this to be an essential anti-boredom tool.
Fabricating the Cones
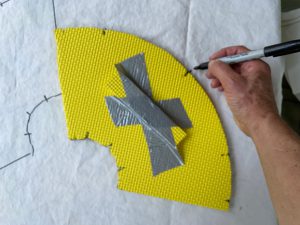
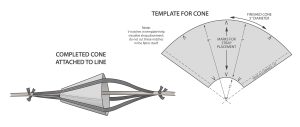
I started by making a template to pattern what would become a 5-inch diameter by 7-inch-long finished cone. A taped-on handle to easily move the template and cut notches to mark eventual placement of straps eased the process.
Before getting too far, I did a test. I cut one cone and three straps, sewed it together, spliced to the line, and stuffed the cone with scrap fabric to simulate being filled with water. After some slight adjustments to the knots’ positions on the line, it passed the Goldilocks test. The cone was not too taut, nor too loose. It was just right so that it should open wide when needed.
I spread the sail and set to work drawing the patterns, all 105 of them. Then, relocating outside to ensure good ventilation, I used a heat gun to cut each out. Having a clean and bonded edge saved substantial time. Cutting with scissors would have required hemming the leading edge to prevent fraying and would have doubled the time to sew the cones.
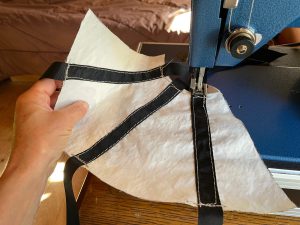
I then hot-knifed the tape into 24-inch pieces to form 315 straps (three per cone) and made a mark at 10 inches on each, the length needed to tie off the leading edge of the cone. This proved to be a time-saver later, letting me quickly position and sew each strap without interruption.
I was ready to start sewing. A zig-zag stitch is often recommended on the straps, but my machine’s temperamental tension performs better with a straight stitch, so that is what I used, trusting in the strength of the heavy thread. I aligned each strap evenly on the cone, using the marks made when patterning. Some recommend stapling or using double-sided tape, but I found I was able to hold the straps in place without these added steps. It was just a matter of sewing the three straps on, folding the sailcloth in half with the straps on the inside, and sewing the straight edges together to form the cone.
I quickly adopted a “route” that allowed me to complete the full cone’s sewing without ever needing to cut the thread. This was a major time- and thread-saving strategy. I secured each seam well with lock stitching, reinforced the leading and trailing edges of each strap, and formed the cone with a strong semi-felled seam, extending the top stitch of the seam as far as the machine could reach into the formed cone.
Then, once turned right side out, I added each completed cone to a slowly growing stack of dunce caps. If you enjoy repetitive tasks, you may enjoy making the cones. If you don’t, brace yourself for a period of light torture.
Adopting a “good enough” philosophy worked when sewing. I did make sure all stitching was of first-rate integrity, but I did not correct areas that turned out less than pretty. If this JSD is ever deployed, I am quite sure that no one will be taking notice of how straight the seams are.
Splicing
It was time to cut the lengths of rope. Since longer is better with JSDs, I added a generous extra allotment (I thought) to each segment just in case there was ever a need to cut and resplice. I started with creating loops by splicing eyes. Having replaced our lifelines with Dyneema less than a year ago, I felt confident with my splicing ability, but this is not a step where I wanted to risk any blunders, so I still turned to YouTube.

I refreshed myself by reviewing instructional videos on the three versions of a Brummel splice that were required: the easier both-ends-of-the-rope-available method for most eyes, the thimble version, and the one-end-available method for the eyes at the opposite end to the thimbles. I find the latter method most challenging, seeming to require my brain to perform as many inside-out acrobatics as the rope.
I threaded nylon chafe guard on the bridle legs before beginning, and there was no need to pre-thread the cones on, as the two coned segments had at least one end without a thimble. I kept the soft loops which, at about 8 inches diameter, were large enough to easily pass cones through when attaching or detaching segments. I also significantly increased the length of each splice’s tail bury to add strength.
Despite believing that I was being meticulous with details, I still miscalculated. When measuring the length of the bridle legs, I cut the rope longer than the recommended minimum of 2.5 times the width of the transom. It was only after completing the splices that I discovered that they were slightly under the minimum. I had neglected to allow for the lengthy bury at each eye in my calculations. A nearly 2-foot tail at each eye, insignificant in a 100-foot line, ended up reducing the intended 14-foot bridle leg to 10 feet! That is significant. I will decide whether to re-do them after sea-trialing the drogue and having an opportunity to observe how well it pulls. The lesson learned for me is to add “calculate thrice” to the common rule of measuring twice and cutting once.
Attaching the Cones
Now, with the bridle done and lead line complete, it was time to get those cones tied on their lines. I threaded the cones on each line, ensuring that the open end of all faced forward. After pre-marking the lines at alternating 16- and 4-inch intervals, I took rug hook in hand, and set to tackling this next step, bracing myself for more tedium.

After loosely aligning a cone within the first 16-inch section, I inserted the hook into the rope core, pushing straight toward the cone at least four strands’ length before angling slightly to emerge a strand or two over. It was then just a matter of hooking a strap and pulling it through. Then with a slight twist about a third of the rope circumference, I repeated for the next strap.
I found the straps held well enough that I could pull straps for several cones through before setting the hook aside and tying each off with a figure eight knot and a tensioning tug. I was pleasantly surprised to find this step progressed more quickly than anticipated, occupying me for two movies and a few podcasts.
All that remained was to cow hitch the JSD’s sections together, then shackle the chain weight onto the tail.
Making a JSD for Ariose was tedious, but maybe sowing dull Karma now will reap rewards should we ever encounter the adrenaline-triggering conditions that would warrant deploying it. Hopefully, Tim and I will never know.

Shirley and her partner, Tim Martens, are avid DIYers, having completed extensive maintenance and upgrades on Ariose, their 1969 Alberg 30. Recently retired, they weighed anchor from their off-grid terrestrial life in northern Ontario, Canada, and have moved aboard to enjoy the next few years of continued off-grid life at sea. Currently, they are somewhere between the Canadian Maritimes and the eastern Caribbean, hopefully encountering nothing but fair winds. They share their liveaboard life and learnings at ArioseNotes.com.
Thank you to Sailrite Enterprises, Inc., for providing free access to back issues of Good Old Boat through intellectual property rights. Sailrite.com