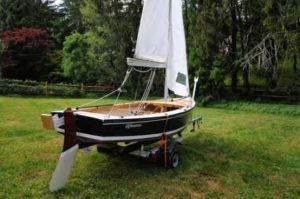
After an exhaustive six-month refit, a forlorn Blue Jay flies again.
Issue 145: July/Aug 2022
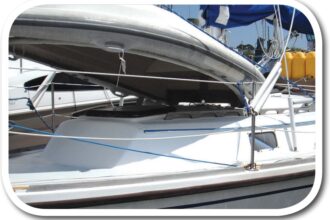
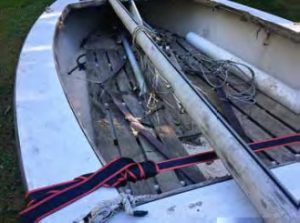
When I first saw her, leaves swam in 6 inches of dirty water in her cockpit, and the trailer had a flat tire. But on that late September day in 2019, there was no mistaking the clean lines of a Blue Jay, a 13-foot sailboat from the drawing board of Drake H. Sparkman of Sparkman & Stephens.
Designed in 1947 to be used as a sail trainer or small family boat, Blue Jays were sold in kit form or as a complete boat from different builders, all under license to Sparkman & Stephens. Many young sailors learned how to handle the Blue Jay’s fractional Bermuda rig at yacht club sailing programs primarily in Connecticut,
New York, New Jersey, and Maryland. Many of today’s senior sailors cut their sailing teeth on a Blue Jay, or they helped their dads build one in the family garage from a kit.
According to the very active International Blue Jay Class Association, more than 7,200 Blue Jays have been built, and you can still buy a new one today from the class builder, Allen Boat Company in Rochester, New York, who has the molds. Annual regattas and national championships still draw a devoted fleet of sailors.
So, this little boat was an ideal candidate to satisfy my hobby of finding forlorn, small, fiberglass-hulled sailboats and restoring them. (I’d already completed one previous Blue Jay restoration, along with a couple of Chrysler Mutineers and a Newport 16.)
I usually troll a couple of websites looking for the next project boat, and I had found this one via Craigslist, in New Jersey. The owner was moving south and needed to get “a project Blue Jay” out of his yard; she was free to whoever would pick her up. The ad provided no photos, just a phone number. So, I called and learned that the boat was complete with sails, mast, boom, rudder/tiller, trailer—everything was there.
The following weekend, I arrived at the owner’s driveway and found the boat in rougher shape than he’d thought. However, I saw her as a challenge.
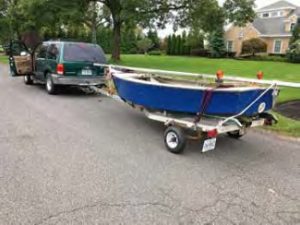
I got to work, pulling the trailer wheels and hubs, greasing the bearings, and mounting two good tires and rims that I had brought with me (this wasn’t my first long-distance-tow rodeo, so I made sure I had good rubber and that the wheels turned easily). I mounted a set of temporary lights, bolted on my tag, got the trailer hooked up to the SUV, and away we went.
The trip wasn’t without adventure; in the middle of the Delaware Memorial Bridge, the trailer tongue broke. BoatU.S. trailer towing insurance to the rescue!
First, the Fiberglass
In early 2020, I started the Blue Jay project in my workshop, and the first step was to assess what was needed to bring her back to life. The list was substantial.
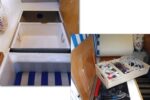
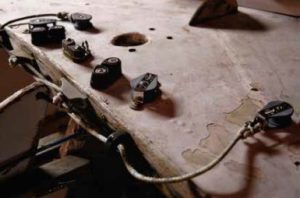
I needed to replace all the floorboards, the coaming boards, the mast step, the splash guard, and the skeg. The rudder had multiple coats of paint and the tiller was a mess of peeling varnish. The wooden centerboard had broken in half when I moved the boat off the trailer, so that needing replacing. The mast was in good shape, but the boom was toast—corrosion had eaten through the fittings, and I deemed it too unsafe to use.
The mainsail was usable, but the jib was torn. All the sail-handling hardware needed to be replaced—a couple of the factory blocks were frozen—and she needed all new running and standing rigging.
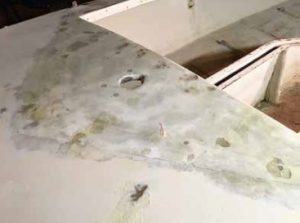
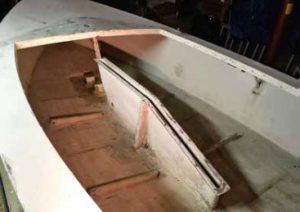
She needed some fiberglass repairs to the cockpit floor, the centerboard trunk, the foredeck, and the bow, and I wanted to close a hole in the transom that some previous owner had cut.
I began by stripping everything off the boat—all the wood, hardware, and the rubrail. To tackle the fiberglass work, I ordered a half-gallon of U.S. Composites 635 Thin Epoxy with a 3:1 hardener and 1 yard of 4-ounce E Glass cloth.
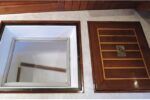
I cut an access hole near the bow so that I could do some underdeck repairs without having to crawl in. The stem fitting had been pulled lose, so I filled in the damage and glassed in a backing plate. Next, I glassed around the area where the splash guards mount and the hole in the deck for the mast tabernacle.
From there, I moved to the cockpit floor, where I glassed over the stringers to fill all the screw holes from the floorboards and to strengthen them. I noticed that the flooring between the stringers seemed thin, so I added a few layers of fiberglass cloth and resin, doing the same to the floor in the stern area. Using TotalBoat Thixo thickened epoxy, I filled in all the screw holes in the deck, on the deck joint, on the cockpit coaming edge, and the top of the centerboard trunk. Finally, I filled in the hole where an owner had added an inspection port. And in between coats of cloth and epoxy, I did a lot of sanding.
Next, the Woodwork
Once I had the fiberglass work under control, I began to think about the woodwork. The old wood was too far gone and most of it was broken anyway, but I could at least use it for templates. On Craigslist, I found a person giving away a solid wood table. A quick call and a trip across town, and I had a 6-foot-by-4-foot table of oak and maple boards that had been glued along their lengths.
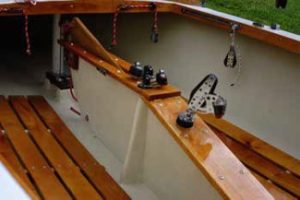
I cut the tabletop along the glue lines for each board and ended up with six 6-foot-by-1-inch-thick boards of varying widths. I ran these through a joiner to ensure that the edges would meet perfectly. Then I ran most of the boards through a surface planer to get them to the thickness I needed for the floorboards and the coaming boards. I used this same wood stock for the new splash guards, skeg, mast step, and for the additional stringers to support the floorboards. Finally, I made new pieces to top the centerboard and trunk.
Woodwork also came into play when I replaced the boom. After searching unsuccessfully for a nearby aluminum replacement, I decided to fabricate one from wood. I had seen photos of early Blue Jays that used wooden booms, so I copied them.
A quick trip to the lumber yard and I had five 8-foot spruce boards, 4 inches wide and 1 inch thick. I ran one board through the table saw and took an inch off the width. With that board on edge and a second one on the flat, I epoxied and screwed them together into a T-shape. I screwed in the gooseneck on one end and fixed a block on the other, then added two sections of T-track to the length of top board. I added track slides to the mainsail’s foot that would easily slide in the new T-track. Boom problem solved!
The next challenging woodwork job was the centerboard. Using my remaining three spruce boards, I ran them through the planer to reduce them to 3/4-inch thick, then cut them in half. With my router and a rabbeting bit, I created interlocking rabbets on the long edge of the boards. I glued these boards with TotalBoat Thixo thickened epoxy and clamped them together. When dried, I had a glued-up board 4 feet long by 2 feet wide.
I laid the old centerboard on this new board, traced the outline, and cut out the excess material with my saber saw. A Blue Jay centerboard has a 5-pound brick of lead in a pocket near the tip of the board to help hold the centerboard in place when sailing. I routed out the pocket and epoxied the brick in place. After shaping the leading and trailing edges of the centerboard, I coated it with two layers of fiberglass cloth followed by two layers of epoxy resin to seal it all in place.
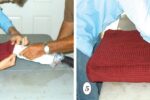
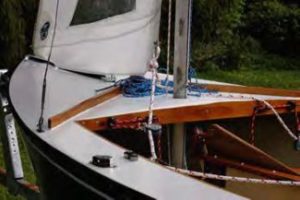
Nearing the end of the woodworking to-do list, I made new splash guards from the last of the tabletop boards, using the one original splash guard remaining as a template. Then I sanded the rudder and tiller down to bare wood, removing old paint and varnish and prepping it for new.
I coated the rudder and tiller—as well as all of the new wood—with a layer of thinned epoxy resin to seal the fibers. Then, over several weeks, I applied four coats of spar varnish to every piece of wood. I’m partial to McCloskey Man O’War brand and went through three cans of it for this part of the project.
By spring of 2020, I moved the boat outdoors for painting. I’d already sanded and faired the dock rash, digs, and scratches on the hull.
I flipped the boat hull-up and wiped it down with acetone to remove any dirt and sanding dust. I applied two coats of Sea Hawk Tuff Stuff white epoxy primer over the entire hull as a barrier coat to reseal the fiberglass. Then I applied Sea Hawk VMG Racing Finish, a red, hard bottom paint, up to the waterline. Above
the waterline, I rolled and tipped three coats of TotalBoat Wet Edge flag blue.
Once all these paints had a week or so to set, I flipped the boat back over and primed the deck and cockpit with two coats of Interlux Epoxy Primekote. The deck got three coats of Interlux Brightside Blue-Glo White, while I painted the cockpit with two coats of Rustoleum Bristol Tan. Last but not least, I added a white boot stripe and cove stripe to the hull.
Pulling it Together
By now it was June, and I wanted to sail the boat in an annual regatta at the Ware River Yacht Club in Gloucester, Virginia, in early August. I had to get the boat
rigged and ready. All winter and spring I had been surfing marine websites and eBay for bargains on rope and sailing hardware, and I’d collected Harken blocks
in various sizes, Harken and Ronstan cam cleats and clam cleats, Sta-Set line in different flecked colors, and a replacement jib and spinnaker.
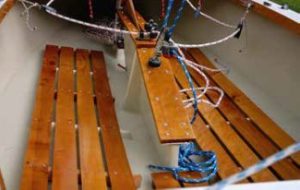
I started putting the boat back together by installing the new centerboard and its new cap, followed by the floorboards, new coaming boards, splash guards, and the new mast step.
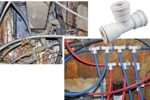
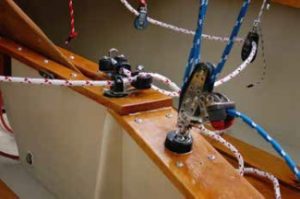
I installed all new stainless standing rigging and then new sail-handling gear—blocks and cleats for the jib cars, jib sheets, and barber haulers, blocks and swivels for the mainsheet and traveler, and blocks, cheek blocks, and cam cleats for the spinnaker sheets. I added all new color-coded halyards and sheets for the main, jib, and spinnaker.
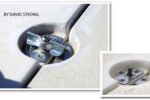
As for auxiliary power, I had found a great new/old stock motor mount on eBay and bolted that to the transom, adding new electrical wiring under the deck and a socket on the transom to plug in a trolling motor.
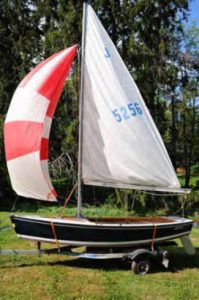
Finally, I gave the boat a new name, Nikommo. I grew up in part of New England that is rich with the history and culture of the Narragansett and Wampanoag people. In their legends, Nikommo is a spirit who brings good fortune and assistance to those who are respectful of nature. A small sailboat like this Blue Jay is, by design, respectful of nature.
She sparkled like a new dime by mid-July on the refurbished trailer, which I had upgraded with a new tongue, hubs, bearings and seals, fenders, wheels, lights, and bunk boards. We made the August regatta on the Ware River, and on this first time out, I found her to be a sweet sailing boat.
But, when it comes to forlorn little sailboats, I have a roving eye, and the following spring it was time to find her a new home, as I was already at work on my next little boat in need, a Sunfish. I advertised Nikommo on Craigslist and my inbox quickly exploded with interest. The best offer came from a nice guy who lived a couple of miles away and summers in Maine. And that’s where Nikommo is now, happily sailing.
Jim Champagne learned to sail in his teens on Narragansett Bay in Rhode Island. He has owned a succession of boats starting with an American Mariner 24. He likes to work on boats as much as sail them. He currently sails a restored 1974 Chrysler Mutineer on Chesapeake Bay and its tributaries and is working on refitting a 1968 Cal 20.
Thank you to Sailrite Enterprises, Inc., for providing free access to back issues of Good Old Boat through intellectual property rights. Sailrite.com