Completing their boat’s much-needed refit was almost like building her twice.
Issue 140: Sept/Oct 2021
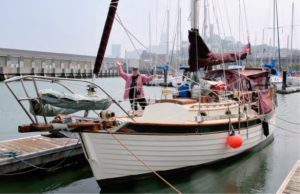
How many people can say that they built the same boat twice? My wife, Ellen, and I can safely raise our well-worked hands to answer that question in the affirmative. Our 1977 Nor’Sea 27, Entr’acte, recently underwent a massive refit to bring her up to snuff after serving as our home afloat for 14 years and taking us safely and comfortably across the Atlantic and Pacific and then some.
In “Testing Their Metal,” (May/June 2021), I told the story of how this refit began, when one stuck seacock led us down the path of removing all of the metal on board Entr’acte and replacing much of it. Where that story stops, this one begins. It was time to turn our attention to other problem areas that we knew were lurking. While we knew some of these jobs would be easier than others, not surprisingly, there were surprises.
Pumps and Pilots
When we built Entr’acte, we installed three identical Whale Gusher 10 manual bilge pumps. The primary, mounted in the engine room, is operated from the cockpit. The secondary, also in the engine room, can be operated from the galley. The third, mounted in the head, we used to pump the holding tank. In case of catastrophic flooding, with a little effort and a lot of motivation, the head pump can be redirected to pump the bilge; thus, all three pumps can be used simultaneously to save the ship.
Having three identical pumps means storing only one set of spare parts and allows us to cannibalize pumps if the need arises. Our manual pumps saw regular use and maintenance and for years never gave us trouble.
Then, a surveyor flagged us for not having an automatic, electric pump. No argument would dissuade him. We installed one. It was useful and convenient, but it also broke down so often that we made it a practice to replace it at every haulout. Meanwhile, we used the manual pumps less and less often. Our maintenance schedule devolved into periodic pumping to ensure they still worked, and a good flush with fresh water before any layup. This was a mistake.
Despite the freshwater rinse, there remained enough salt residue trapped in the pumps’ damp interior to solidify over time, corroding the epoxy coating, and clogging both the inlet and outlet.
It didn’t have to be this way. Diaphragm pumps are simple. One screw is all it takes to remove the diaphragm for cleaning and inspection. But as we increasingly relied on faulty electric pumps, we allowed our previously dependable manual pumps to wait for an emergency they’d have been unprepared to address.
A simple cleaning was not enough to restore these pumps. Rather than replace them, we gave them a good media blasting followed by a fresh coating of epoxy, inside and out, which gave them a new lease on life.
Going forward, we would do what we should have done: exercise the pumps regularly, and periodically remove the diaphragm, wash out the interior with soap and water, and let it dry thoroughly. And, if the boat’s staying on the hard for a while, we’ll store the pump with the diaphragm out and reinstall it before launch.
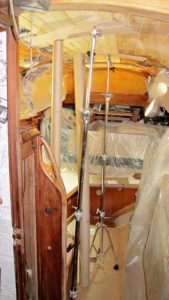
Another surprise came with our electronic autopilot. For the most part, our regimen of stowing electronics in plastic bags along with a packet of silica gel worked well. (What did not work was to coat the metal connections with dielectric grease before storage and then clean it off with electrical contact cleaner when we returned. This almost cost us an expensive SSB radio. The cleaner we used did not dissolve the grease—but it did dissolve plastic!)
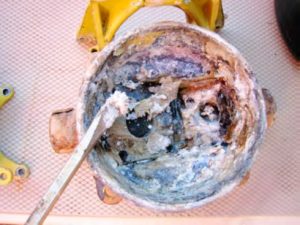
Besides our primary Aries wind vane gear, we carried two electronic autopilots for extreme light-air or no-wind use. Neither saw much action. Years ago, one had failed, and this refit was finally the time to disassemble the offending unit.
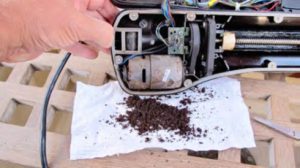
It was bad. The accumulated rust looked like ground coffee. I cleaned everything up, but the motor refused to turn. I grabbed the drive gear with a pair a pair of pliers and twisted. I heard a snap and the gear then spun freely. I applied the power and the motor hummed like new.
This corrosion happened inside a waterproof autopilot housing. It might well be waterproof, but it is not moisture- and condensation-proof. In this case, a long layup in the tropics had provided enough humidity, moisture, and mechanical dormancy to fuse the autopilot motor’s drive shaft to the motor housing. The boat had been opened and aired out daily, but it did not prevent this corrosion. We should have had a schedule whereby moving parts like these got moved.
Don’t Look Up
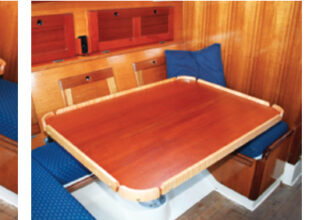
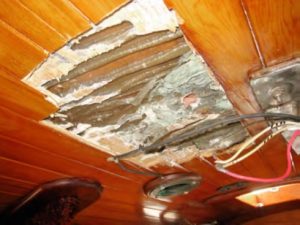
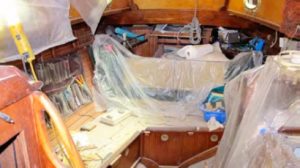
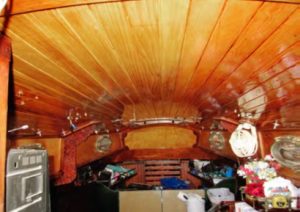
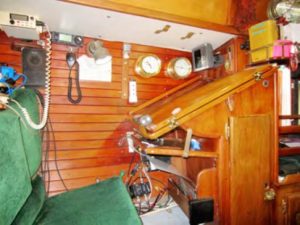
By far the hardest job was the wood overhead in the cabin. This had been a sore spot for years, ever since—again—a long tropical layup had resulted in an ugly surprise. We’d been confident in our usual layup regime to forego hiring someone to look after Entr’acte while we were gone. We returned six months later to an absolute horror!
Although we’d entirely covered the boat, wind and rain had allowed a very small (and in normal conditions, insignificant) breach in the bedding of a deck electrical fitting. Water found a path below in a very fine wire. During the months our boat sat completely closed up through hurricane season, the air below grew stale while the leaking water accumulated in the wooden overhead of the main cabin, with no cause to evaporate.
Our joyous return to Entr’acte ended when we opened the companionway and were hit by an unbelievable stench of rot and mold. The overhead adjacent to the mast was one massive area of blackened rot. We looked, sat down, and cried. I chiseled away the rot, exposing 14-by-8 inches of ugly bare fiberglass right above the dinette.
There was no mill within 500 miles of us, so we knew we’d have to cobble together an interim fix until we had time and materials for a proper repair. We commissioned a wood carver in Tonga to create an insert that exactly fit the hole. For 10 years, we had looked up at a beautiful, if oddly located, carving of whales, rather than our ugly mistake. Now, back home, it was time to make it right.

The first hurdle was matching the look and grain of the 30-year-old Alaskan cedar. Photos and samples came and went. We finally discovered the perfect match, Port Orford cedar, in a furniture builder’s supply shop in Washington state. The wood was available in thin, pre-milled strips that we could easily finish to exact dimensions on-site.
I had passed countless night watches during the prior decade like a prisoner planning a breakout, staring at that ceiling and brainstorming exactly how I was going to pull this off. Like Tim Robbins’ character in The Shawshank Redemption, I nurtured my plan.
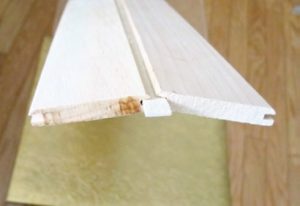
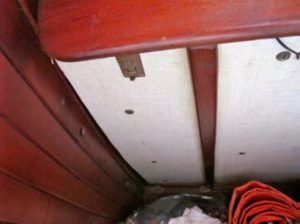
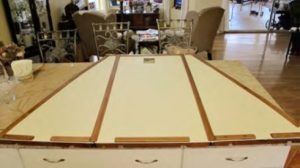
The overhead was an integral part of the deck layup. Constructed of single strips of 3/8-inch-thick and 2-3/8-inch-wide cedar, it was completely bonded to the underside of the fiberglass deck as the final laminate of the deck construction. The strips were chamfered on both sides to give a strip-plank effect. For structural and aesthetic continuity, the factory relied on a variation of tongue-and-groove construction. The groove was cut along the entire length of both sides of each strip, into which was set a 1/8-inch full-length spline to function as a tongue to tie all the strips together. We set out to do the same.
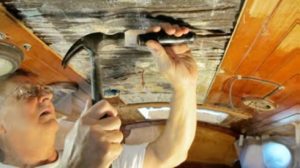
The first step was to excise what remained of any strips associated with the already-re-moved rotted wood, as well as any adjoining strips that showed signs of rot. In the end, we got rid of nine full-length strips from the overhead. Using a vibrating multitool, we slid the blade between a plank and the fiberglass cabintop, removing the strips while leaving remaining good wood undamaged. We salvaged pieces that we could sand down to bare wood and use to test different finishes until we were able to achieve a uniformity.
One problem loomed. The trim of our main and fore hatches is a complex assembly of bent, plugged, and well-bedded teak. The ends of the overhead strips terminate under this hatch trim, and we were loath to disassemble something so beautiful and solid for the sake of a few small ends of wood. Again, the multitool saved the day, allowing me to precisely excise the old wood and provide a nice clean space in which to insert the new.
We cut each of the nine replacement strips to a precise length, so that a slight bend of the strip would allow the ends to slide under the hatch trim and fit perfectly flush to the cabintop, leaving a little room for expansion.
The tongue-and-groove construction presented a challenge for fitting the full-length new strips in with the old, specifically, how to fit the final king plank and spline, which would tie it all together. I feared we might paint our way into a corner with no way out.
We dry-fitted the strips one by one and discovered that by starting in the center of the overhead and working outward, the final strip ran directly across the 4-inch opening from the port side dorade box to terminate under the fore hatch trim. This final strip would have to be cut into two pieces to maintain the opening, which would also provide an ideal entry point to slide in these final two pieces and their splines.
Using the dorade opening as an entry point, a small forward piece would easily slide from the opening into its proper place and fit under the fore hatch trim. The longer aft piece would be the king plank and slide from the opening all the way aft to fit under the aft trim. The splines would easily slide into place along the full length of the final strips. A teak doughnut with bug screen would trim out the dorade opening as before.
Convinced that everything looked and behaved exactly as we wanted, it was all carefully disassembled, numbered, marked for reassembly, and set aside.
Ellen next set to work on the most horrible of jobs. Using vast quantities of paint remover and numerous scrapers, she methodically stripped away every last trace of varnish from the old wood still in place. Working for hours above her head was messy, dirty, tedious, and exhausting.
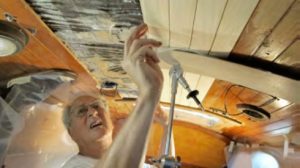
The final installation, spread out over three days, went smoothly. After coating each strip with thickened epoxy and setting it into place, we fitted the spline and bent in the next strip. To prevent any possible disaster, we set a limit of only three strips per day.
To support the strips from below until the epoxy cured, we wedged round cardboard shipping tubes against 1/8-inch plywood. When we exhausted our tube supply, cymbal stands from my drum kit saved the day.
We knew from the beginning that we would have to apply some type of stain to the entire overhead to achieve a uniform finish, but we wanted the wood to look as natural as possible. Ellen randomly mixed lengths of old and new wood and began experimenting with various stain and varnish combinations. We received valuable advice from friends who dabbled at furniture restoration. When something looked promising, we attached the results to the overhead with double-faced tape to see how it looked, only to throw it away and try again. Days turned into weeks until, eventually, we had something that really looked like it would work. We finished up a large area of test material, taped it into place, and lived with it for a week under varying lighting conditions, just to be certain.
Even so, applying the new finish was stressful, because once the stain was on, there was no turning back. We would either like it or paint the entire overhead white. The experimental stage complete, Ellen began applying the stain with total confidence, using a small working amount while leaving the “mother” can in the cockpit, where I was busy with other tasks. It looked great. For three minutes. Then I heard panic.
“Give me more stain, quick!”
“What’s wrong?”
“Give me more stain now, there’s no time to talk!”
From topsides, I heard cans banging and a flurry of brushes, rags, and invective as she worked furiously.
She emerged in the cockpit a few minutes later and collapsed.
“I don’t know what happened. The stain wasn’t soaking into the wood uniformly like it did in the tests. At one point, there were 20 different colors down there. I don’t know whether I fixed or destroyed everything. We’ll know more after the stain dries. It was horrible.”
Neither of us slept well that night, but the next morning, the overhead looked great. Six coats of varnish later, the job was finally done, and our Tongan whales were relegated to a place of honor in our living room.
The Last Lap
For the final phase of our refit, we trailered Entr’acte to California for a new bottom job, followed by a shakedown cruise on San Francisco Bay. At Napa Valley Marina, we had 10 years of old bottom paint removed and a new Coppercoat treatment applied. It didn’t take much convincing to relegate this job to someone who knew this complex, precise procedure well and had applied it many times. This would be only the second time ever that we paid anyone to work on our boat.

While the pros worked on the hull, we kept busy. Three weeks later, the mast and boom were stripped and repainted, and the lifelines were completely renewed.
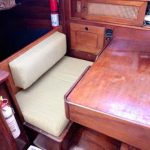
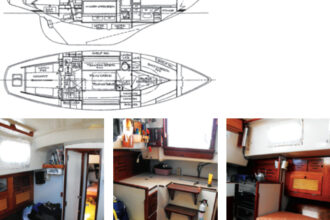
By the end, all of Entr’acte’s, metal had been removed and either restored or replaced. We’d stripped and refinished all the interior cabinetry and restored vinyl-covered trim panels. We’d installed a new Shipmate stove, restored her windlass, and re-piped her water system. Her hull and topsides were cleaned and buffed to gleaming perfection, and her bottom shined like a new penny. Entr’acte was ready to launch.
After admiring and complimenting her, someone at a marina BBQ asked me, “Do you ever think about building another boat?”
I considered the question, then realized something. “We just did!”
Good Old Boat Contributing Editor Ed Zacko and his wife, Ellen, built their Nor’Sea 27, Entr’acte, from a bare hull and since 1980 have made four transatlantic crossings and one transpacific crossing. They also keep up a busy concert schedule; Ed, the drummer, and Ellen, the violinist, met in the orchestra pit of a Broadway musical. They recently completed their latest project, a children’s book, The Adventures of Mike the Moose: The Boys Find the World. Most recently they can be found sailing between the Bahamas and New England.
Thank you to Sailrite Enterprises, Inc., for providing free access to back issues of Good Old Boat through intellectual property rights. Sailrite.com