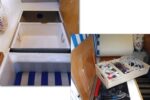
Repurposing a 12-volt car cooler transforms
an icebox into an inexpensive DIY fridge.
Issue 145: July/Aug 2022
Our boat Allamanda, a 1984 Alberg 29, has an icebox for keeping food. While this is a fail-proof option that uses zero onboard energy, it also has obvious limitations, not least of which are finding ice while cruising for longer than a weekend and preventing one’s comestibles from turning to mush after swimming in ice melt.

Planning for some summer sailing in somewhat remote places around Vancouver Island, we decided to explore ultralow-cost options for onboard refrigeration. Given that we’d recently spent about 10 years’ worth of boat money replacing all through-hulls and valves and rebuilding the rudder, the fridge budget dropped to menacingly low levels. And whatever we chose would need to manage with our spartan electrical system. Allamanda sports two 50-watt solar panels connected to two Group 24 lead acid batteries, one of which needs to be kept charged enough to start the diesel.
With these constraints in mind, I started exploring the world of onboard cold-making, and I concluded that the most efficient system remains the good old compressor—a method that produces cold by having a gas expand in an evaporation module located inside the cold zone of the refrigerator, and then recompressed again in another, heat-producing compressor unit outside of the fridge.
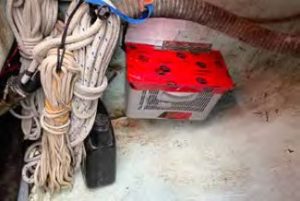
But…budget. The marine compressor-based systems are well into four figures when all the parts (compressor, evaporator, and control units) are factored in. So, after mulling some more, we decided to build our own compressor-based system out of a modified 12-volt car cooler. These coolers have a built-in compressor and run off the vehicle’s 12-volt charger, so you can travel or car-camp with basically a mini-fridge.
My plan was to buy an inexpensive unit and gut it, then reconfigure its key parts—the compressor and evaporator—to work in our icebox. We purchased a $200 unit (shipping and taxes included) made by a Chinese company named Vevor.
One anticipated challenge was that I would not be able to disconnect the compressor from the evaporator during the installation. Boat-specific refrigerator systems have a clip-in connector between the compressor and the evaporator so you can install each unit where it belongs, run copper pipes from one to the other, and then connect them without losing the coolant. Without such a connector, I would have to cut a larger opening in the icebox wall to slide the entire evaporator in while still attached to the compressor.
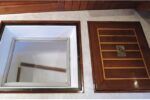
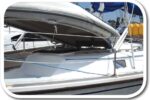
Also, the two units would need to be close to each other. Fortunately, the aft wall of the Alberg 29’s icebox, located in the galley to starboard, also happens to be the forward wall of the lazarette. I could install the compressor in the lazarette against that forward wall and slide the evaporator into the icebox.
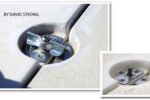
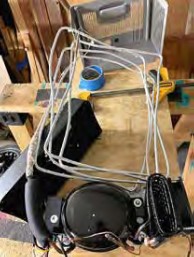
Another challenge was lack of information or technical diagrams for these inexpensive car coolers; when the box arrived, I was anxious to see what the guts of the beast would be. I was pleasantly surprised to see that the compressor was quite large and reasonably well built. The manual also showed lots of interesting options from the control unit, such as a low-power mode when the compressor runs on a reduced power draw, as well as an adjustable self-shut-down setting when battery voltage drops below a set threshold.
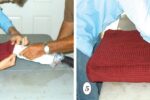
However, the manufacturer had built the evaporation unit right into the cooler’s insulation as one continuous, spiraling copper tube embedded in the urethane foam. This called for careful dismantling and created some interesting new retrofit hurdles. (This embedded evaporation module could also be adaptable on boats where a couple feet are needed between the compressor and icebox.)
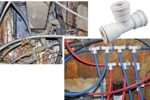
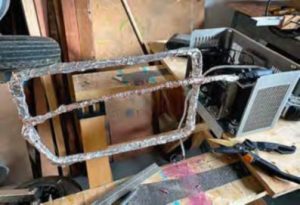
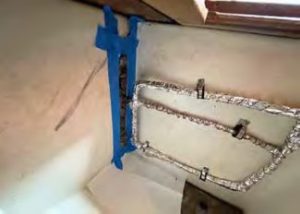
After carefully extracting the evaporation tube from the foam without pinching or puncturing it, I was left with an odd-shaped pipe spaghetti. I reconfigured the pipes into a shape that would likely fit our icebox, repacked them in foil adhesive, and wrapped some copper wire around them for good measure.
I decided to install the control unit in the galley rather than leaving it on the casing above the compressor—the thought of crawling into the lazarette to tweak the temperature provided plenty of motivation to go this extra step. This required cutting the six wires going from the compressor to the control unit and soldering a longer harness. The only wires I didn’t cut were those running from the control unit to the temperature probe, since they looked long enough to reach the icebox as they were.
While I was at it, I also fully embedded the electronics in silicone to protect them from onboard humidity and added some small aluminum hangers to secure the new evaporator module. I built the casing for the compressor from parts of the original cooler and some marine-grade plywood. I rehoused the control unit in leftover teak.
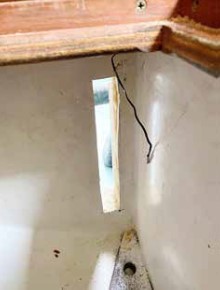
Next, I drilled two pilot holes from inside the icebox into the lazarette to align the final cutting. Then I Houdinied myself inside the lazarette, and with the drilled holes as reference, I used a thin-blade oscillating saw to cut a 12-by-1/2-inch rectangular opening between the lazarette and the icebox. I also drilled a hole the size of the evaporator tube just at the edge of the cutout so that I could snug the cutout back into place once everything was installed.
Despite the stress I always feel when sawing through the boat, the rest of the install went smoothly. I screwed the compressor housing to the lazarette wall, reconnected the wire harness, slid the temperature probe into the icebox, and connected the 12-volt power supply to the appropriate breaker. As I switched it on, the control module came to life. The compressor is so silent that I couldn’t hear it from inside the cabin, which prompted another anxious visit to the lazarette. But the compressor was happily purring, and, after a while, the evaporator started icing.
With everything installed and operating, I slid the plywood cutout back into place and carefully filled the opening with boat-grade urethane from the icebox side. A day later, I cut away the surplus urethane and reinstalled the reciprocal fiberglass cutout in the icebox wall. I had planned to re-glass it but just re-taped it in place for the time being. The finishing touch was to screw an 1/8-inch aluminum plate over the evaporator tubes to help diffuse temperature, protect them, and prevent food from leaning up against them and freezing.
A few days later, we went for a short sail, and with a mix of sun and clouds, the solar panels kept the battery topped up with the fridge (on eco-mode), sailing instruments, and VHF all running. The battery was fully charged when we left and fully charged when we returned, which exceeded my expectations. Meanwhile, the icebox temperature dropped from 53°F to the set temperature of 37°F. From the information provided by the solar charger, eco-mode power consumption appears to be between 2 and 3 amps when the compressor runs.
Given our small house battery, I suspect we might have to turn the fridge off if we hit long stretches of gray, windy weather. But where we sail, gray, windy days never get hot anyway. And, we’ll always have the option to put the fridge on fast-freeze mode when motoring or in marinas. According to the manual, the maximum draw of the new system is 45 watts (under 4 amps at 12 volts) so the onboard 20-amp charger should be able to recharge the batteries and power the fridge on 12 volts when we connect to shore-power.
As for the BTU of cold produced, I don’t have any measurements, but given how fast the evaporator freezes even in eco-mode, I’m not worried about it. The true test will be durability. Our boat drips with moisture six months per year, which is tough on even the most rugged, marine-grade equipment. Time will tell how long our cheap fridge will last, but for now, we’re pleased with the result.
Astrid and Damien sail from Victoria, British Columbia, usually with some, or all, of their three kids. Also, truth to be told, Allamanda is Astrid’s boat. Astrid’s second boat. The first was a 1975 Folkboat. There is something like a trend in the affection for old-school, long-keel boats that won’t ever back up where you want them to. But forward they’re fine. Really fine.
Thank you to Sailrite Enterprises, Inc., for providing free access to back issues of Good Old Boat through intellectual property rights. Sailrite.com