 Correct adjustment of your spreaders may save your rig
Issue 128: Sept/Oct 2019
Next time you’re at the marina, look up. If there are enough sailboats around, you’ll likely find a variety of rigs, with masts sporting anywhere from zero to several sets of spreaders. And in that mix of masts, chances are there will be quite a few wonky spreaders.
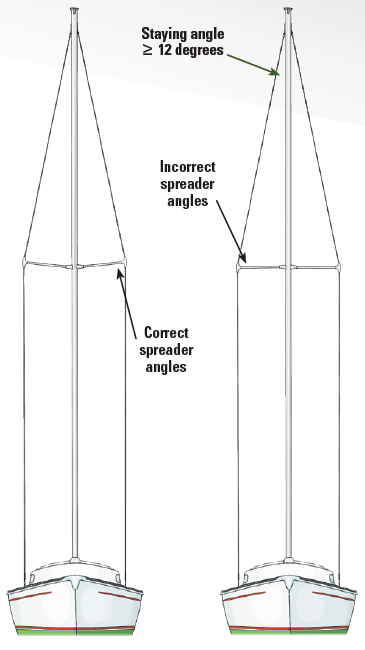
Spreaders serve a couple purposes on a rig. To start, they act as a means of increasing the staying angle. The staying angle is the inside angle that is formed at the top of the mast, between the mast and stay. For a stay to exert the force necessary to support a mast, the staying angle should be at least 12 degrees, the minimum magic number. Sailboats are generally long enough that it’s easy, in the case of a forestay or a backstay, to meet or exceed the 12-degree minimum. But monohulls are not normally beamy enough (or the masts not short enough) to run a stay from the top of the mast to the outside of the hull and create a staying angle of at least 12 degrees.
Enter the spreader.
By introducing a spreader (to spread the angle between the mast and shroud), a staying angle greater than 12 degrees is easy to achieve, even on a narrow-beamed boat.
At this point, you may be wondering why multihulls use spreaders. After all, with all that beam, surely shrouds can be easily fixed at deck level such that the critical 12-degree staying angle is exceeded. And what about boats with taller masts, why two or more sets of spreaders? After all, the first set of spreaders establishes the critical angle.
In both cases, the answer is the same. In addition to providing a greater staying angle for shrouds, spreaders act as a compression member, supporting the mast where they’re attached, shortening the unsupported length of mast. A single set of spreaders set 3⁄4 of the way up a 48-foot mast produces two unsupported sections of mast, 36 feet below the spreaders and 12 feet above, rather than a single 48-foot unsupported section. Consider the often-used analogy of a stick of uncooked spaghetti. Put your hands on either end of the spaghetti and push. SNAP! It will break fairly easily. Now, take one of the shorter pieces and try it again. You’ll be able to exert much more force on a shorter strand without breaking it. Because your mast is loaded under compression forces, it should be clear why this is an apt comparison.
Now, take another, longer stick of spaghetti and have a friend pinch it in the middle, or perhaps in two places, and repeat the experiment. This time, the longer “mast” is as stiff as a shorter one. This is because the unsupported length is shorter. Shrouds exert a compressive force on the spreaders, which in turn act like a friend pinching the spaghetti: they shorten the unsupported section of mast, allowing you to have a taller rig that can handle the compression loads imposed on it, without buckling.
But spreaders are only as effective as their installation. Rigger-extraordinaire Brion Toss calls improper spreader angle the “single most common flaw in rigging.” Looking around the harbor, I agree. It appears there’s a not-so-uncommon misperception that spreaders should be horizontal, level with the water. The dangers of having spreaders in this position are significant.
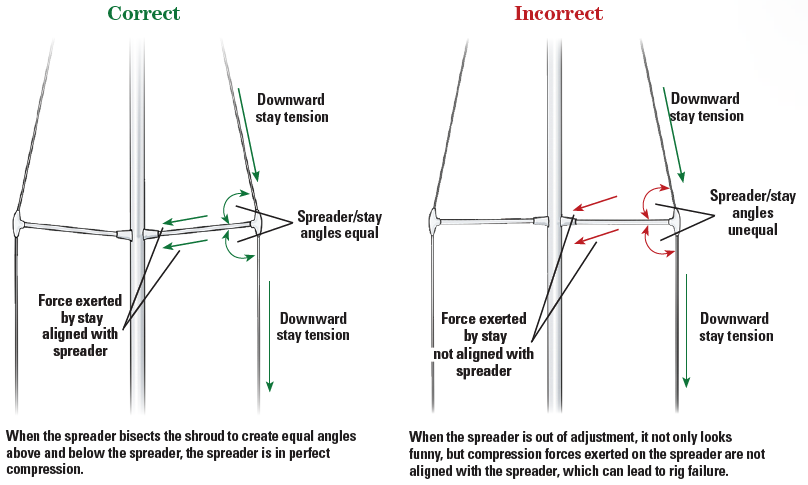
The compressive force exerted by a shroud upon a spreader should be in-line with the spreader itself, from the spreader tip to the spreader root. And the only way a shroud can exert a force evenly upon the spreader, is if the angle formed where the spreader intersects the shroud is the same above and below the spreader.
With that understanding, consider again the horizontal spreader. The only way a shroud could impart a compressive force aligned with the plane of a horizontally mounted spreader, is if that spreader was mounted exactly halfway between the deck and the top of the mast, and if the stay was attached to the masthead and at the point where the deck and mast meet — like a bow and arrow.
But boats aren’t rigged that way and so spreaders should never be level (and never drooping downward!). Consider that same improperly leveled spreader in the conventional position, much higher on the mast, and with the lower end of the shroud attached well-outboard, near the toe rail. Now the shroud is exerting a downward force on the horizontally aligned spreader. If the seizing, or whatever mechanism holds the spreader tip in place, slips or breaks, the downward component of the force exerted could collapse the spreader and result in a dismasting.
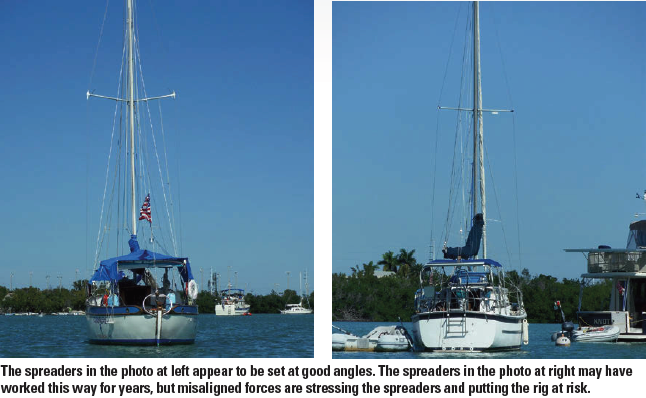
Fortunately, even without measuring angles, it’s easy, with the right perspective, to visually identify correct and incorrect spreader angles. Look at your boat and others head on, from a couple hundred feet away. Does a spreader seem to be horizontal? Incorrect. But note that when the angle between the spreader and the shroud, both above and below the spreader, appears to be the same, the spreader is angled slightly upward. This is correct. Do your own spreaders look correct?
If not, the remedy is simple, and urgent. Climb your rig. Arrange hand signals with a friend whose got the right perspective. Based on your friend’s input, adjust the angle of the spreader. But before you secure the spreader tip to the shroud, use a bevel gauge to double-check that the above and below angles are the same. (An eye can get it close, but a gauge can confirm they are the same angle.)
Spreader angles are too important to neglect. Take a row around the harbor, study your own spreaders, then take a bevel gauge aloft. Your rig will thank you.
Using a Bevel Gauge

A bevel gauge, though primarily a carpenter’s tool, can be handy to have aboard. It can be used to verify, compare, and transfer angles, or bevels. In the case of rigging, a bevel gauge can be used to compare the angle formed by the shroud and the spreader both above and below the spreader. Properly aligned spreaders should create equal angles.
To use a bevel gauge, first loosen the wing nut. The metal half slides and pivots (thus its other name, sliding T-bevel) to form any angle with the handle. When using it to verify spreader angle, it is easiest to align the handle with the spreader, let’s say the bottom side, and adjust the metal half to lay against the shroud. Tighten the wing nut to keep the gauge at that angle. Then, flip the bevel gauge to the other side of the spreader, in this case, the top side, and verify that the angle formed with the shroud is the same as what your gauge shows. If not, move the spreader toward the smaller angle. In other words, if you mark the bottom angle, then compare it to the top angle and see that your gauge is bigger than that angle, move the outboard end of the spreader up.
Don’t believe everything you read (or hear) — Editors
We’ve seen it in the online forums and heard it said on the docks that the best way to ensure the proper spreader angle is to make sure the distance from the masthead to the root of the spreader is equal to the distance from the masthead to the tip of the spreader. This sounds pretty good and moves the spreaders in the right direction — and may even serendipitously turn out to be true on a few rigs — but it’s inaccurate. That approach ensures only that the two angles above the spreader — where the spreader root intersects the mast and where the spreader tip intersects the shroud — are equal. This is not relevant. Not only is it easier to use a bevel gauge or the good eyes of a helper to guide your spreader adjustment, you’ll get a better result.
Connie McBride and her husband, Dave, raised three boys aboard their 34-foot sailboat Eurisko while cruising the Caribbean. After 15 years, they now divide their time between enjoying being empty nesters and visiting their grandson, the third-generation McBride cruiser. You can follow their adventures at www.facebook.com/simplysailingonline.
Thank you to Sailrite Enterprises, Inc., for providing free access to back issues of Good Old Boat through intellectual property rights. Sailrite.com