Making Magnolia more seaworthy
Alternative methods
Here are two ways to attach a sea hood that define it as a separate entity from the cabintop.
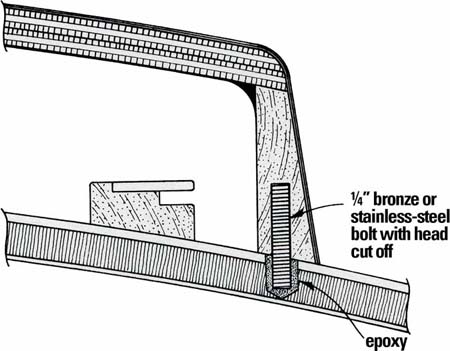 Permanent attachment
As shown in the illustration above, the sea hood is permanently affixed to the cabintop, just as in the method described in the main article, but the epoxy mush fillet between the sea hood sides and the cabintop is eliminated. Because there is no reinforcing fillet, the joint between the sea hood and cabintop is instead strengthened with ¼-inch stainless-steel bolts (with their heads cut off) or lengths of threaded rod every 6 inches or so along the joint.
Drill ¼-inch holes up into the sides and end of the sea hood, then use a pipe cleaner to coat both the bolts and the holes with unthickened epoxy. Use enough epoxy so that it will overflow a little when the bolts are inserted. Drill corresponding holes in the cabintop but oversize them to reduce alignment problems.
When you dry fit the sea hood, apply masking tape to the cabintop all along the joint. This will protect the gelcoat from squeezed-out epoxy and make cleanup easier when you epoxy the sea hood in place.
 Removable seahood
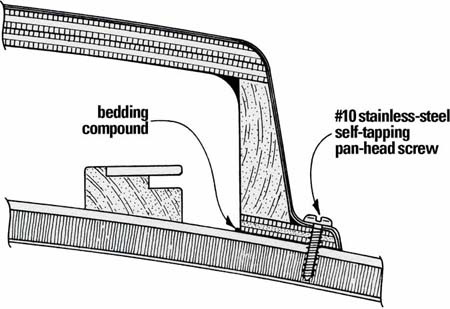
This method employs a flange for attaching the sea hood to the cabintop.
Make the sea hood as described in the article, but before fiberglassing the exterior, add the flange to the bottom. Make the flange from three pieces of ¼-inch marine ply, using simple miter joints in the corners.
Place the sea hood without the flange in its exact position on the cabintop and carefully trace its outline on the cabintop with a pencil. Remove the sea hood and, measuring in from your first line, draw a line representing the inside edge of the sea hood. Guided by this line, screw the three flange pieces to the cabintop using #10 stainless-steel, self-tapping, panhead screws. Adjust the fit of the corner miters, slide waxed paper under them, and glue the corners together with epoxy.
With the flange in place on the cabintop, epoxy the sea hood to the flange, fillet and all, as decribed in the article. The thickened epoxy makes up for minor imperfections in the fit between the sea hood sides and the flange.
When the epoxy has cured, remove the sea hood, complete any final shaping of the flange, and apply two layers of fiberglass cloth to the entire exterior, including the flange. Re-bore the mounting holes in the flange, then thoroughly coat all remaining raw wood surfaces with epoxy, including the insides of the mounting holes. Mount the sea hood to the cabintop using a bedding compound, such as silicone or polysulfide, that does not permanently bond.
Finishing up
For finishing the sea hood, I suggest two-part polyurethane paint. The permanent sea hood has to be painted in place, while the flanged sea hood can be taken to a painter. In either case, it may be possible to have a professional do the spraying at a reasonable cost, if you have done all the surface preparation, such as final sanding and priming. Consult with your painter to ensure that the primer will be compatible with the topcoat.
If you decide to do your own painting, you can do a reasonably good job using the roll-and-tip method described in other publications, including Don Casey’s book Sailboat Refinishing.
This is a supplement to the article printed in Good Old Boat magazine, January 2010.