Two self-described amateurs tackle a DIY rigging replacement project.
Issue 148: Jan/Feb 2023
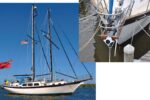
When we purchased Dawn, our 1978 Tartan 27-2, she had been dry-docked for several years with her mast down. Upon her initial launch, we found a cracked swage on one of the shrouds. We’ve heard that if one shroud is suspect, the whole rig is suspect and should be replaced. But we were in a hurry to get her cleaned, launched, and ready to make a several-day trip to our home port, so we only had the one shroud replaced and made a mental note that a re-rig was in her future.
Five seasons later, it was finally time to put Dawn in heated winter storage to tackle a growing list of structural and refit projects, which necessitated dropping her mast. Therefore, it was a perfect time for us to fully inspect the mast and replace the standing rigging.
terminal.
As self-proclaimed, underqualified amateurs with little knowledge of boat rigging, we started with gathering as much information and how-to guidance as we could. In particular, Don Casey’s This Old Boat includes a fairly thorough discussion of sailboat rigging, different types of terminals, and the process of rerigging an old boat. Much of his approach informed our process and experience. Luckily, we also found that we were able to pick the brains of other Tartan 27 owners via online forums and a Facebook owners group. There are also videos available via YouTube and other channels, both from do-it-yourselfers and manufacturers of rigging and other marine products. Those resources helped us understand all the steps in the rigging process, and videos were particularly helpful to visualize how to assemble each rigging terminal.
Choosing the Materials
A consideration when doing your own rigging work is that many boats are rigged with standard 1×19 stainless steel cable. However, some manufacturers built boats with rod rigging, which is a solid (but relatively flexible) piece of a particular type of stainless steel. Considerations for rod rigging are different than with wire rigging. Luckily, Dawn was designed for and equipped with 1×19 stainless steel wire, which is relatively straightforward to work with and well within the capabilities of the amateur boat mechanic.
When tackling a rigging project, another major consideration is what type of terminals will be used. Most sailboats with wire rigging are fitted with swaged terminals, which are pressed onto a shroud or stay with a swage tool. Rigging shops use hydraulic swage tools that press the swages onto the wire with immense force. Unfortunately, swaging tools suitable for standing rigging are specialized equipment that is expensive and requires some basic knowledge to use effectively. The cheaper, plier-like crimping tools available do not sufficiently and consistently press on the terminals in a way that’s suitable for the forces involved in holding up a mast under sail.
If you are set on swaged terminals, you can carefully measure your rig and let a rigging shop cut and fit swaged terminals to rigging that you later install. Perhaps surprisingly, the cost of having a shop fit the terminals does not seem to add much to the total cost of a rerigging project, and this could be a good approach for those confident in their measuring skills. You can simply measure your original rigging and send the measurements to the shop, along with the number and types of terminals you need. Dawn’s rigging never seemed to fit quite right, so we did not trust whatever measurements we might take.
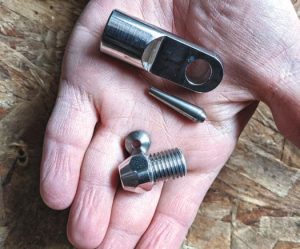
The other options are mechanical terminals. Several brands exist, but the most popular and regularly available appear to be Sta-Lok and Hi-MOD. Two main benefits of mechanical terminals are that they can be easily inspected and most brands can be reused in some fashion. After considering the options, we chose Sta-Lok terminals for their availability, ease of use, friendliness to the do-it-yourselfer, and the recommendations of others who have used them.
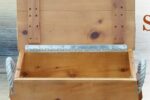
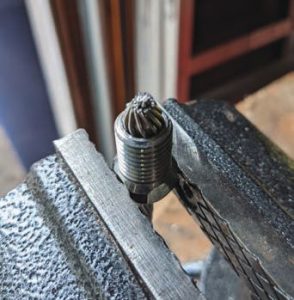
before assembling a Sta-Lok terminal.
Unlike the swaged terminals that operate under external compression of the terminal onto the wire, mechanical terminals use opposing forces to hold a fitting in place on the rigging wire. For Sta-Lok terminals, you unwind the outer portion of the wire rigging and slide a provided cone-like wedge over the inner wire. After rewrapping the wire, the wire and wedge slide inside a fitting. When force is applied to the wire, the wire is pressed firmly between the wedge and the fitting. The more force, the more pressure there is on the wire holding it in place. This makes for a very strong connection.
Assembling the Rigging
Once we decided how to go about the rigging project, it was time to assemble the necessary materials. All the old rigging was laid out and the existing type and number of terminals counted. Terminals come in a variety of shapes and forms such as forks, threaded studs, and eyes. Matching the terminal types to the existing rigging ensured everything would fit in place when it came time to re-step the mast. After a careful count, seven eyes and five threaded studs with turnbuckle fittings were required for the full rig of four stays and two shrouds. Since Dawn has both ¼-inch wire and 3/16-inch wire rigging, we had to be very careful to order Sta-Lok fittings for the appropriate wire size. In these sizes, all eyes are eventually attached to the mast and chainplates via 3/8-inch clevis pins.
We also double-checked the sizing of attachment points on the mast in case any components needed to be replaced to accept 3/8-inch clevis pins. It is possible that design standards have changed and the boat was fit with different size pins than modern standards dictate. To work properly, clevis pins must fit closely. Fitting an undersized clevis pin or drilling out a fitting to accept a larger pin significantly alters the integrity of the rigging and is not advised. Luckily, all the existing attachment points on Dawn’s mast and chainplates also accepted 3/8-inch clevis pins, so we did not need to make any changes to fit the new terminals. We got the terminals and miscellaneous hardware, such as clevis pins and cotter pins, through Rigging Only, which has a wide variety of terminals and hardware.
Other Tartan 27 owners shared the length of each stay and shroud they used, based on their re-rigging experiences. From these numbers and our own measurements, we estimated the total length and size of wire needed. We ordered additional wire for onboard spares and to cover for any mistakes. We got 180 feet of 3/16-inch wire and 36 feet of ¼-inch 1×19 stainless steel wire from Defender Industries. We ordered each size of wire in one continuous length, with the intention of cutting each stay and shroud to length ourselves.
Now it was finally time to start assembly. We had all of Dawn’s old rigging at home, which made for a nice garage and basement project during winter evenings when we were not out at the boat. Following Don Casey’s advice, we started with the longest wire first. That way, if a mistake was made, we could re-fashion it into one of the shorter shrouds.
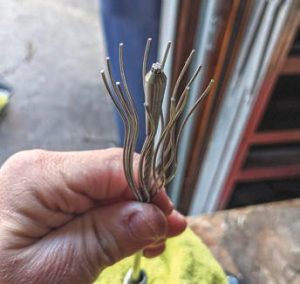
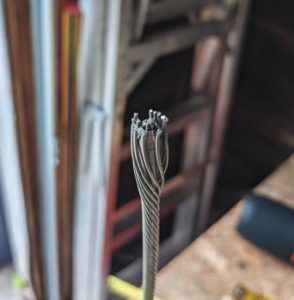
To size the rigging, we started by fitting an eye terminal to the wire where it attaches at the mast. Sta-Lok terminals come partly assembled. First, we made sure that the cut end of the 1×19 wire was clean, square, and free of any barbs or spurs. Then we disassembled the terminal and its pieces, which consisted of the two-part socket assembly, a wedge, and a forming cone. Following the instructions provided by Sta-Lok, we slid the bottom piece of the socket assembly over the wire down about 12 inches, then carefully unraveled the 12 outer strands of the 1×19 wire and slid the wedge over the inner seven strands so that the wide end of the wedge sat roughly ¼ inch below the end of the wire. Then we carefully wound the outer strands back over the inner portion of the wire and the wedge. We slid the bottom piece of the socket assembly back up the wire so it began to compress the wedge and wire together. At that point, we were careful to ensure that the wedge remained approximately ¼ inch below the end of the wire and that one of the outer strands did not get caught in the gap of the wedge, or the wedge would not compress properly when the fitting was tightened.
everything came together correctly before rerigging the boat.
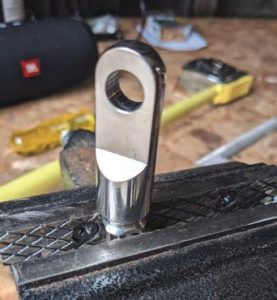
When we were satisfied that everything was neat and in order, we screwed the upper portion of the socket assembly onto the lower part by hand, then moderately tightened the two pieces together with two adjustable wrenches to ensure the parts were compressed together. This process was aided by using a vice and a stable workbench. Then we disassembled the fitting to ensure everything came together properly. We also found mixed advice on whether to include sealant in the fitting to prevent water intrusion. If desired, this would be the time to add sealant before a final reassembly.
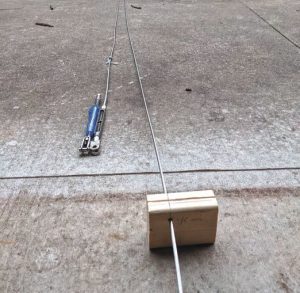
Now that an eye was fitted to one end of the wire, we laid it out next to the old rigging. To aid in this, we nailed a 2×4 board into a split in the concrete in the driveway to hold it fast and hammered two additional nails into the board. We slid the eye of the old rigging over one, attached a new eye connected to a spool of wire to the other nail and pulled both wires taut, laying the two wires out side by side in the driveway.
Laying the new terminal next to the wire, we were able to mark where the wire should be cut to match the length of the old rigging. Where necessary, we also made minor adjustments to help ensure the new rigging would fit better. While power tools can be used to cut 1×19 stainless wire, they are unnecessary and could accidentally damage the ends of the wire. A sharp hacksaw with a fine-toothed blade for cutting metal works just fine. Whenever we were left with an uneven surface or a slight burr, we simply either recut the end or lightly filed it square.
Taking another page from Don Casey’s book, we fashioned a jig of a small section of scrap 2×4, drilling a ¼-inch hole through the wood and cutting a perpendicular slot across the hole. The wire was placed through the hole and then cut through the slot, ensuring the saw did not bounce and cut cleanly across the wire.
After cutting the wire, we added the bottom terminal (eye or threaded rod, depending on the stay or shroud) in the same process as outlined above to assemble the stay or shroud. This entire process took approximately one to two hours per stay or shroud. When those were finished, each length of wire was lightly coiled, labeled, and stored until the spring.
Moment of Truth
Needless to say, we were a little anxious when it came time to fit the rig. A few days before our scheduled mast stepping, we installed all the new rigging, making sure everything fit snugly to the mast attachment points and that each shroud and stay was properly located. We then bound it all together with duct tape, so the yard would be able to easily move the mast without wires flailing around.
With the mast back in the boat, we helped the yard install the clevis pins holding the rig to the chainplates. Much to our surprise—it seems boat projects always go a little awry—everything fit easily. After an initial tightening, we put Dawn in a slip to tune the rig. Over a couple of weeks, we took the boat out sailing in different wind conditions and continued tuning the rig until we were happy with her performance.
Since completing the rigging, we’ve had Dawn out in 20-plus knots of wind and with full canvas; everything has held fast and she’s back to sailing on her shoulder. She’s tuned better than ever, and we are confident that the new stainless steel will give us a couple decades of good service on the Great Lakes. Perhaps most importantly, we have a little more peace of mind when the wind is up and Dawn’s humming along.
Lee Mueller and Traci Montgomery sail their 1978 Tartan 27-2, Dawn out of Whitehall, Michigan. Over the last six seasons, they’ve been slowly restoring and improving her. Each summer, they can be found sailing around Lake Michigan. Their projects can be followed on Instagram at @ SV_Dawn.
Thank you to Sailrite Enterprises, Inc., for providing free access to back issues of Good Old Boat through intellectual property rights. Sailrite.com