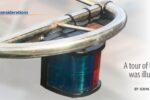
A new pair of pedestals and cockpit winches improves trimming ergonomics.
Issue 141: Nov/Dec 2021
When I purchased my 1965 Alberg 35, Tomfoolery, a little over two decades ago, she came with a tiller. A year later I replaced the tiller with an Edson wheel.
This change freed up cockpit space that would have otherwise been occupied by the helmsman, but suddenly, the winches used for sail trimming were no longer optimally located. Placed well aft in the cockpit, where the sail trimming crew would sit behind a tiller-steering helmsman, they now were adjacent to the new wheel. This arrangement worked well for singlehanding, but when racing with a full crew, things in the aft end of the cockpit got a bit, well…congested.
The solution? I decided to add another pair of winches that were more centrally located in the cockpit. Not only would this help spread out personnel when the boat was fully crewed, it would also provide some redundancy if one of the older winches failed.
The first step was to find suitable winches. Installing another pair of self-tailing Lewmar 44s would have been ideal, but new ones were prohibitively expensive. Eventually I found a used pair of two-speed Barlow 24s that looked up to the task. Now I had to figure out how to attach them to the boat.
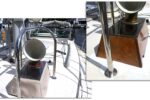
Tomfoolery’s old winches are mounted on solid wooden pedestals that are bolted through the deck and screwed to the boat’s wooden cockpit coamings—a fairly straightforward and time-tested arrangement on older boats with wooden cockpit coamings. I decided to attach my new-to-me winches in the same manner.
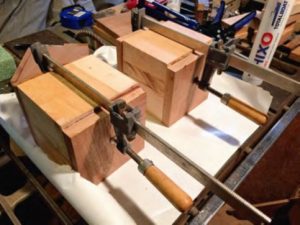
First, I built two winch pedestals. Rather than using two solid blocks of wood, I made my own blocks out of wood that I laminated together; this is a more practical and stronger solution than using a single block. Since I didn’t have quite enough mahogany on hand for the whole job, I used rough-cut, 2-1/2-inch-thick cherry for the blocks’ cores. I glued the pedestals together with TotalBoat’s Thixo low-viscosity epoxy.
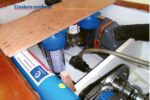
Next, I fashioned two backing plates out of 1/4-inch aluminum; these would go beneath the pedestals under the sidedeck.
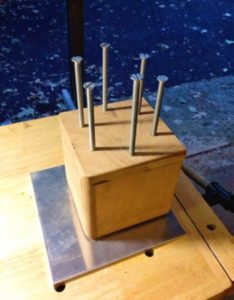
Since the deck and the cockpit coamings do not intersect at right angles (it’s a boat), I drilled the through-bolt holes in the pedestals before custom fitting each one for its location. (A trip to the boat confirmed what I already suspected: The angles between the deck and coaming varied slightly from port side to starboard.) Pre-drilling the holes ensured that even after I fit each pedestal, the drilled holes stayed square to the top.
To accomplish this, I used the winch base as a template to mark where each bolt needed to go, and then drilled down at a 90-degree angle to the surface so that the drill bit emerged in the same relative position on the bottom of the block. Doing this accurately by hand is way beyond my skill level, so I used a drill press—an invaluable tool if you are trying to drill a hole perpendicular (90 degrees) to a surface.
Once each pedestal had been fitted, I marked its location and clamped it in place against the cockpit coaming. Then I used the mounting
holes in the pedestals as guides for drilling the holes through the deck.
Silicon-bronze bolts—my first choice—were quite expensive, about $300 for the 12 bolts total I would need. Beyond the price, the ideal-sized bolt for installing the winches, 8 x 5/16 inches with a machine-screw head, were incredibly difficult to find. Even a large marine chandlery like Defender doesn’t carry them at that length.

So, on the advice of a local industrial supplier, I opted to make my own out of stainless steel. I screwed a shorter bolt into the top of a coupler, then screwed threaded rod into the bottom of the coupler. The threaded rod provided the length I needed to attach the backing plate; I trimmed them to fit using the cutting wheel on a Dremel tool. The total cost of the stainless steel bolts, couplers, and nuts came to $50. (I realize this is probably more work than the typical DIYer would take on; in that case, you should be able to purchase 12 8-inch x 5/16-inch stainless steel machine screws for the job at about $240 from an online industrial supplier.)
I also added 4-inch stainless steel screws through the inch-thick coaming and into the pedestals. As the winches and pedestals work under high loads, these reinforcing fasteners help prevent a gap opening up between the coaming and the pedestal. The coaming also provides substantial fore-and-aft support (much like a strongback gives stiffness to a tabletop), given that it’s a solid piece of teak about 7 feet long.
After applying seven coats of varnish to each pedestal, I reattached all the hardware and mounted them to the boat using a liberal layer of TotalBoat Sealer from Jamestown Distributors.
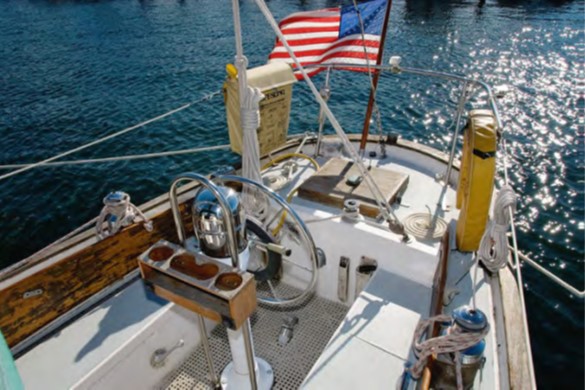
Violà, a second set of winches, and much more room in the cockpit when we’re racing. The only problem is that now it looks like I’ll have to re-varnish the rest of the cockpit’s wood to match the new pedestals!
Tom Alley and his family sail a 1965 Alberg 35 sloop, Tomfoolery, and are active racers and cruisers with the Finger Lakes Yacht Club in Watkins Glen, New York. Tom is a long-time U.S. Power Squadrons member, and manages an Alberg 35 website (Alberg35.org). When he’s not sailing, thinking about sailing, or tinkering with his boat, he is scuba diving, hanging out with fellow amateur radio operators, or (as a last resort) working as an engineer to support his sailing addiction and/or to send his kids to college.
Thank you to Sailrite Enterprises, Inc., for providing free access to back issues of Good Old Boat through intellectual property rights. Sailrite.com