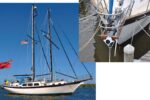
Replacing an old canvas dodger with a hardtop/canvas hybrid levels up comfort and safety.
Issue 147: Nov/Dec 2022
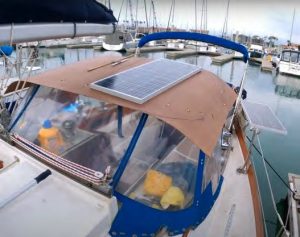
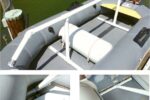
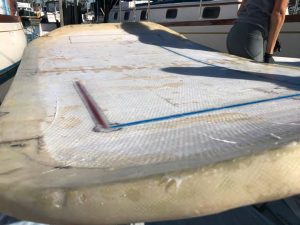
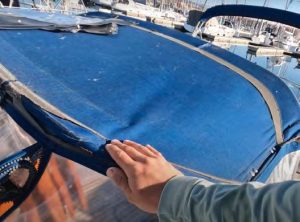
template to shape the new one. Here, the new
material is laid on top of the old dodger and
a solar panel placed in approximate position
for sizing.
In the grand scheme of things, few items on a sailboat are truly more oriented to comfort than a dodger. After a few rounds of bashing into the wind, days of sailing under the brutal sun, and combating squalls, the dodger plays a major role in protection and well-being.
In 2018, my partner, Chris, and I bought our 1979 Cheoy Lee 41, Avocet, with no intentions of cruising; we were barely 21, fresh out of college, newly wed, and excited to make a boat our first home—and nothing more than that. Only after the days, months, and years of DIY projects, as we uncovered more of Avocet’s past life as a true cruiser, were we inspired to continue her legacy and sail to new horizons. This meant we needed not only to make Avocet comfortable to live aboard, but also make upgrades so she’s capable of sailing through whatever Poseidon throws our way. And sometimes the stars align, and a project will accomplish comfort and function serendipitously.
The canvas dodger we had inherited with Avocet had seen better days. The frame was not stout, the dark blue canvas had been sun bleached and abused over the years, and perhaps worst of all, the Strataglass was as transparent as milk, making any attempt to see through it impossible. Although it served well as a windbreak and had gotten us this far in our journey, we knew it was time to upgrade.
Originally, we thought we’d create a completely rigid hard dodger and forgo the hassle of sewing canvas at all. But on the advice of notable sailors (such as Lin Pardey), we decided to create a hardtop that could support our Renogy 100 solar panels, with canvas sides that can be removed for easy cleaning and air flow on particularly stuffy days at anchor.
Having researched plenty of DIY and professional hardtop/hard dodger configurations, Chris had a concept for how he wanted the dodger to look, scribbling design after design onto a yellow legal pad for me to review. With the final sketch approved by yours truly, he got to work cutting materials and bringing his drawing to life.
Taking Shape
The overall shape of the top was really determined by two things: the length of our solar panels (which would be mounted on top) and the dimensions of the core material, which was exactly 4 feet wide. With these, we established that the length fore and aft would equal the length of the solar panels, while the hardtop width would remain 4 feet (just a hair larger than the previous dodger) to keep us from cutting away more material.
Following a basic FRP construction plan, we decided to use a factory-scored honeycomb core called Nidaplast. At 1 inch thick, this lightweight, rot-resistant, and flexible material could bend to match the arch of the old dodger.
Chris chose 1708 fiberglass cloth (17-ounce biaxial glass and 8-ounce matte glass) for this project for its strength in layers and interweaving fibers that, when bonded with resin, offer excellent torsion rigidity. He decided that two layers of 1708 glass on each side would give us the desired strength.
The first day, we cut the Nidaplast core to shape, leaving the old dodger in place and using it as a template and support, ensuring we would create the perfect arch and soft corners with our new design. Chris then cut the fiberglass cloth for the top skin, making sure to overlap where the edges of glass met to ensure there were no weak spots. Since the cloth was so large, it was tough to wet out alone, making layup a two-person job. With the glass still wet, Chris applied fairing compound to chemically bond, making this about a four-hour process.
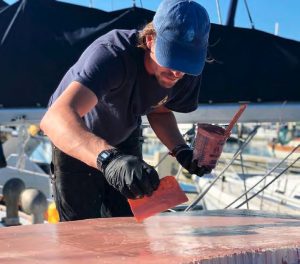
The weight of the glass and addition of pink, goopy fairing compound made the once light core material quite dense, causing some unforeseen dips throughout the dodger top. Working quickly to prevent the dips from setting in place, Chris used every camera tripod, paddleboard paddle, and boat hook he could find to better support the structure while it cured.
Once dry, the next step was to remove the new piece to the dock, but Chris quickly realized that the top was not as rigid as he had intended. This was a perfect opportunity to implement a design technique that would benefit us in more ways than one.
We laid two Divinycell 2 x 55-inch stringers parallel across the beam of the dodger top, securing them with a layer of 1708. This strengthened the top while also creating the perfect raised platform to mount our solar panels. Chris had learned this technique building fishing boats, and we had put the concept to the test when we successfully stiffened the decks aboard our Victory 21, Geronimo. With this modification complete, we moved the top dockside so we could finish glassing and fairing the underside.
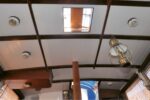
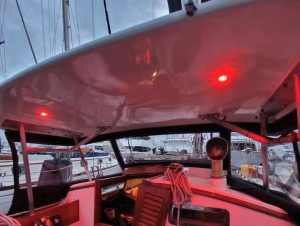
Lights, Conduit, Paint
With the bottom of the hardtop easily accessible, Chris located where he wanted to install two red lights that would help illuminate the cockpit at night. Part of his decision to use 1-inch-thick core was to inlay conduit not only for the lights but also our solar panels, keeping the wires neatly out of sight. So, before he glassed the bottom skin, he mapped the paths for the conduit and used a router to cut away the core for the Garolite conduit material. Using a generous amount of thickened epoxy, we glued the conduit tubes in place and then resumed glassing.
After a couple days of work, we had a solid hardtop, which meant we could determine where we would glass the 4 x 32-inch aluminum mounting plates to the underside that would attach to the aluminum frame we were building. This process looked pretty funny as we hoisted the now-fairing-compound-pink hardtop above the cockpit using a Dyneema bridle, a rope off the backstay, and four lines on each corner to help stabilize the hardtop. This arrangement let us find the proper dodger height and “tilt.”
With the mounting points mapped out, we resumed glassing, starting with two 1/4-inch G10 backing plates that the aluminum frame would be bolted to. Using G10 ensured a flat surface immediately, rather than fairing two parallel flat spots on the areas that had the most curvature.
After three days of glassing, fairing, and planning, we moved the dodger top to the Ventura Harbor Boatyard, where Chris could safely complete the sanding needed before finishing.
Although we are DIY junkies at heart, we are not afraid to hand off projects to trusted professionals if necessary. When it was finally time to paint, Chris and I both were consumed with work away from the boat, so we hired our friends at the boatyard to spray the dodger top with Oyster White Awlgrip. This honestly wasn’t the worst investment. Since the yard prohibits DIY spraying, we would have had to roll and tip, which meant three separate coats with sanding between each, making this a multiday affair. In one day, the yard completed the job, and we had a beautiful hardtop ready to be united with the boat—once we finished the frame.
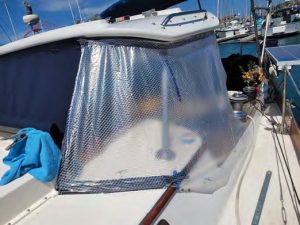
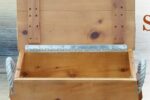
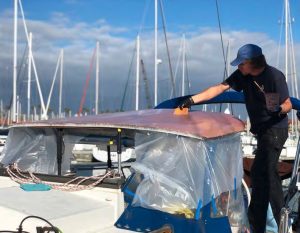
material to fabricate the new Sunbrella sides of the dodger.
The Frame
While the painting unfolded in the boatyard, we shifted our attention to building the frame with the help of our friend and master metal worker, Ryan. After extensive research and thought, we decided to build the frame of 1-1/4-inch aluminum tubing, which would be cheaper than other metals as well as lightweight, an important consideration since its location is well above the waterline.
Ryan’s masterful welding brought our metal frame design to life. Since one of our goals was to eliminate horizontal torsion or any wobble, Chris implemented gusset tubes into the design to ensure it would remain stout, a major upgrade from our rickety old canvas dodger.
Before the boys could build laterally, they had to first build the bases to support the structure. This took some time to plan, but eventually they decided on the placement of the four circular aluminum bases that would be through-bolted to the boat, as well as the locations where the aluminum tubing would be welded.
Ryan welded two 4 x 32-inch plates atop of the tubing that corresponded to reciprocating G10 plates glassed into the underside of the hardtop. Between each bolt we used a fair amount of Tef-Gel and G10 washers to separate the stainless bolts and nuts from the aluminum. We finished the frame with Nyalic, which we had successfully used during our mast rebuild.
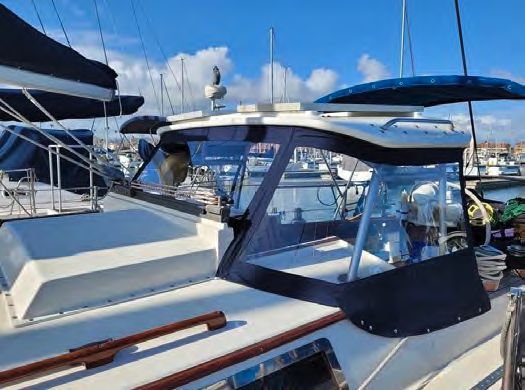
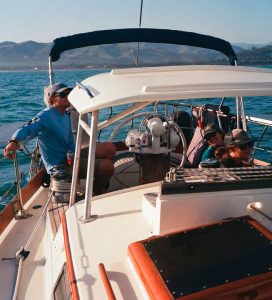
Before assembling everything aboard Avocet, Chris installed the bolt track for the canvas and ran the wiring through the conduit. With everything ready for the moment of unification, we carefully carried the dodger top from the dock to the boat. After some gentle nudging and adjusting, we finished bolting the top to the frame and completed the wiring into the boat. We were over halfway done!
“That looks niiiiice,” Chris said as he flicked on the new red cockpit lights, which illuminated the space beneath the dodger and glowed into the cockpit. With construction complete, we couldn’t wait to put our hard work to the test and took Avocet out for a sail, despite not having any canvas to protect us from the wind or spray.

The Final Steps
Back in the marina with a renewed sense of determination, we pulled out our trusty sewing machine and bolts of Sunbrella to begin perhaps the most challenging part of the entire project: sewing.
It’s always nice to have friends who possess skills we lack. For instance, our friend Mitch, who had worked for a canvas company, shared his experience, and with his guidance we felt confident taking on this critical part of our dodger. First, we measured the distance from the starboard corner all the way around to the port corner, which provided the measurements to order the correct amount of navy blue Sunbrella, Tuffak for the windows, and eight YKK #10 finished zippers.
With materials in hand, Mitch offered a technique that was new to us, stretching the canvas over where the finished product will be, using pins to form the shape and hold it all in place for sewing. Although this worked well for the front panel, the complex curves of the two side panels proved to be too difficult for us to manage with the Sunbrella, so we resorted to using some Canvex gifted to us by another set of friends (sometimes it really does take a village—or a marina!). Canvex is great for this type of work because it is easy to bend and can be cut as many times as you want to make the perfect template before taking the cuts to your expensive canvas. After a day of trial and error, Chris had the templates needed to make the cuts in the Sunbrella that would become our dodger.
The following day, we used space in our friend’s storage unit that has essentially been transformed into a sewing paradise. With plenty of room to lay out materials, take measurements, and sew, this part of the project went by like a breeze. Living aboard a sailboat is great, but sometimes you just need a little more space to get the job done! Using Lifetime Thread by Sailrite, Chris sewed the binding, chafe protection, and some zippers, leaving the three panels ready to be test fit on the dodger.
To our pleasant surprise, everything fit as it should except for a few minor adjustments, such as tightening the front panel and recutting where the side panels met the front to attach the lateral zippers. Chris busted out these updates, installing the remaining two zippers and sewing the Tuffak windows into place before cutting out the canvas.
This is when the project really came together. Seeing the navy blue canvas attached to the dodger was like the icing on a cake—but we were still missing the cherry.
We had been holding onto two Renogy compact 100-watt panels for a year or so, just waiting for the right moment to install them. Once we laid them on top of the new hardtop, we realized that there was room for an additional panel, so we relocated one of the other panels attached to the side of the cockpit to its new home on top of the dodger. Now equipped with 300 watts of power potential on the dodger alone, our lithium batteries were well fed and ready for cruising.
Mounting the panels to the stringers was simple after drilling four small holes to accommodate 1/4-inch G10 tubing and 3/32 pins; the pins mean we can easily remove the panels for cleaning or replacement.
 This project combined multiple DIY elements, and while we had many of the necessary skills to execute the new hardtop on our own, it would have taken longer or perhaps included more trial and error without the foresight and guidance of our friends. So, here’s a formal thanks to Mitch, Quincey, Alan, and Elizabeth for their extra set of hands and sewing advice; Ryan the Metal God for once again working his magic; and our friend Dale at the Ventura Harbor Boatyard for the last-minute accommodations and paint services.
As I sit in the cockpit writing about this project, it seems only fitting to be under the new hardtop, watching the sun set over Santa Cruz Island where we are anchored for the next while. The red lights are illuminating my keyboard and the canvas is shielding me from the light breeze, keeping me comfortable as I type. We are so thrilled with this upgrade and look forward to continuing to put our hard work to the test.
Chris and Marissa Neely have been living aboard and upgrading their 1979 Cheoy Lee 41, Avocet, since 2018. Primarily they sail in and around Southern California’s Channel Islands. Follow them at svavocet.com, on other social platforms at @svavocet, and on their YouTube channel called Sailing Avocet.
Thank you to Sailrite Enterprises, Inc., for providing free access to back issues of Good Old Boat through intellectual property rights. Sailrite.com