Try these tricks to stay toasty warm while cold-weather cruising.
Issue 141: Nov/Dec 2021
Summer sailing can be lovely, but there are downsides; the season is short in much of the country, the waters are often way too crowded, the heat can be oppressive, and the bugs can be annoying. For me, the most glorious sailing weather is in the fall and even into early winter, when the breeze is steady, the sun less intense, the water still warm, and the anchorages often empty.
But, to truly enjoy cool-weather sailing and cruising, you have to know how to stay warm and dry. Following are a few time-tested tricks I’ve learned to maximize the cozy factor during those brisk autumn days and long, star-studded, chilly nights.
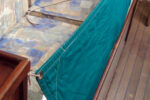
Seal the Companionway

Dropboards are strong, simple, and take up minimum space, but they make trips in and out of the cabin a nuisance. In cold weather, by the time I slide them out, clamber through, and replace them, the heat has leaked out—and within seconds I might expect to hear behind me, “Did you grow up in a barn?” or some less polite version of, “Close the darn door!” This discourages nighttime exits to check on things, and the cabin feels that much more claustrophobic, sealed without a ready means of egress.
I wish there were room for a hinged door, but there just isn’t. As a result, I only use the boards when I’m away from the boat. So, how to find something more convenient than dropboards that still holds in the heat and enables easy access in and out?

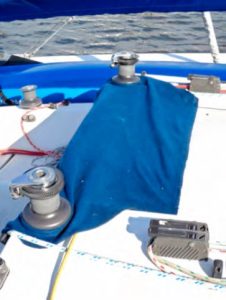
My solution is a two-part fabric seal. On the outside is a cape—a simple cloth flap that attaches to the slider at the top, hangs down to completely cover the opening, and is weighted at the bottom, allowing quick exit with minimal air leakage. On the inside is a fleece that is cut to size and, similar to my mosquito netting in summer, attaches along the companionway perimeter inside. This inner lining provides insulation as well as controlled ventilation.
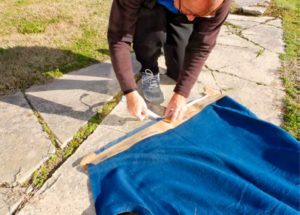
My first effort at the cape portion was a beach towel thrown over the companionway, secured at the top with ropes around the pair of cabintop winches that flank the slider. It was warm, but it gained 10 pounds when rained on and took a week to dry. Even dry, the beach towel was bulky and didn’t fit well. After a few trips in and out it would work loose from the winches.
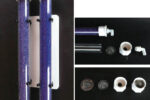
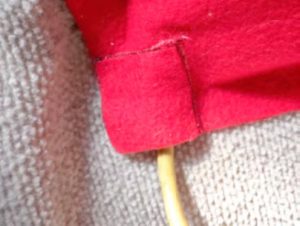
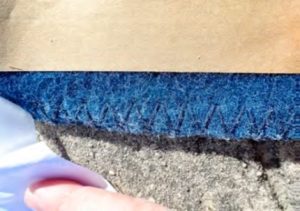
For round two, I chose fleece, which doesn’t get heavy when wet and dries within hours. I tailored the cloth to more closely fit the opening, while still leaving a conservative 8-inch overlap on all sides. I weighted the bottom with a length of 3/16–inch chain, which I placed inside a glued hem. To secure the top, I placed a strip of self-adhesive Velcro tape across the width of the slider and glued the opposing strip to the fabric for a firm attachment all the way across.
Instead of using ropes to tie the corners to the winches, I cut holes in the fabric, so I can slip the cape over the winches. I reinforced the fabric by gluing a 10-inch square of the same fabric underneath. If I am using a winch underway, the Velcro is still enough to hold the cape. This method can be used to make a simple bug screen for summer, as well.
On Fast and Furry-ous, attaching the inner lining is simple, because there’s a carpeted liner on the bulkhead around the companionway. I cut the inner fleece to shape, then glued the hook side of Velcro tape to it. Like my mosquito netting in summer, it clings to the carpeted liner.
If I’m coming and going through the companionway while settling in, I use only the cape. Once satisfied I’m done coming and going for a while, I add the inside seal. Once fully sealed, there are zero drafts, only the warm glow of afternoon light diffusing through the fabric.
A key advantage of a fleece seal is controlled ventilation. Since I primarily use this at anchor, the inner seal is not directly exposed to wind, and even in a marina, it is covered by the cape. The dodger protects it from rain. A fully wind- and rain-proof fabric could make sense, but so far, I like the breathability of fleece, which prevents the cabin from growing clammy from water vapor emitted by cooking and exhaling.
If I expect heavy rain to blow in from aft, I remove the cape and install the dropboards. I can generally still leave the slider open, relying on the inner lining to provide controlled, draft-free ventilation. In fair weather, if it’s not quite cold enough for both, I just use the cape.
If you’d rather not try this method, attach a layer of fleece to the door or dropboards with Velcro; that will cut the heat loss in half.
Plug the (Air) Leaks
Boats are drafty, and plugging those drafts goes a long way to keeping the cabin cozy. Buy an infrared thermometer and search the cabin for cold areas. The most common are single-glazed windows, the floor, leaky ventilators, drafts around the companionway, and uninsulated boards themselves.
You can slow the drafts from single-glazed windows by adding external canvas covers, a trick I explained in “Protective Covers for Windows,” (November/ December 2016). Fabricating internal quilted covers to replace your curtains for the winter will also help. And, in “Season Extenders” (May/June 2018), I showed how to create double-glazed hatches by replacing the bug screen with 1/8-inch polycarbonate sheets cut to size.
Another big source of heat loss is a wooden floor. Wooden floors may look nice, but in the winter, they suck the heat right out of your feet by conduction, which is much faster than convection to the air. They also cause temperature stratification in the cabin, creating a cold layer near the floor. An easy solution is to create area rugs from inexpensive rubber-backed carpets and runners. They don’t slide, they protect the floor from shoes, and if you cut them with a hot knife, they don’t fray.
Consider Heaters (Carefully)
Many winter sailors like to use heaters, but I see non-vented heaters as a serious air quality hazard. They may have oxygen depletion sensors, and carbon monoxide emissions may be very low, but they are still venting unhealthy amounts of CO₂ into the air. You must leave a window open (defeating the purpose), they add moisture to the cabin that will soon turn into condensation, and you can’t leave them on while you sleep. The American Boat and Yacht Council requires that all heating devices, other than the stove, have an external flue and a provision for combustion air intake. Spend the money and do it right, and don’t forget the CO₂ monitor. Or, for a great DIY vented stove-top heater see “Hot Stuff” (March/April 2020).
Also, be careful with electric heaters, at the dock and on the hard. A friend of mine lost his boat because he left an electric heater running while he went to the chandlery for 15 minutes. Something combustible fell against it, and by the time he returned it was a bonfire. They must have tip-over protection, be placed well away from combustible materials, and they should never be left on unattended. The only ones I would leave on while sleeping are the oil-filled sort.
Get a Good Night’s Sleep
Sleeping bags are a great choice for staying warm overnight while cold-weather sailing. Get synthetic, not down; down becomes useless if it gets wet, and by the second day there will be enough dampness in the insulation from overnight sweat that the loft will be dramatically reduced. Mummy bags are the warmest, but a semi-mummy is more restful. If it’s actually going to get cold—below about 50°F—a hood and comfortable draft collar are vital. I have many bags, the result of a long backpacking and mountaineering career, but the iconic North Face Cat’s Meow is a good value and is typical of what works—20°F rating, semi-mummy, functional draft collar, synthetic fill.
Whatever bag you choose, get the extra-long version. Then, keep your shoes inside the foot of the bag. Near-frozen shoes are miserable to put on and immediately freeze the toes, no matter how warm you were. You can put morning clothes in the bag too, but they will be drier if you leave them outside.

Dry the bag every day. The water vapor from your body moves into the insulation and falls out as dew wherever it reaches the dew point, which will be somewhere within the insulation. As a result, sleeping bags become increasingly damp with each passing day unless well-aired during the day. This means leaving them open for hours.
You’ll also want to moisture-proof your mattress. As with a sleeping bag, moisture diffuses through the mattress until it reaches its dew point, either within the mattress or under the mattress when it meets a cold, uninsulated bulkhead. Some advocate ventilating the space with a gridwork mat. This works as long as the bulkhead is only cool, not cold. If it is actually cold, it’s as hopeless as trying to keep a glass of ice-cold tea dry in the summer; the sweating only stops when the tea warms up closer to the air temperature.
A second option is to insulate under the mattress with closed-cell foam. Tape it tightly to the fiberglass so that humid air cannot get behind it, or adhere it tightly with glue or self-adhesive. The simplest solution is the one I have found to be the best, even on subfreezing trips; wrap the mattress in a waterproof cover, like hospitals do, and use a mattress topper on top of that. A closed-cell foam pad as a mattress topper (backpacker’s mattress) also works.
Cabin fever reaches its zenith in early spring, tempting me out on the water while it’s still cool, and fall tempts me into winter to keep exploring even in the cold. There’s no reason to cut the sailing season short. Using some or all of these methods will help extend the sailing season in comfort.
Good Old Boat Technical Editor Drew Frye draws on his training as a chemical engineer and pastimes of climbing and sailing to solve boat problems. He cruises Chesapeake Bay and the mid-Atlantic coast in his Corsair F-24 trimaran, Fast and Furry-ous, using its shoal draft to venture into less-explored waters. He is most recently the author of Rigging Modern Anchors (2018, Seaworthy Publications).
Thank you to Sailrite Enterprises, Inc., for providing free access to back issues of Good Old Boat through intellectual property rights. Sailrite.com