A new headliner provides a big makeover for a 44-year-old racer/cruiser.
Issue 146: Sept/Oct 2022
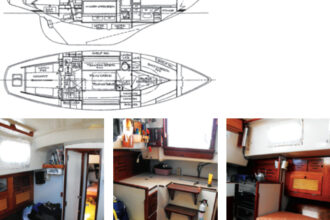
When Doug Peterson designed the Peterson 34 based off his innovative one-tonner Ganbare, he reportedly said that the strong, fast racer/cruiser was “built to deliver about eight people quickly and safely from point A to point B.”
That meant the belowdecks accommodations were pretty much all business—the offshore racing business that is—with little in the way of what one might call the finer appointments. In the case of the 1978 Peterson 34 my husband, Johnny, and I purchased in 2000 and named Luna, one of those appointments in the lacking department was anything resembling a headliner.
In those early years, Johnny installed a headliner made of thin plywood sheets cut to size and covered in a white vinyl fabric, screwed to small wooden blocks glued to the bare overhead. If it sounds a little Las Vegas, trust me, compared with what it covered, it was positively Paris.
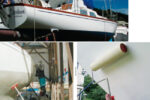
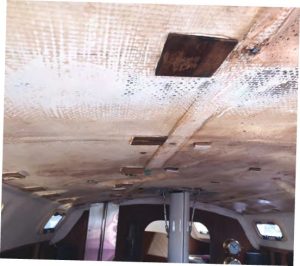
This served well for years until we went offshore cruising for an extended period with a much bigger boat. We sold Luna, who unfortunately ended up untended on the hard, slowly leaking through deck hardware and in the process rotting most of the headliner backing blocks and the plywood itself (among other things).
When we returned from cruising, we reacquired Luna with a partner, and the first order of business was re-coring much of the cabintop and deck. And, having stripped out all of the old, damaged headliner, we had, once again, a clean slate to install a new one.
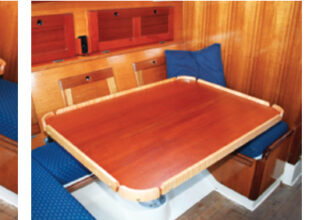
Our long-distance cruising boat had a beautiful tongue and groove headliner made of a honey-colored Australian wood. And I’d always liked the traditional New England vibe of white tongue and groove running fore and aft in a cabin, offset with horizontal, varnished trim pieces. Too upscale for a 44-year-old ex-offshore rocket? We wouldn’t know till we tried it on for size.
Sourcing the Materials
We didn’t anticipate any more deck leaks, but you know how old boats are—full of unexpected surprises. Given what had happened to the wood in the previous headliner, we wanted this new one to be made not of wood but of a material that would be light, easy to work with and clean, and rot resistant.
It proved harder to find than we thought. We spent more time than we wanted Googling “beadboard” on the internet, where we seemed to keep ending up with wide wall panels, pine strips, or worst of all, vinyl again. A trip to a nearby Lowe’s didn’t help much; we purchased a sample of a thin, plastic, beadboard-type material about three strips wide, but it felt flimsy in the hand, and when we held it up later onboard it was an instant nope.
Our search started to yield slightly better results when a friend suggested looking for wainscoting, but in the end, we found ourselves at one of Johnny’s favorite wood and building materials outfits, Warren’s Wood Works in Easton, Maryland. Here, we talked with a gentleman in customer service, explained our project and what we were trying to find, and in no time at all, he laid a sample of what we’d been looking for on the counter.
The material, Azek Beaded Sheets, is made of UV-resistant PVC formed as tongue and groove planks and used in outdoor home applications. Johnny calculated what we would need for the main saloon, excluding the small areas over the pilot berths, approximately 65 square feet. It wasn’t cheap— about $400—but we felt it would be worth it.

The materials arrived wrapped in plastic bundles. When we opened them, we found many of the planks covered in a tenacious black dirt that would not clean off no matter what we tried—even though the Azek website said standard cleaning products would work. We were hoping we wouldn’t have to paint the planks; the dirt said otherwise.
However, in for a penny, in for a pound, so we decided to install everything before painting to make sure we had enough material and it worked as we’d hoped. Once dry-fitted, we’d take everything down, paint, and reinstall.
Installation
Having never done a tongue and groove headliner before, we were kind of making it up as we went along. We knew we didn’t want to drill into the overhead, so we needed to install athwartships support structures to secure the fore-and-aft planks.
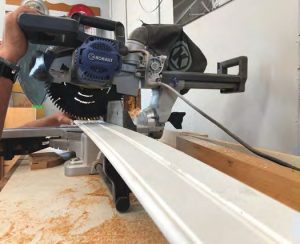
We briefly tried a few wood strips, but what worked best was the Azek material itself, because it was so flexible and held a fair curve. We sacrificed one length and cut it into three pieces to run three athwartships supports.
The companionway opening dictated the location of the first support, since we would need to attach the centerline planks there, first. The second support was about 4 feet farther forward, just behind the keel-stepped mast. The third support was forward of the mast and just aft of the saloon’s forward bulkhead.
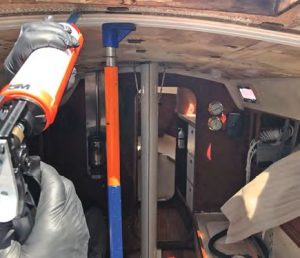
To attach the supports to the overhead, we sanded the fiberglass and gelcoat smooth where the supports would be glued and roughened one side of the support planks. We applied a liberal coat of West System 610 epoxy to the roughened side of the supports, then glued them to the overhead using a hydraulic jack and other props to hold them in place while the epoxy dried. It worked beautifully.
With the supports in place, we decided to start the installation from the centerline, using the center of the mast and companionway fore and aft as our guides for placing the first piece, and work outward from there. Using a tapered counterbore wood bit, we were able to pre-set the drill depth for a No. 8 by 3/4-inch flathead sheet metal screw; these would be our fasteners for the entire install.
After installing the first seven planks that ended at the companionway, we worked down the portside, butting the aft ends of the planks against the aft bulkhead (we supported these aft ends with an L-shaped trim piece.) The forward edges of these planks were cut to land halfway over the second support; this was to ensure room to butt the next course of planks, forward, against them. We also had to trim several of the aft ends to accommodate wiring from cockpit instruments installed in the aft bulkhead.
We didn’t know exactly what would happen as we approached the port side of the overhead, but happily, the final plank slid perfectly into place with no extra trimming required.
We repeated the process on the starboard side. We ran into a snag here, when bolts from the halyard jammers on deck were just a wee bit too long. We’d hoped we could get away with not cutting them, but as it turned out we had to (with a hacksaw).
After all the aft pieces were in, we began fitting the next course forward. This was a little trickier because we had to go around the mast, a solar vent, and the chimney for the propane cabin heater. Also, the cabintop begins to narrow more rapidly here, so we needed to cut angled pieces to fit the deepening curve.
We found that the material was light enough that where needed, we could install short pieces with just one fastener at one end, using the tongue and groove as the additional support. Some pieces had to be scribed, trimmed, and fitted for a proper appearance. The material machined well and was very easy to work with. We used dust collection systems on all the power tools in an effort to minimize any plastic dust.
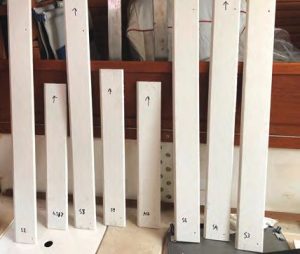
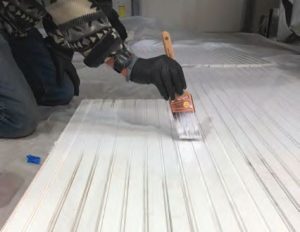
Once we had the headliner installed, we carefully removed it, labeling each piece with a letter indicating port or starboard, a number indicating its location from centerline, and an arrow showing direction fore and aft. Then we took everything home and laid it out on plastic on our garage floor.
Painting was simple. We lightly abraded the surface with a Scotch-Brite pad. Then we rolled and tipped three coats of Interlux Brightside white. We did not use a primer.
Finishing Touches
Using our labeling system, reinstalling the painted boards was fairly simple, though the paint did stick some of them together and we had to gently pry them apart to fit them properly again.
Johnny chose sapele mahogany for the athwartships trim pieces to cover the fastener holes where the planks were attached. He determined a width of 2-1/2 inches for each. Using a small roundover bit, he rounded over the edges giving them a nice detail, then cut the strips 3/16th of an inch thick on the table saw. Installing them was straightforward.
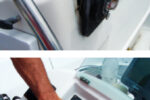
We didn’t want to bring the headliner material too close to the cabin heater’s metal chimney, for fear of heat damage. But this left a big open space around the chimney through which the ugly overhead was still visible.
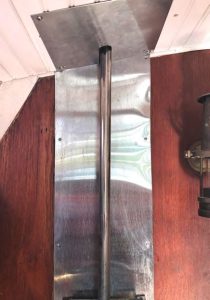
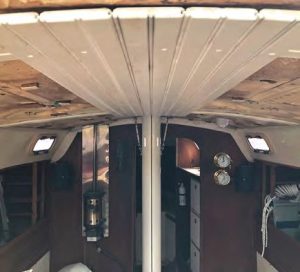
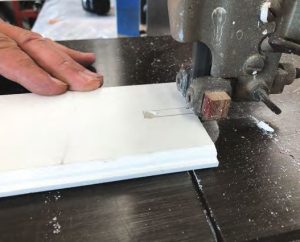
To enclose this area, Johnny chose 1/32-inch-thick stainless steel plate. After determining the diameter of the chimney, he used a hole saw to cut the appropriate size hole in the plate, then used a metal-cutting bandsaw to cut a slot from the edge of the steel up to the hole. The end result was a metal plate that slid around the chimney, covered the unsightly gaps, and fastened to the headliner.
Final trim pieces included wood trim around the companionway, the mast, and the solar vent opening.
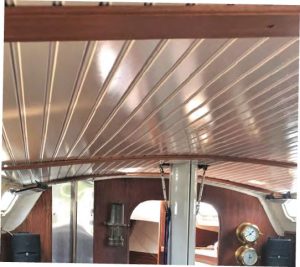
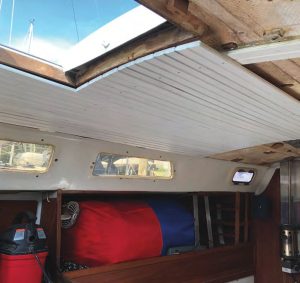
The headliner looks terrific. (As the Dude said in “The Big Lebowski,” it really ties the room together.) Although the materials cost more than we’d hoped, the ease of fabrication and durability made it worth it, and aesthetically, it entirely changes the character of the old racing boat’s interior.
It does, however, point up all the other places she needs some more spiffing, so now it’s on to upgrading the woodwork…one more item on the endless list.
Good Old Boat Senior Editor Wendy Mitman Clarke calls Chesapeake Bay home. Her husband, Johnny, is operations manager at Oak Harbor Marina in Pasadena, Maryland, where he works on a wide variety of good old boats.
Thank you to Sailrite Enterprises, Inc., for providing free access to back issues of Good Old Boat through intellectual property rights. Sailrite.com