A steep learning curve on a Speedy Stitcher eventually yields happy results.
Issue 147: Nov/Dec 2022
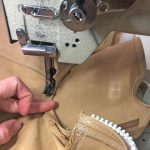
Most sailors have seen a Speedy Stitcher or sewing awl. How many have used one? My first time was such a flop I would have happily thrown it overboard. But since my second attempt, using the sewing awl has been a success, and this tool will have a place on board evermore.
My first try, in retrospect, was all wrong. I’d tucked the tool away in an emergency sail repair kit, and a day came when, after many miles underway, our headsail developed some chafe near the bow pulpit. I tried to add leather chafe material to the sail’s tack, an area already thick with layers of material and webbing and likely saltier than I realized. It was too much for the stitcher—be that myself or the tool is debatable. Sweating and cursing with each stitch, I broke the stitcher’s needles and rendered it useless. I finished the job with what I should have started with: a palm, waxed thread, needle, and a small piece of wax.
Years later though, with a mixture of hope and hesitancy, I pulled out the Speedy Stitcher again to tackle several areas that needed patching on our dinghy chaps. This time, I carefully took it apart and reassembled it. I read the instructions multiple times and visualized each step. I measured and prepared my first patch, stuck it down with some 3M double-sided tape along the folded edges, and followed the instructions.
Success! I learned I could control the tension on the top and bottom of the fabric to create a strong and even hold. I discovered the importance of finding the best path for the needle, and how to size a patch so the awl is not overtasked. Like many tools, the Speedy Stitcher has a niche and a sweet spot, which in my experience lies in the number of layers and the types of material being joined.
I’ve since used the Speedy Stitcher to make new sail ties. Following are my stepby- step instructions for this small project. Hopefully this can serve as a much better way to learn how to use the tool than the way I did it! Occasionally, the thread on the front side will twist on itself as you pull it all the way through. Sometimes it will seem to bugger up just shy of actually making the stitch. If this happens, loosen the hold on the backside thread to allow the frontside thread more room to come through. It is OK if a backside loop comes through to the frontside.
Once the frontside thread is pulled taut, put enough tension on the backside thread to pull the loop back into the webbing. Then apply even tension to both front and back threads. Once the last stitch is reached, puncture through to the backside and pull back slightly as before. When the loop forms, pull the stitching side of the thread all the way through. I cut it to the same length as what is left of the backside. Pull both threads tight and secure with a surgeon’s knot. I have had square knots slip out when I cut the threads back.


Maurisa Descheemaeker lives and sails with her husband and two kids aboard an Alajuela 48 ketch, Whirlwind. Their firstborn was but a peanut when sailing became a family adventure. Boat by boat, they have put many miles under a handful of keels throughout the Salish Sea, down the Pacific Coast, and south to warmer latitudes.
Thank you to Sailrite Enterprises, Inc., for providing free access to back issues of Good Old Boat through intellectual property rights. Sailrite.com