When the right boat proves elusive, a sailor tackles a major overhaul.
Issue 155: March/April 2025
My search for the ideal beach cruiser started several years ago, when I decided to compete in the Everglades Challenge, an unsupported race of about 300 nautical miles for small boats, canoes, and kayaks. I bought a wooden Core Sound 17, a popular model for this event; unfortunately, the builder’s deviations from the plans decreased her stability and impaired her positive flotation, making her unsuitable.
After an exciting sail on a friend’s WindRider 16, I purchased one, modified her a bit, and started the Everglades Challenge. A torn sail put me out of the race, but I realized that I preferred a less organized and competitive environment. Additionally, while the WindRider only drew 18 inches, beaching with her fixed keel and rudder was difficult, and I wanted more shelter than the two previous boats offered.
My next choice was a Peep Hen, a spacious 14-footer with a great cabin and shallow draft. After participating in the Florida 120 rally, an annual cruise for small boats, it became apparent that the grave compromises in her sailing performance were unacceptable. These exercises in picking my poison gave me a much clearer idea of what I wanted. The next boat had to sail well, have a centerboard that would kick up in shallows, not have a fixed keel, be stable and self-bailing, and provide some minimal accommodations.
I came across an ad on Craigslist for a Thistle — “$750/needs work,” it said, and there were a few poor photos. She wasn’t my perfect boat, but at that price, it was certainly worth a look. I grew up as a boat-crazed kid in Indiana and knew about Thistles. They were far out of my reach as a child, but I was captivated by their lines and beautiful woodwork.
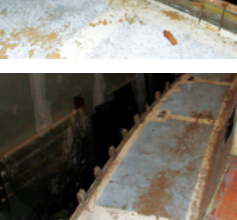
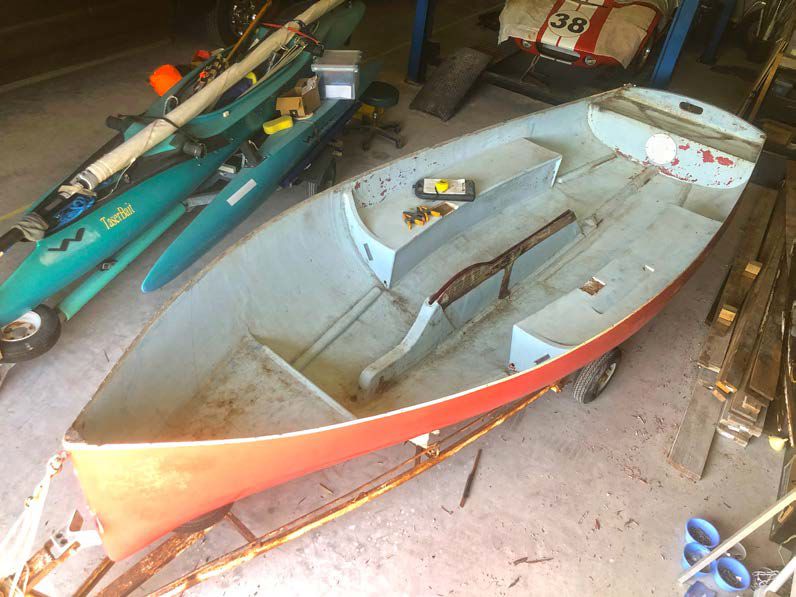
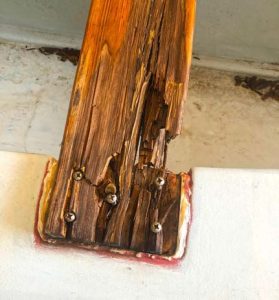
I was predisposed to like the boat, but I was disappointed. It had clearly not been sailed in years. The tarp covering it was ancient, allowing leaves and debris to collect inside. The woodwork was decayed and the roughly brushed paint was peeling, but the fiberglass hull seemed intact and the boat was complete with rig, sails, and a trailer. I made a lowball offer, half hoping he would turn it down, but he didn’t. Towing her home, I realized I didn’t really know what I wanted to do with her. With childhood visions of the beautiful Thistles in mind, my plan was to do the woodwork needed to pretty her up, which I didn’t think would be too expensive.
Once I got her into my shop and started poking and prodding, I discovered that the woodwork was in much worse shape than I’d realized. Nearly every piece was dry-rotted and needed to be replaced. Turning to the internet, I got my next rude awakening. Those beautiful replacement rails alone would be over $1,000.
In an effort to help determine what I wanted to do with the boat, I signed up to crew at a Thistle regatta. When conditions turned gusty the second day, it took all three crew to keep her upright, and on the last race, we put the rail down briefly and partially swamped the boat. Comparing the fleet’s display of glossy gelcoat, stunning brightwork, modern go-fast gear, updated spars, and new sails to my pitiful project with her peeling paint, ancient blocks, obsolete mast, wooden boom, and blown-out sails was a reality check.
It would take many hours and likely well over $10,000 to have a boat worth much less than that, which still was unlikely to be frontline competitive. Furthermore, the need for three crew to sail the boat effectively, and her lack of self-bailing ability, convinced me that her original design was unsuitable for my needs. But her speed potential, light weight, and shallow draft were undeniable assets. The decision to transform her into the “ThistleCruiser,” my ideal high-performance beach cruiser, was easy and gave me a new sense of direction.
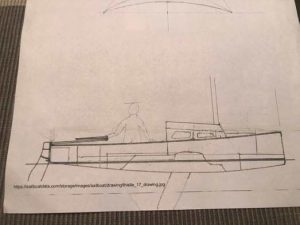
I got out my sketch pad and measuring tape. The book of class rules she came with included a set of lines, which made drawing my modifications easier. I planned to build her new deck and cabin using the tack-and-tape technique with which I was familiar. I wanted a self-bailing cockpit that was long enough to lie down in, a cabin with a full-length bunk, space for a portable toilet, a forward anchor well like my Peep Hen, an icebox accessible while sailing so I didn’t have to bring an awkward cooler, and some lockers for watertight storage. With a little modification, I could incorporate the existing flotation tanks as bulkheads and for storage.
More modest goals gave me freedom to reuse her antique hardware and modify the original sails. I would step the mast in a tabernacle for easy raising and set the jib on a furler. The mainsail is enormous and needed slab reefing, which is not allowed by the class. The fixed rudder would have to be changed to a kick-up type. In designing the cabin, it was apparent that the hull was not shaped for interior accommodations. It is optimized for speed — narrow forward and shallow aft. The centerboard trunk was a defining feature and set the height of the cockpit floor, allowing it to drain through the trunk’s open top. The cockpit seating was moved to rail height for greater comfort; raising the cockpit floor added flotation up high, which helps with self-righting. The aft flotation tank and 6-foot 6-inch cockpit length pushed the main cabin bulkhead forward.
To minimize added weight and windage and retain her attractive lines, I wanted to keep her cabin profile low. It took many tries to get the right look to the portlights. There wasn’t enough width and depth to fit a quarter berth, so the bunk went forward and I accepted the compromise of limited headroom over it. This still left room for an anchor well, using the forward flotation tank as its floor. There is headroom in the cabin only when seated on the sole. Not wanting to alter her balance, I kept the same relative mast position, though that limited my hatch options.
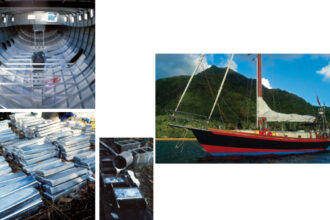
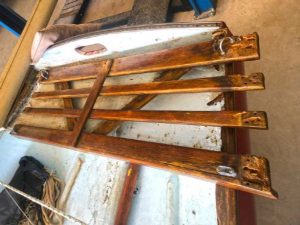
I removed every bit of wood and hardware, leaving just the hull. The chainplates came off easily, since the backing blocks had rotted away to dirt. With all the extra fastener holes in the rail area, it was obvious that this was not her first makeover. I decided early on that I was aiming for a functional finish rather than anything fancy. Her beauty would be in her utility. Lumberyard 3/8-inch plywood and ordinary lumber were the order of the day. A quick scraping dislodged the worst of her peeling interior paint, followed by a quick wash to remove accumulated dirt. I stripped the upper edges of the hull and locations for the new bulkheads of paint, almost the only laborious sanding I did on the whole project.
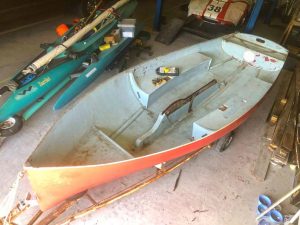
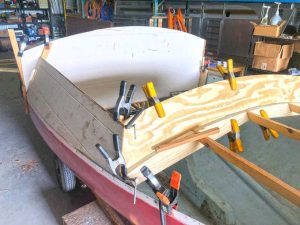
With a bare fiberglass shell, I was ready to start her transformation. I fitted the anchor well bulkhead and taped it into place. Throughout the project, I used paneling salvaged from a friend’s home remodeling project to make patterns and mock-ups before cutting the actual components. The hull edge needed reinforcing, so I added inwales fore and aft, and a breasthook later. This followed my overall approach of a rough design outline, with details to be sorted out as the build progressed.
I cut and installed the forward cabin face. Attached just at the hull edge, it was quite flimsy at first, but stiffened up once I added 1 x 2 longitudinal deck beams for the forward deck. I had the cabin top camber from my drawings and used this curve for the forward deck as well. I fitted the forward deck and glued it to the beams with epoxy, temporarily securing it with drywall screws. I then taped the deck edge.
The next step was to cut and fit the aft cabin bulkhead. This had to go over the centerboard trunk, so the centerboard came out, and like every other part of the boat, it needed some attention. It is a solid piece of mahogany, the lower half being a lead casting secured with brass side plates. The critical upper forward corner of the board was rotted, so I repaired it with some scrap oak. There was some movement between the lead and wood segments, so I reinforced the joint with fiberglass and epoxy, with a few strips of leftover carbon fiber thrown in for coolness. The centerboard arrangement is a little unusual as it is not hinged on a pin, but rather, rides on rollers along the top edge of the trunk, with a reel and tackle arrangement providing mechanical advantage to raise the heavy board.
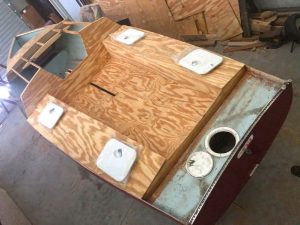
After replacing the pieces along the trunk edge, I taped the aft cabin bulkhead to the hull sides and the flotation tanks, and cut hatches where the forward and side flotation tanks extended into the cabin for storage. Once both cabin bulkheads were in, I installed the rear cockpit bulkhead. To stiffen the rear cockpit floor, I placed a centerline beam from the aft end of the centerboard trunk to this bulkhead. Partitions under the floor prevent gear from disappearing into the inaccessible depths of the cavernous lockers.
After slapping a quick coat of paint on the inside of the hull, I installed the cockpit floor with a slot for the opening of the trunk. The outer edges of the floor rest on the side tanks. I then installed the faces of the cockpit seats. On the port side forward, I cut away the top of the flotation tank and placed 4 inches of insulation all around for an icebox, taping the joints with aluminum duct tape. I then installed the seat tops and taped those seams.
While I still had easy cabin access, I reinstalled the centerboard and placed the wood stanchions that support the pennant system and double as mast compression posts. I tied in the stanchions, which I cut down from some ancient yellow pine 2 x 4s I had in the shop, with the deck framing.
While the boat was still open, I fitted the rudimentary cabin joinery, which was little more than a flat area for a bunk to starboard, a vertical panel forward to port to create a storage bin, and a small cabin sole for a flat spot to set a possible portable toilet. As the shrouds would now be attached to the cabin sides, I made knees to support the cabin sides in this area, attaching them to the forward face of the flotation tanks. The cabin sides in the chainplate area were reinforced with an extra layer of plywood.
Fitting the cabin sides was one of the most challenging parts of the project. I imagined I would just bend them into place, but the hull edge was too flexible and the 3/8-inch plywood was too stiff, though I had already cut the holes for the portlights. I never achieved a fair curve on the cabin sides, despite using a variety of tricks trying to bend them. I then closed her up by installing the cabin top. I had planned this carefully to make sure a single 4-foot wide piece of plywood fit. I added a 1 x 1 toerail to the cabin top, an essential safety feature missing on my Peep Hen, then taped all the remaining seams and installed the plastic cockpit seat hatches I had picked up at a consignment shop.
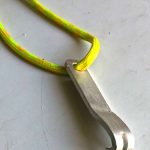
Another challenge was the rudder. The Thistle rudder is a fixed blade design that is not easily modified, and good foil shape is important for windward ability. A kick-up cassette design seemed ideal, but the Thistle tiller passes through an opening in the transom and I couldn’t figure out how to engineer it. While mulling over my options, I came across a daggerboard on Craigslist for $35. While the foil shape was great, the top was a little too thick and the flats were asymmetrical. I eventually split the top, crushed the rear part with big clamps, and epoxied it back together, building out the flats symmetrically with chopped fiberglass and body filler. I cut cheeks from ¾-inch plywood and the new tiller from one of those great old 2 x 4s. I sold the original rudder and tiller to a sailor for $200.
I added coamings around the hatch and cut the portlights from 1/8-inch polycarbonate left over from another project. I made a mast step for the cabin top and cut a tabernacle from a section of 4-inch square aluminum tube. I fabricated a plastic hinge plate and added it to the base of the mast, with a ¼-inch stainless bolt used for the pin. After installing the chainplates, I took careful measurements, cut the shrouds, and added new mechanical terminals.
The forestay was too short.
Unconventionally, I added a turnbuckle at the upper end, which allowed for both adjustment and retention of the original tensioning system at the lower end. It was only when I got the mast up that I realized how remarkably overcanvassed this boat is. Concerned about capsize recovery, I made a crude pivoting masthead float laminated out of two thicknesses of 2-inch insulating foam board.
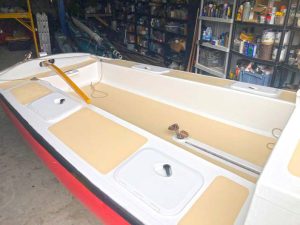
After I was happy with the boat’s structure, I removed the hardware and gave her decks two thick coats of white oil paint. I then taped off and painted beige non-skid in an attractive pattern. The strip I sanded along the upper edge of the hull was still bare so I painted it black, echoing my hero Moitessier’s Joshua. After reinstalling all the hatches and portlights, there were still myriad fittings to be added for running rigging, anchoring, and docking. Many of these were either original or came out of my parts bin. I hadn’t really thought through how I was going to build the hatch cover. As a quick temporary solution, I made a canvas cover supported by fiberglass rods that continues to work well.
Her original trailer was in the same pathetic condition as the boat. I was surprised it made it the 100-mile trip home. I replaced it with another that ultimately needed the axle replaced and also bearings, tires, and lights. Moving her onto the new trailer in preparation for her first sail was an adventure in itself.
I launched her and did capsize testing, which showed that she was very stable, self-righting from about 80 degrees with the centerboard down. Importantly, with the cabin out to the sides of the hull and the cockpit seats at deck level, she floats high while on her side and comes up without taking on any water. Her masthead float is effective at preventing her from turning turtle.
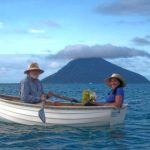
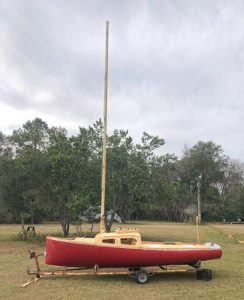
On her subsequent maiden voyage, she exceeded my expectations. She is fast and weatherly, is a delight to sail on all points, ghosts along in just a breath of wind, and floats in just a few inches of water. Generous reefs in the main keep her docile. Her cabin, though cramped, is adequate for a singlehander’s needs, and a boom tent can provide more space if I wish to spread out. And best of all, the icebox keeps ice for five days.
After some thinking, I named her Transmogrifier after my favorite cartoon character’s invention and had a sign shop make up her name in his childish scrawl. According to the Oxford dictionary, transmogrify means to “transform in a surprising or magical manner.” Seems fitting.
John Churchill grew up a boat-crazy kid in Indiana. He built a raft at age 6, sailed Snipes as a teenager, and worked his way toward salt water and bigger boats. He has sailed a Cape Dory 26 singlehanded to Bermuda and back, and a Bristol Channel Cutter transatlantic with his father. Now in Florida, John sails Nurdle, a Bristol 35.5 (and former repo) that he’s rehabbing for extended post-retirement cruising.
Thank you to Sailrite Enterprises, Inc., for providing free access to back issues of Good Old Boat through intellectual property rights. Sailrite.com