An unpleasant surprise necessitates the replacement of a sole and stringer
Issue 151: July/Aug 2023
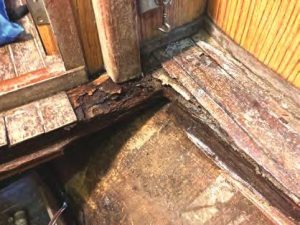
I have a long list of projects on my boat that I want to complete. But replacing the cabin sole was not on the list, nor was it something I wanted to do. Unfortunately, a slow deck leak that traversed unseen through some cabinetry and behind some panels kept one of the stringers supporting the sole in the forward compartments of our Alberg 35 damp long enough for it to rot and fail. The failure occurred when someone stepped into the shower stall and the floor dropped a couple of inches when the stringer gave way.
While replacing a stringer and cabin sole may not be technologically complex, it is a task that can intimidate for other reasons. By chronicling my adventures here, I hope I can help instill a little confidence in other owners of good old boats should they find themselves in a similar situation.

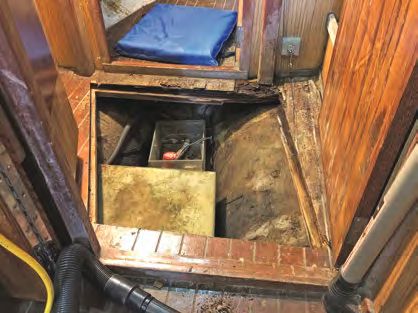
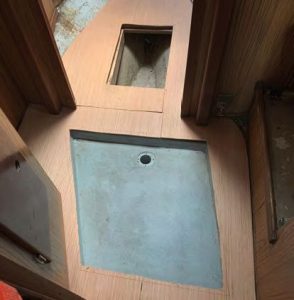
The project began with disassembling and demolishing the sole in the head. The leak had caused some wood rot in the corner of the shower pan, though most of that was not visible since the teak veneer did a good job of hiding it. The first step was to remove the trim covering the screws holding down the shower pan. Once the shower pan was removed, I could get a clearer picture of the extent of the wood rot.
Sadly, there would be no saving this floor, nor the stringer immediately under it. At first, I had hoped I could simply sister a stringer alongside the existing one, but the rot was too extensive, and the plywood sole had delaminated a significant distance into the forward cabin, so I decided to remove the floor in the forward cabin and head and replace it. While removing the sole in the head, I discovered that the aft-most two inches was still quite solid, so I left that piece in place.
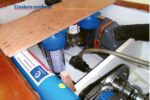
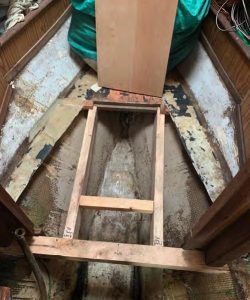
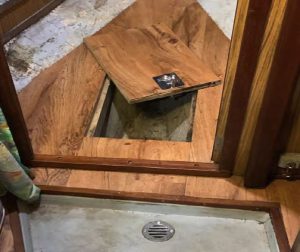
There was one surprise during disassembly. The Alberg 35 has a deck-stepped mast that sits on a transverse beam spanning the doorway to the forward cabin. There are two compression posts either side of the doorway. I had assumed these extended down to the hull, but they stop at the cabin sole. Upon closer inspection, I found that these posts are attached to the bulkhead with multiple screws or bolts and that the bulkhead is used to distribute the compressive forces of the rigging to the hull. That makes sense, because it distributes the rigging loads instead of putting point loads on the hull. I assume the compression posts also act as strongbacks to prevent the bulkhead from buckling under the compressive rigging loads.
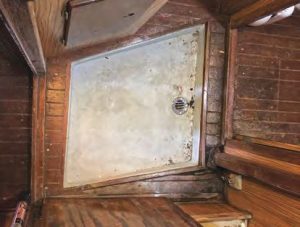
With the floor removed, I was able to fashion a new transverse stringer using a piece of hardwood from an old pallet. I also added two longitudinal stringers going forward to support the edges of what would become a larger access hatch to the bilge. The existing fiberglass tabbing for the original deck was left in place to serve as a guide for locating the new floor. It also served as a good tab against which I could epoxy the new flooring. Since I knew I would be unable to match the existing flooring, I removed the ¼-inch teak veneer plywood on the remaining portions of the sole in the cabin.
While the epoxy and fiberglass tabbing was setting up for the new stringers, I took home some cardboard templates I made to begin cutting new flooring from ¾-inch plywood. I cut everything a little bit large and then fitted the pieces using a 4½-inch grinder with 40-grit sanding discs.
in the forward cabin.
Next came the painstaking process of fitting each piece into place and making sure the fit was tight. A rubber mallet ensured the pieces were nice and snug between the tabbing and the taper of the hull.
The shower pan was the next challenge. Although it had straight sides, there were no right angles on it. The easiest way to size the hole for the shower pan was to lay it upside down on the bottom of the new subfloor and trace it before installing the subfloor. I then cut the opening, but because I kept the aft end of the sole in the head, I had to make sure the opening in the new flooring aligned with it. I did that by cutting the hole small, fitting the pieces, then trimming the hole to align the shower pan to its original location.
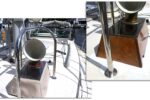
The next piece of the subfloor formed the support for the forward edge of the shower sump. It was also fitted up against a small portion of the original floor that I was able to save. Again, this existing piece formed a great reference to ensure the new floor was in the same location as the old. Tabbing along the starboard side formed the other reference. I also cut and fitted a new hatch cover, and used dive weights in the forward cabin to apply pressure on the tabbing to ensure the epoxy has a good bond to the new flooring.
I then put the final pieces of the subfloor into place, using screws along the outside of the shower sump to support cleats that fit under the lip of the shower pan and hold it in place. The cleats, which I epoxied and screwed into position, also serve to align the new subfloor with the old. I attached the shower sump to the cleats with wood screws.
The next step involved using craft paper to make a template for the next layer of the floor. Since not all the edges of the plywood formed perfectly aligned joints, the idea was to glue down some ¼-inch underlayment to provide a smooth surface over which the flooring could be installed.
At home, I laid the template on a 4 x 8-foot piece of luan plywood for tracing.

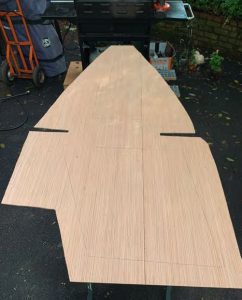
Being optimistic (and probably naive), I thought the material might be flexible enough to curl into an inverted “U” and then pop into place. Turns out I was wrong, and I wound up having to cut the nicely traced floor — first into two pieces so it would fit through the companionway, and then into three pieces for the installation. I hadn’t cut the openings into the luan at this point, wanting to first make sure that everything lined up correctly.
The forward cabin floor went in as a single piece, and I was able to hide the seam under the doorsill. Having the underlayment in two pieces in the head was helpful when I was locating the shower pan opening.
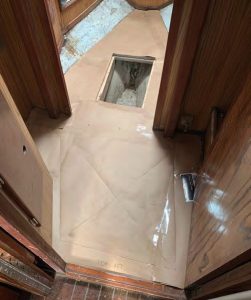
By this stage, I had cut rough openings, but as before, I made them undersized so that I could trim to an exact fit against the subfloor. Once this was done, I glued the luan to the subfloor with a waterproof glue. I cut a separate piece of plywood and luan to fit the new forward bilge access hatch and glued them together in a press in my workshop.
tested the look and fit of the flooring material.
I had considered several different scenarios for the new flooring. My original plan was to install a teak and holly sole, but the cost quickly became prohibitive, especially with monthly tuition checks going out to two different schools for my children. Next, I investigated PlasTeak and similar products. These are essentially sheets of vinyl made to look like a teak and holly sole that get glued down to the underlayment. Still, the cost to do the boat’s forward two cabins using that type of product would have been over $800.
One evening I got a call from one of my crew members while she was at Lowe’s. They had a box of waterproof laminate flooring in a teak pattern. The box had been damaged and was on sale for $10 (it would normally be close to $60). Was I interested? For $10 I certainly was, as this was a very low-risk gamble. I got the box the next day and looked inside. Not only was the pattern one that I thought would work, but there was also enough flooring to do the entire space. And should I later want to refinish the floor in the main cabin, I’ll be able to match the pattern in the future — though probably not for $10!
I started laying the floor from the center of the boat, working my way out so I could ensure the pattern was running longitudinally. It also allowed me to align at least one seam with the edge of the forward hatch to simplify trimming — at least a little bit. I used a utility knife to trim each piece, then once they were fitted, spread a waterproof glue out on the luan, snapped each piece into place, and pressed down. Overall, installation was quick and relatively easy, as long as I kept the utility knife sharp.
Trimming the flooring around the shower sump would prove to be more challenging because the small size of the floor surrounding it allowed for some flex. That caused a slight misalignment at the aft end of the head, but not enough to make it unmanageable. I covered the forward hatch at the same time to match the pattern of the wood.
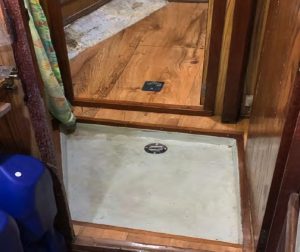
After some cleaning, I replaced the grill on the shower drain. The forward access hatch has a latch to hold it in place, and the forward end is secured with two pins that fit into holes drilled into the subfloor. Eventually I will build a new cover for the shower pan, but for now, the crew is happy to be able to stay clean without having to step down into the bilge! The new floor still looks great after a season of use, and it’s nice to have a floor that’s also waterproof, especially around the shower. The new floor is solid underfoot and doesn’t squeak, groan, or flex when walked on.
Tom Alley and his family sail a 1965 Alberg 35 sloop, Tomfoolery, and are active racers and cruisers with the Finger Lakes Yacht Club in Watkins Glen, New York. Tom has been a member of the United States Power Squadrons (USPS) since the late ’80s and manages the Alberg 35 User Group website. When he’s not sailing, thinking about sailing, or tinkering with his boat, Tom is either scuba diving, hanging out with fellow amateur radio operators (Tom’s call sign is NT2S), or (as a last resort) working as an engineer to support his sailing addiction and, if there’s any money left over, send his kids to college.
Thank you to Sailrite Enterprises, Inc., for providing free access to back issues of Good Old Boat through intellectual property rights. Sailrite.com