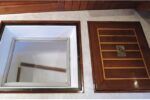
Custom treads made from composite decking take the pain out of a boat ladder.
Issue 148: Jan/Feb 2023

In the sailing world, misery for feet abounds—from scorched decks to stubbed toes to Slocum’s tacks for warding off pirates. For modern boaters, there exists yet another foot-killer: metal swim ladders.
You know the kind. They are made out of round 1-inch stainless steel tubing. Boaters who stand on those rungs for any amount of time can almost hear their feet cry out, “Have mercy!”
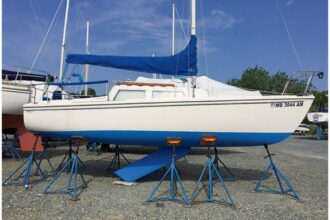
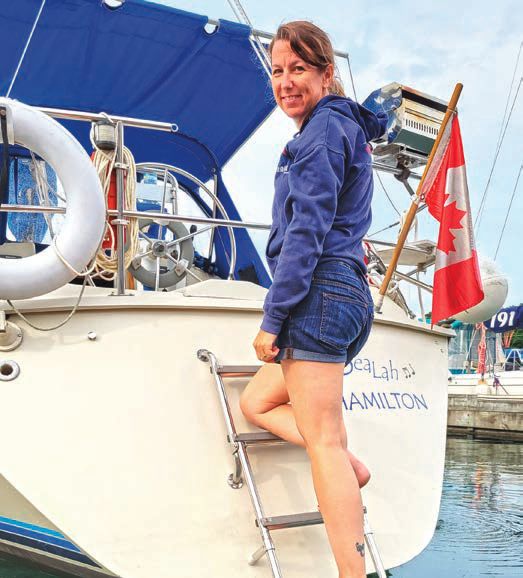
After four years of experiencing just such agony on my Mirage 29 sailboat, SeaLah, I knew it was time for an upgrade. Having seen similar ladders with aftermarket attachments, I knew approximately what I was looking for—flat treads at least 2 inches wide for standing comfort. Alas, Amazon provided no help, leading me to pursue a MacGyver solution.

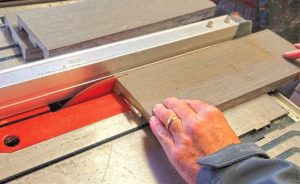
Off to Home Depot I went and purchased a 12-foot piece of gray composite decking, 6 inches wide by 1 inch thick. This particular board included two underside grooves cut along its length, ½ inch deep by 1 inch wide. I immediately figured this could be useful in straddling the rungs.
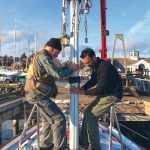
I removed the lower, articulating portion of my swim ladder and brought it home, then created a template out of plywood. After a couple of tries, a decent model emerged that fit tightly between but also straddled the ladder’s vertical side tubes.
Step three included creating the first composite tread and testing it on the ladder. Perfect fit! Apparently Murphy had taken the day off as his law was not in effect. I soon realized, however, that each step was slightly different and each tread needed to be custom built.
To create the treads from the piece of composite, I first ripped the board in half lengthwise to create treads 2 inches wide. This 2-inch strip included the cutout groove on the underside. Once the total length of 14.5 inches was cut, I drilled a 1-inch hole on each end and then cut out each end of the piece flush with the diameter of the hole. This allowed for the tread to straddle the ladder uprights at each side, thereby providing tabs for mounting screws. For a nicer appearance and more comfortable use, each edge was smoothed out on a belt sander and the ends completely rounded off.
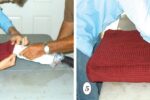
Fabricating the treads was the easy part. By far the most difficult step was pre-drilling holes through the stainless steel ladder for the mounting screws. The convex surface, coupled with incredibly hard metal, made the process a chore, to say the least. Many drill bits perished before all holes were complete. I found success by clamping the tread to the ladder and using a drill press to drill through both the composite and stainless materials at the same time. The composite helped to keep the first, tiny pilot drill bit from wandering over the curved surface. I used three sizes of bits to eventually complete the holes.

Once the holes were drilled to the appropriate size, I used a tap-and-die set to thread each hole. Years ago, while refurbishing my first boat (See “A Hidden Gem,” GOB, January/February 2020), I purchased a box of ¹³8-inch by 1-inch long flathead machine screws—more than I needed. These extra fasteners suited my ladder project perfectly. To complete the look, I used finish washers under each screw, with a dab of blue Loctite to adhere each screw in place.
The three rungs on the bottom section of the ladder below the hinge were somewhat easy to install since the angles were square. However, the top section, permanently fixed to the boat’s inverted transom, required the treads to be installed at a 40-degree angle from the side tubes. This involved drilling 7³8-inch end holes at the same 40-degree angle. At this angle, the treads no longer sat down fully in the underside groove, so the front edge of the groove needed to be chiseled and then sanded to a 45-degree angle.

Installing these upper treads directly on the boat, without using a drill press, made me nearly despair. Thankfully, trial and error and patience eventually won out.
The end result is a visually satisfying appearance with even better functionality. Gone are the days of aching feet. My wife can now stand on the ladder for a very long time, deciding whether to brave full immersion in the notoriously cold Lake Ontario water, without worrying about sore tootsies in the process.
Would I do anything diff erent if I were to attempt a similar ladder upgrade again? Since this is the fi rst season on the new steps, only time will tell. But so far, so good.
Lee Brubacher hails from Hamilton, Ontario, Canada and has been in church worship ministry since 1998. Starting with a 17-foot Newbridge Topaz in 2013 and later a 26-foot Luger Tradewinds, Lee currently sails a Quebec-built Mirage 29. Lee and his wife, Cheryl, enjoy cruising and have explored Lake Erie, Lake Ontario, and the 1,000 Islands.
Thank you to Sailrite Enterprises, Inc., for providing free access to back issues of Good Old Boat through intellectual property rights. Sailrite.com