A satisfying solution to a difficult problem
Issue 154: Jan/Feb 2024
Haulouts are always a somewhat anxious time. Sailors develop a plan and a list of tasks we want to accomplish to maintain or improve our boats, but there is always a bit of worry that some unknown problem might become apparent once the vessel is out of the water.
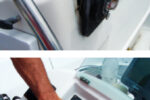
I had one of those “Oh boy!” moments recently when Nurdle, my 1979 Bristol 35.5 centerboarder, was put on the hard. I had replaced the cutlass bearing some years ago, and at the last haulout, it seemed fine. I noticed a tiny bit of play, but it snugged up when the setscrews were tightened. When diving to clean the propeller, I hadn’t noticed anything wrong with the cutlass bearing, although I hadn’t paid it any specific attention — after all, nothing was amiss the last time I checked.
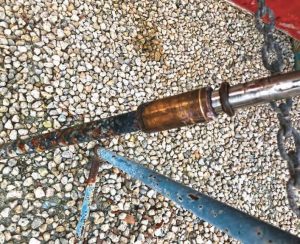
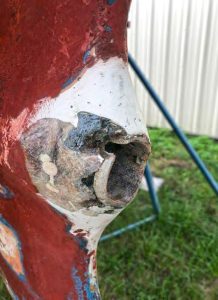
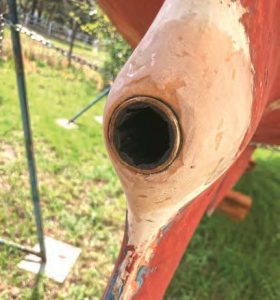
Imagine my surprise at haulout when I saw that the cutlass bearing was now stuck to the shaft and turning freely in the stern tube. Worse yet, the tube had been worn away and there was almost an 1/8-inch of play around the bearing.
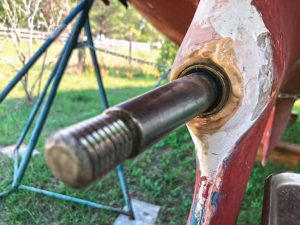
Nurdle has a common and simple arrangement. The stern tube is the housing for the propeller shaft to pass through the hull. The tube is made of fiberglass and is manufactured separately from the hull, allowing precise control of both the inner and outer dimensions. The tube is then incorporated into the hull during construction. The prop shaft is supported at the inner end by the engine coupling and passes through a waterproof shaft seal. The shaft is supported at the outer end of the tube by the cutlass bearing (also known as a cutless bearing, a genericized brand name), a ribbed rubber bushing held in a metal or polymer sleeve. The groove and rib arrangement allows water entry for lubrication and cooling. The bearing has a snug fit within the tube and is secured with small setscrews.
Breaking down the issue into individual problems, I had a bearing stuck to the shaft and a worn stern tube that no longer properly fit the bearing. Pulling the prop and shaft and then removing the old bearing from it was straightforward. I am fortunate that Ted Hood and Bristol Yachts built the boat to allow shaft removal with the rudder in place. I removed the dripless shaft seal bellows as well. My first thought was to just epoxy a new bearing in place. That would be a quick and easy fix, but what about when the time comes to replace it? And how would I be sure it was properly aligned?
Surprisingly for a do-it-yourself boatyard, a van showed up from Norm’s Propeller Removal service that advertised specialty work on props, shafts, and bearings, so I solicited some expert advice. Norm suggested getting a custom-made bearing and gave me the name of a shop in Michigan that fabricated them. I had some concerns about that idea, since it seemed like it would be difficult to accurately measure the diameter of the worn tube, especially at the deepest part. Besides the anticipated high cost of a custom solution, the issue of future bearing replacement remained.
I called the Michigan shop and the owner suggested I speak to his father, the founder of the company. He suggested sleeving the stern tube as an effective solution, and we discussed how that might be done. This approach seemed to resolve my concerns about future replacement with a standard bearing. The upper end could be centered by drilling, and using the shaft through the new cutlass mounted in the tube would permit accurate alignment of the sleeve in the worn portion of the stern tube.
I then discovered San Diego-based Rock West Composites, which carries a wide variety of tubes in fiberglass, Kevlar, and carbon fiber in an enormous range of sizes. The company sells direct to consumers, with no minimum order, and its prices are listed. I found a tube with a 1.375-inch inner diameter, the same inner diameter as the original, and an outer diameter of 1.481 inches, at $37 for a 12-inch long section. The very slightly undersized outer diameter would allow me to drill out the existing tube with a standard 1 ½-inch bit and leave a little room for it to slide in.
Drilling out the stern tube was easier than I imagined. I had envisioned using a hole saw but could not find a long extension that would work. Instead, I located a 1 ½-inch spade bit that mounted on a matched shaft extension. Drilling went smoothly. I lined up the drill by using a reference point on the rudder for the centerline of the tube and stopped frequently to cool the drill bit in a pail of water. I drilled a little past the 12-inch mark. I also sanded the entire area outside the stern tube, removing bottom paint and a bit of gelcoat, and picked away decaying bits of ancient filler and cracked fiberglass. I vacuumed all the dust out of the tube, then swabbed the bore with an alcohol-soaked rag on a stick to remove any dust and contaminants.
I dry-fitted the tube and it slid in fairly easily, with the last 2 inches sticking out. I didn’t force it as I had no easy way of extracting it, but it went in easily enough that I was confident it would slide the rest of the way. The tube was rigid and looked well centered in the stern tube opening. I then pulled the tube back out and installed the shaft into the engine coupling while temporarily supporting the outboard end with some rags in the tube entrance. The bearing was a snug fit in the new sleeve.
I sanded the exterior of the bearing down very slightly and popped it in the freezer to shrink with the cold. I was able to press it into the sleeve without difficulty and left the bearing about 1/16-inch proud at the end. I set the sleeve and bearing assembly in the sun to warm up and dry any condensation. Then I made a wood block with a 1-inch hole for the shaft and a 1 3/8-inch recess for the bearing so I could tap directly on the sleeve itself.
Before I glued the sleeve in place, I thought through each step of the process several times, knowing I would only get one chance. Once I felt completely prepared, I mixed some epoxy. I had marked the outer portion of the tube where there was some play, and on the deepest section beyond this, I applied unthickened epoxy to the sleeve. I had thought of trying to put epoxy on the inner surface of the stern tube, but having the shaft in the way made that idea impractical.
For the remaining portion of the sleeve, I thickened the epoxy with wood flour and colloidal silica. I slid the tube in gradually, ensuring an adequate amount of epoxy was applied. The prop shaft worked great to keep it centered in the stern tube bore. I tapped the tube in the last couple of inches, which was a snug fit, taking great care to keep the epoxy off the cutlass bearing. I used the thickened epoxy to build up and fair out the damaged area around the opening.
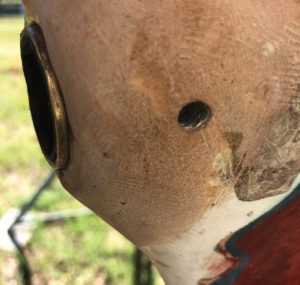
After letting the epoxy set overnight, I removed the shaft and filed and sanded the surrounding area smooth. After giving it a week to fully harden, I drilled and tapped new holes for the ¼-inch-20 setscrews. I drilled a small pilot hole first, then overdrilled that with a 3/16-inch bit down into the brass bearing shell to create a small dimple for the setscrew. I had made sure the bearing went in with a pair of horizontal recesses so any breakthrough would be in the grooves rather than the ribs, where the shaft rides.
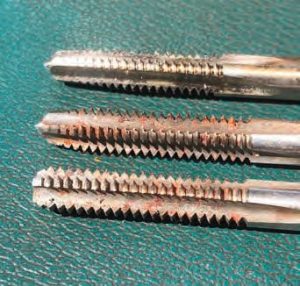
Finally, I overdrilled with a 13/64-inch bit for the ¼-inch-20 tap. Tapping the hole was a little tricky, since it is a blind hole and needed to be threaded to the very bottom. There are three main types of taps; the common standard, or plug tap, cuts the threads gradually over the first several turns. There is also a taper tap that cuts the threads more gradually and is typically used on very hard metals. I used the third type, a bottoming tap that cuts threads nearly to the bottom. This allows the setscrew to go all the way down into the blind hole and engage the bearing. After installing the setscrews, I was ready to put the shaft back in and install the prop.
The big question: Why did this happen in the first place? As with most problems on aging boats, I suspect a number of factors. When I got Nurdle a dozen years ago, her prop shaft was slightly bent and she was fitted with a Luke feathering prop that was quite worn and loose, which created vibration. I replaced both. I suspect that the bad prop and bent shaft might have started the wear of the stern tube, which I had not recognized as significant when I replaced the bearing previously.
Additionally, at one point, I had accidentally wrapped an abandoned ski towrope around the prop and think that might have caused some damage. Upon removing the bottom paint from around the opening, I discovered a number of previously filled old setscrew holes that suggested prior problems. One of the holes I had been using was in an area of filler that may not have been ideal. I am hopeful that the newly sleeved stern tube will alleviate problems in this area for the foreseeable future.
John Churchill grew up a boat-crazy kid in Indiana. He built a raft at age 6, sailed Snipes as a teenager, and worked his way toward saltwater and bigger boats. He has sailed a Cape Dory 26 singlehanded to Bermuda and back, and a Bristol Channel Cutter transatlantic with his father. Now in Florida, John sails Nurdle, a Bristol 35.5 (and former repo) that he’s rehabbing for extended post-retirement cruising.
Thank you to Sailrite Enterprises, Inc., for providing free access to back issues of Good Old Boat through intellectual property rights. Sailrite.com