Ease that fear of falling: Techniques for making a trip up the stick safer.
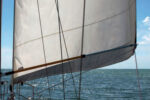
The only sure things in life are death, taxes, and that – sooner or later – you will have to go up your mast. Many people dread going aloft and will do just about anything to avoid it, even putting off needed repairs or rig inspections. But the trip needn’t be a white-knuckle affair. With the proper equipment and technique, you can actually enjoy going aloft. I’ve gone from being afraid of heights to looking for opportunities to climb the mast (anyone’s mast) just for the view. Really.
There are two parts to the problem. The first is how to get up the mast. Unless you have a couple of strong deck apes handy to grind away on a halyard winch, this can be a real concern. But this isn’t your only consideration. Just as important is the question of what to use for support once you’re up there.
Bosun’s chairs
For most sailors the answer to this second part is the trusty bosun’s chair. For comfort aloft it’s hard to beat a well-padded board. But bosun’s chairs are also part of the reason most people hate going aloft. It just doesn’t feel secure sitting in one of those things. You are tense and apprehensive the whole time, worried that you might fall right out of it. And in fact, if you lean over too far in many of them (like when stretching to reach a spreader tip), you can fall out. Fabric chairs with back supports, waist belts, and crotch straps give more of a feeling of security, but you still aren’t secure.
John Vigor notes in The Practical Mariner’s Book of Knowledge that he prefers to use an ordinary wooden plank as a bosun’s chair “to remain insecure and terrified on the theory that if I don’t feel complacent, I won’t relax my guard.” Avoiding complacency is a good thing, but feeling terrified may keep many sailors from going aloft, even when they need to.
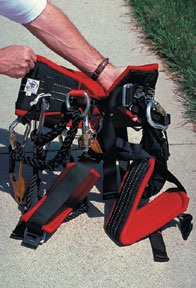
Climber’s harness
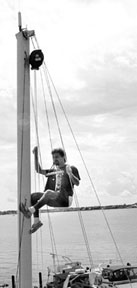
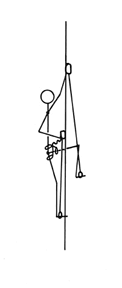
The solution to this feeling of insecurity is not therapy, but a mountaineer-style climber’s harness. It looks and feels a bit strange at first to be tightly strapped into this contraption, but you get used to it. And the sense of security that comes with knowing you can even hang upside down is fantastic. It was a revelation to find just how relaxed I could feel aloft while using one of these. An additional benefit to using a harness is that the point of attachment is lower than with a chair. That makes it a little easier to reach the top of the mast when working at the masthead.
The main drawback to many harnesses is that they can be uncomfortable for long “hang times,” since your weight is supported by two-inch webbing. Choose a harness with thick padding on the waist belt and leg loops (as shown in illustration). The best I have seen uses a modified rescue harness available from Brion Toss Rigging.
Safety
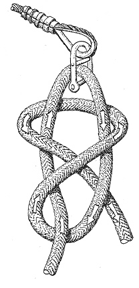
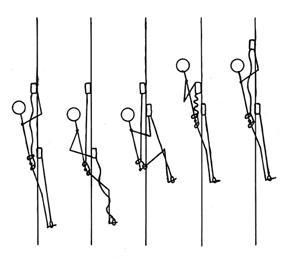
There isn’t much you can do on a sailboat that is inherently more dangerous than climbing the mast. So safety should be uppermost in your mind at every step of the process. Don’t try any of these techniques until you are sure you know what you are doing. Always use a “belt and suspenders” approach, with a backup for the primary hoist method. That usually means being hooked to two halyards when aloft, preferably halyards with internal masthead sheaves. If using a climber’s harness, hook both halyards to the ring provided. If using a chair, hook the second halyard to a separate chest safety harness. (Note: for clarity the extra safety halyard was omitted from illustrations on Pages 7, 8, and 9, but this is not a good idea in practice!) Don’t depend on snap shackles! Use only screw shackles, locking carabiners, or good knots to attach the halyards: a bowline, or better yet, a buntline hitch – never a square knot (see illustration).
Before you ascend, talk through every step with those on deck who are helping you, to be sure that all of your commands are clear and understood. (The last thing you want is for someone to release the wrong halyard.) Don’t depend on self-tailers alone to belay halyards – use cleats. Tie all of your tools to your tool bucket, as it annoys members of the crew to have things fall on them. Finally, don’t get complacent when coming down – take your time.
What techniques are available for climbing the mast, and which is right for you? Some of the things to keep in mind in choosing a method include whether you need crew on deck, how much equipment is involved, and whether the technique would work at sea in an emergency.
Mast steps
The most obvious approach for getting up your mast would be to turn your mast into a giant ladder using mast steps. These fixed or folding metal steps are most often seen aboard shorthanded cruising boats and can make getting up the mast as simple as climbing a ladder. The benefits are that they are always ready, give easy access to the very top of the mast, and allow you to climb aloft without the aid of crew. The drawbacks include windage, weight aloft, aesthetics, potential halyard fouling, and the difficulty of hanging onto the steps in anything rougher than a dead calm. If help is available, you should always climb mast steps with a second halyard attached to a safety harness or a climber’s harness, and you should have someone taking up the slack in the halyard to support you in case you fall. Once up the mast, you may still want a bosun’s chair or a climber’s harness for support while working, as you can’t easily reach the spreader tips from the mast steps. Overall, if you are willing to put up with having steps on your mast, it would be hard to beat the convenience of this method.
If you plan on using mast steps to go aloft alone, you should rig an ascender on a fixed line as a backup. An ascender is a piece of mountain-climbing gear ($50). Well-known examples include the Petzl and Jumar. It fits around a line (of about 1/2 inch diameter) and has an internal cam that allows it to slide easily up a line, but locks in place if you pull downward. If you have an available halyard of the proper diameter, you secure it near the deck, fasten a tether from the ascender to your harness, and slide the ascender up the fixed line as you go. If your halyard is not the proper diameter, you will need to hoist a 1/2-inch line aloft instead. Once you get where you’re going, you can allow the ascender to take the load. To descend, you momentarily disengage the cam and slide the ascender down a few feet at a time as you climb down the steps.
An alternative to using a halyard or an ascender for a backup would be to clip a safety line from your safety (or climber’s) harness around the mast as you work your way up. Use a carabiner on the end, so you can unclip as you pass the shrouds and spreaders. (An alternative to this would be a lineman’s belt, or Mast Mate’s Tool Bag Workbelt. If you fall, this line will jam up against the next obstruction on the mast. But that still means you could drop from the second to first spreaders or from just under the first spreaders to the deck. To be extra safe (especially if it is turbulent), use a halyard with an ascender and a safety line around the mast.
Mast ladders
What if you don’t want to mount those metal triangles on your mast, but still want the simplicity of climbing steps? Then your best bet would be a mast ladder. There are currently two of these on the market, the Mast Mate and Capt. Al’s. These are essentially web ladders that are hoisted up the mast with a halyard, then made fast at the deck. To minimize the side-to-side motion while climbing, each has provisions for mounting sail slides (which you provide) to the vertical webbing. You can then run the slides up the mainsail sailtrack to give lateral support. The Mast Mate uses two-inch webbing for its single vertical support strap. It has alternating steps every 17 inches (there is also a 12-inch step version). The Capt. Al’s uses three one-inch vertical web straps, with PVC tubing placed over webbing between the straps to form the steps every 12 inches.
A mast ladder has most of the advantages of the fixed mast steps, without the drawbacks of windage, aesthetics, and potential halyard fouling. The major downside to mast ladders is that they can’t easily be used underway unless you either drop the mainsail or do without the sailtrack support. And even if the main is down, it may be necessary sometimes to remove much of the main from the sailtrack to mount the mast ladder. The safety procedures for regular mast steps (a second halyard, ascender, or safety line) should be followed here too. The Mast Mate is about $250 (35-foot length) to $350 (50-foot length) while Capt. Al’s is about $150 (36-foot length) to $250 (50-foot length).
My Ericson came with a Mast Mate left in one of the lockers by the previous owner. I loved the simplicity of the approach and was eager to try it. But I found the sensation of climbing a flexible ladder to be a little unsteady for my taste (not surprising, since I wasn’t using any safety backup that day), and I only made it to the lower spreaders before turning back. By the time I needed to go aloft again, I had installed a batten car system that blocked off my sailtrack – I needed to find another approach. But a friend with a 45-footer regularly uses a mast ladder and swears by it.
Halyard winches
Another method for going aloft uses the boat’s halyard winch to hoist someone in a bosun’s chair attached to a halyard. There are a few problems with this approach. In the case of most sailing couples, the man goes aloft and the woman stays on deck. Given the small size of most halyard winches, there usually isn’t enough mechanical advantage for the woman (or many men, for that matter) to be able to handle the load. Furthermore, if the winch isn’t self-tailing, you need a third person to tail.
One way to make things slightly easier is to use a snatch block to lead the halyard to one of the primary winches aboard. But even with a larger winch, this approach can still be too much work. Of course, this method doesn’t allow you to get aloft by yourself. And that’s one of the drawbacks – you have to really trust the people at the winch, as they do have your life in their hands. (Couples: don’t try this right after an argument.)
After the experiment with the mast ladder, we next tried having my wife hoist me aloft in a bosun’s chair. But even with the help of our primaries, it was just too much work for her. The only way I made any progress was by wrapping my arms and legs around the mast and shinnying a few inches at a time to create slack in the halyard. But this can lead to overrides on the winch. We had to find another way.
Powered winches
Depending on the equipment aboard your boat, there are a couple of ways to lessen the effort of this grinding. If you have electric primaries, getting someone aloft is as easy as pressing a button. Lacking these, the next best bet would be to run the tail of the halyard forward to a powered anchor windlass. If you do decide to try either of these options, be especially careful with the last few feet of hoist near the masthead. Without the feedback of a manual winch, it may not be obvious when you have “two-blocked” the rig, and you can jam the shackles in the masthead halyard sheave or even rip out the attachment rings in the chair if you aren’t careful. This is why some people argue against the practice of using electric winches or powered windlasses in this application.
Counterweights aloft
An alternative to having your crew winch you aloft directly is to attach a heavy counterweight to one end of an external halyard (internals won’t work here) and hoist the weight to the masthead instead. You then attach yourself to the other end of the halyard and let gravity do the work as the counterweight drops. This is supposed to be an old trick of singlehanders, who had no one around to help with the grinding. And I suppose someone could use this technique to get aloft if the crew weren’t strong enough to handle the winch. Of course you should at least take care that you weigh more than the counterweight, or you could easily get stuck up there!
I offer the following as an example of just how ingenious sailors can be when there is a problem to be solved, not as a recommended technique for getting aloft. My favorite version of this involved someone hoisting aloft a large, empty, plastic container with one end of a garden hose tied to the inside rim. Once it was in place, the skipper turned on the water to fill the container, and rode up the mast on the other end of the halyard as the container filled. If you do decide to try something like this, please alert your dockmates so they can have their video cameras ready.
Mastlift
What if your partner can’t grind you aloft, and there’s never a deck ape around to help when you need one? In this case you might consider the Swisstech Mastlift. This is a chain hoist with a 10:1 gear ratio, except that the load-bearing line is made of Spectra, not chain. In practice, you shackle the Mastlift to a halyard, attach the load-bearing line to a bosun’s chair or climbing harness, unroll the load-bearing line as you hoist the 15-pound cylinder to the masthead, then cleat the halyard. Using the endless control line (with double internal safety brakes), you then hoist yourself aloft. This is easily a one-person job, with very little effort. It would be a good idea to lightly fasten a line around the control line at deck level to prevent it from blowing away and fouling, especially if you go up alone. For safety you would want to use one of the backup methods mentioned above.
Downsides to the Mastlift? The first is that the size of the drum makes it a little more difficult to get close to the masthead, as you are probably a foot lower than when using a halyard alone. But the big drawback of the Mastlift is cost. When I contacted the importer a couple of years ago, the introductory special prices were $1,100 for the 45-foot hoist model, and $1,300 for the 82-foot model. At that price not too many skippers will be buying them for their personal use. But it would be a great item for a club to own, if you could just figure a way around the inevitable liability issues.
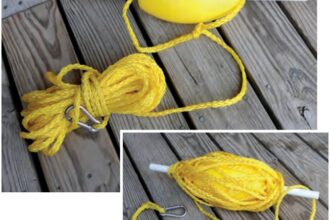
By the way, a solution to the problem of not quite being able to reach the masthead from a chair or harness is to fashion a pair of rope steps, each at the end of a four-foot tether. Once you get as close to the masthead as possible, attach the tethers to the crane with a carabiner. Then place your feet in the steps, and stand up at the masthead. Hold yourself upright with a piece of line tied around your waist and the mast. Mast Mate sells a Workbelt patterned after a lineman’s belt that is designed for just this application (see illustration). An alternative to the tethers is to mount a pair of mast steps on either side of the mast about four feet down.
Block and tackle
If your crew can’t hoist you aloft, and you can’t afford a Mastlift, you might consider putting together a block and tackle arrangement to help do the work. The simplest version of this is to get a length of 1/2-inch line twice the length of your mast, position a single block at the mid-point, and haul the block aloft on a halyard. Attach one end of the line to your bosun’s chair or climber’s harness with a good knot, grab the other end, and just haul yourself aloft.
How much work is this? Well, normally you find the mechanical advantage of any block and tackle by counting the number of parts coming out of the moving block. With no moving block, it seems as if there should be no mechanical advantage to this simple rig. But for reasons that still confuse me, there is a 2:1 mechanical advantage in this case, so that you are only lifting half your weight. (The best way I can explain it is to point out that you have to haul in 100 feet of line to raise yourself 50 feet.) So this is actually easier than it looks. To reduce the effort further, you add extra parts to the tackle, but that can add up to a lot of line.
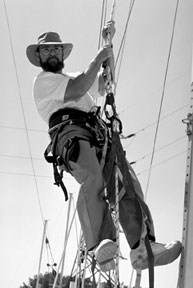
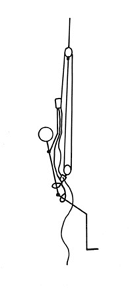
I learned about this approach from rigger Brion Toss at one of his seminars, and thought I’d give it a try. To reduce the effort a bit, I opted for a 3:1 mechanical advantage. This meant putting together an upper single block with becket, a lower single block, and a 1/2-inch line three times my mast’s length, or 150 feet (see Figure A on the next page). Brion also suggests using a Harken “Hexaratchet” ratcheting block in the upper position, as it greatly reduces the effort required to grip the line.
This tackle approach will work with either a bosun’s chair or a climber’s harness, but I use a climber’s harness knowing I need the feeling of security it provides. After getting the line reeved through the blocks, I haul the upper block aloft with a halyard, and shackle the lower block to my harness. For safety, I use a second halyard attached to the harness, but any of the backup methods would work.
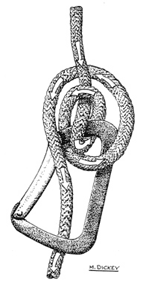
Before hauling away, there are two more techniques to mention. The first is how to belay the line once you’re up there. You can make do by passing a bight of the line through the ring in your harness and making several half hitches with the loop. But I like the technique Brion uses in which the standing part of the line is led through a carabiner at the harness and then tied off using a special mountaineering knot – the carabiner hitch (see illustration on next page). This carabiner hitch is easy to tie and untie under load – a real advantage.
I added a second technique as a way to feel even more secure. It involves mounting an ascender on the hauling part of the tackle and then rigging a three-foot tether between the harness and the ascender. Each pull aloft is made easier by having the comfortable handle of the ascender, rather than just the line, to grip. At the bottom of each pull, I hold the line fast at the carabiner with one hand and slide the ascender back up the hauling part with the other. The added security comes from the short tether, as I could let go with both hands and only slide back three feet at most. This addition also makes it easy to stop and rest along the way. To get as close to the masthead as possible, I remove the ascender from the line, two-block the tackle, and rig a carabiner hitch. To descend, I just keep a wrap or two around the carabiner and slowly lower myself to the deck.
This combination of tackle, climbing harness, and ascender is a real joy to use. With it I feel secure enough that I’ve been known to go up the mast while underway just to take pictures from the masthead. (It’s amazing how small a 38-foot sailboat looks from 50 feet up!)
This approach is good for singlehanders, as you don’t need help from anyone on deck. And that means you don’t have to depend on anyone else for your safety. But if you do try this approach alone, give some thought to keeping the tail of the line from getting tangled in the rigging on deck. If the line gets caught, you won’t be able to lower yourself down. Brion’s instructional video, Going Aloft, features this approach. I highly recommend it.
Line climbing
Two final methods for getting up your mast are based directly on mountaineering techniques and are probably the least familiar to sailors. In these, you climb up a fixed line with your feet in rope steps at the end of tethers rigged to the fixed line with ascenders. You could use one of your halyards as the fixed line (if it’s the proper diameter), but since the cams of the ascenders are hard on the line, I recommend hoisting aloft a separate length of 1/2-inch rope to reduce halyard wear.
I think of these two methods as the “stair step” and the “inchworm,” based on the action used to climb the rope. The “stair step” method is perhaps a little easier to understand. In this approach, two ascenders are mounted on the fixed line, each attached to a rope step on the end of a three- to four-foot tether. At least one of the ascenders is also attached with a tether to your climber’s harness (or to a safety harness if a bosun’s chair is used). To begin, position the steps above the deck, place your feet in the steps, and grab the ascenders for support. Then raise one leg and its corresponding ascender at the same time. After that, step up onto that upper step, and finish by raising up the other leg and its corresponding ascender to just under the first ascender.
By alternating one side after the other, you can “stair step” your way up the line. You will need to adjust the length of the tethers between the ascenders and the steps to suit your reach and height, or you can purchase two triers at $24 each from a mountaineering store. These are short web ladders with four to six steps in a line, about 15 inches apart. One of the steps should be at just about the height you need.
By comparison, the “inchworm” method looks a little strange. This method works best with a climber’s harness, but a bosun’s chair will work in a pinch. After rigging your fixed line, attach a short tether of about three feet between your harness and the first ascender. The second ascender is then added to the line underneath the first and attached to a pair of rope steps, each on a three- to four-foot tether (or a pair of triers).
To begin climbing, position the steps above the deck, place your feet in the steps, and grab the fixed line for support. First, slide the upper ascender up the fixed line as far as you can reach, then sit back to put your weight on the harness. Next, slide the lower ascender up the line as far as possible while bringing your knees up. Finally, extend your body and step up onto the steps, holding onto the fixed line for balance. After that you extend the upper ascender up the line again and sit back into the harness. Repeating these steps allows you to “inchworm” your way up the line. You will need to experiment a bit to find out how long the upper and lower tethers need to be for the most efficient progress.
The “inchworm” method is probably slower, but the motion is a little easier to learn and uses the strength of both legs at once to do the climbing. While the “stair step” method can be faster, it can take some time to get the hang of the technique (sort of like the diagonal stride in cross-country skiing). A drawback to both line-climbing methods is that getting down can be a little slow, since most ascenders are a little difficult to slide down a line as you descend.
With either of these methods, be sure to practice a bit before tackling a big job. Both are well-suited for use by singlehanders. You will, of course, want to use one of the safety backup methods with or without crew on deck.
Which is best for you?
Which approach is best for you depends on your boat, your age, and your bank account. Just like everything else in sailing, each approach is a compromise, and no single method is right for everyone. I like my current block-and-tackle rig, but if I could afford it, I would have a Mastlift instead. I strongly suggest that you consider trying a climber’s harness for support aloft – unless you like feeling insecure and terrified.
Above all, please be safe up there.
Article from Good Old Boat magazine, September/October 1999.